

Showing posts with label Cameo. Show all posts
Showing posts with label Cameo. Show all posts
Monday, May 26, 2014
Thinking of You
The inspiration from this card came from a mash-up of two sources: the card Kristina Werner made with Ferro and some heat embossing on vellum that Nichol Magouirk did in a recent video. But for my card, I didn't use Ferro this time. Instead, I used two products that have been sitting in my stash for a couple of weeks from some recent sale shopping I've done: Claudine Hellmuth Studio Multi-Medium Matte and some Distress Stickles dry glitter. I used the Heidi Swapp dotted stencil, brushed on a layer of medium, lifted my stencil, cleaned it and sprinkled on the glitter. Once it dried, I trimmed the piece to fit my card base with a small mat. Then I stamped the tag from Lawn Fawn's Winter Gifts set with Versamark and heat embossed it with white embossing powder. Then I added the sentiment from Inkadinkado's Expressions and Frames set following the same method. To finish it off, I decided on a red poppy when scrolling through my cut files in my Cameo library. I loved this one and I think it was just the right finishing piece (with a little Wink of Stella in the center of course).


Saturday, April 19, 2014
Easter Treats
Today was the birthday party for my youngest niece so I wanted to take both nieces a little Easter treat to the party. I had seen some adorable things made with Lawn Fawn's Happy Easter set, so thought I would start there. I used a couple of pages from the Echo Park Perfect Summer 6x6 pad from last year. I used the Lawn Fawn Grassy Border die with some scraps of green paper from the pad, plus cut the background from some blue paper from the pad with the dies from Winter Gifts set. I stamped the bunny and eggs form the Happy Easter set. I added their names with the Jessie's ABC's set just to finish them off. The cute little pillow boxes were made from the Celebration stack from DCWV using design ID 1184 on my Cameo. Super quick and fun. Then I tied the tags on with some Lawn Fawn Silver Sparkle Lawn Cuts. I'm sure the part they liked the best was the chocolate inside!

Friday, February 7, 2014
Sweet Treat Carton Inspired by Sabine on the Lawnscaping Challenge Blog
When I saw this sweet milk carton design from Sabine on the Lawnscaping Challenge Blog, I just knew I had to give it a try myself. It was so stinking cute! For my version, I choose some blue paper from My Mind's Eye Twinkle, Twinkle Little Boy 12x12 paper pad that I love so much I bought two. Then it was just a lot of stamping, coloring and fussy cutting from a few Lawn Fawn stamps sets including Critters on the Farm (thanks Mom for the cow, sheep and hay) and Critters from the 'Burbs (tree). Then I just cut some green paper with my Martha Stewart fringe scissors (thanks again Pat) since the cute new grass die from (who else?) Lawn Fawn doesn't hit the stores until later this month. I downloaded the milk carton from Silhouette and cut it out on my Cameo. I put it all together and filled it with some chocolate before sealing it up. But the top just seemed a little too plain. So I cut a cute scalloped edge with Deco Scallop border punch from EK Success on two sides of a small strip of white card stock. Once it was glued in place, I punched a couple of holes with my We R Memory Keepers chomper and threaded through some twine I had left over from the packaging of a Citrus Twist kit. Super cute!


Thursday, October 10, 2013
Celebrate - Inspired by The Card Grotto
I needed a birthday card for my cousin's recent birthday and she just loves Mickey Mouse. I looked for some inspiration on Google and I didn't really see anything. So I started trolling through my Pinterest Card Layout Ideas board to see if something caught my eye. When I came across this card from the The Card Grotto, I thought I could make a variation on the theme that would suit my needs.
I had a cut file in my studio files for my Cameo that I had made a while back, that I decided would substitute well for the butterflies. I cut it from some black card stock from my stash. I cut a banner and stamped it with the sentiment from the Fiskars' Happy Birthday set using (what else?) Versafine ink.
For the background, I cut a 4 by 5.25 piece of some paper from Creative Imaginations meant to be a Disney paper. Then it was just a matter of gluing it all together.

I had a cut file in my studio files for my Cameo that I had made a while back, that I decided would substitute well for the butterflies. I cut it from some black card stock from my stash. I cut a banner and stamped it with the sentiment from the Fiskars' Happy Birthday set using (what else?) Versafine ink.
For the background, I cut a 4 by 5.25 piece of some paper from Creative Imaginations meant to be a Disney paper. Then it was just a matter of gluing it all together.

Monday, July 22, 2013
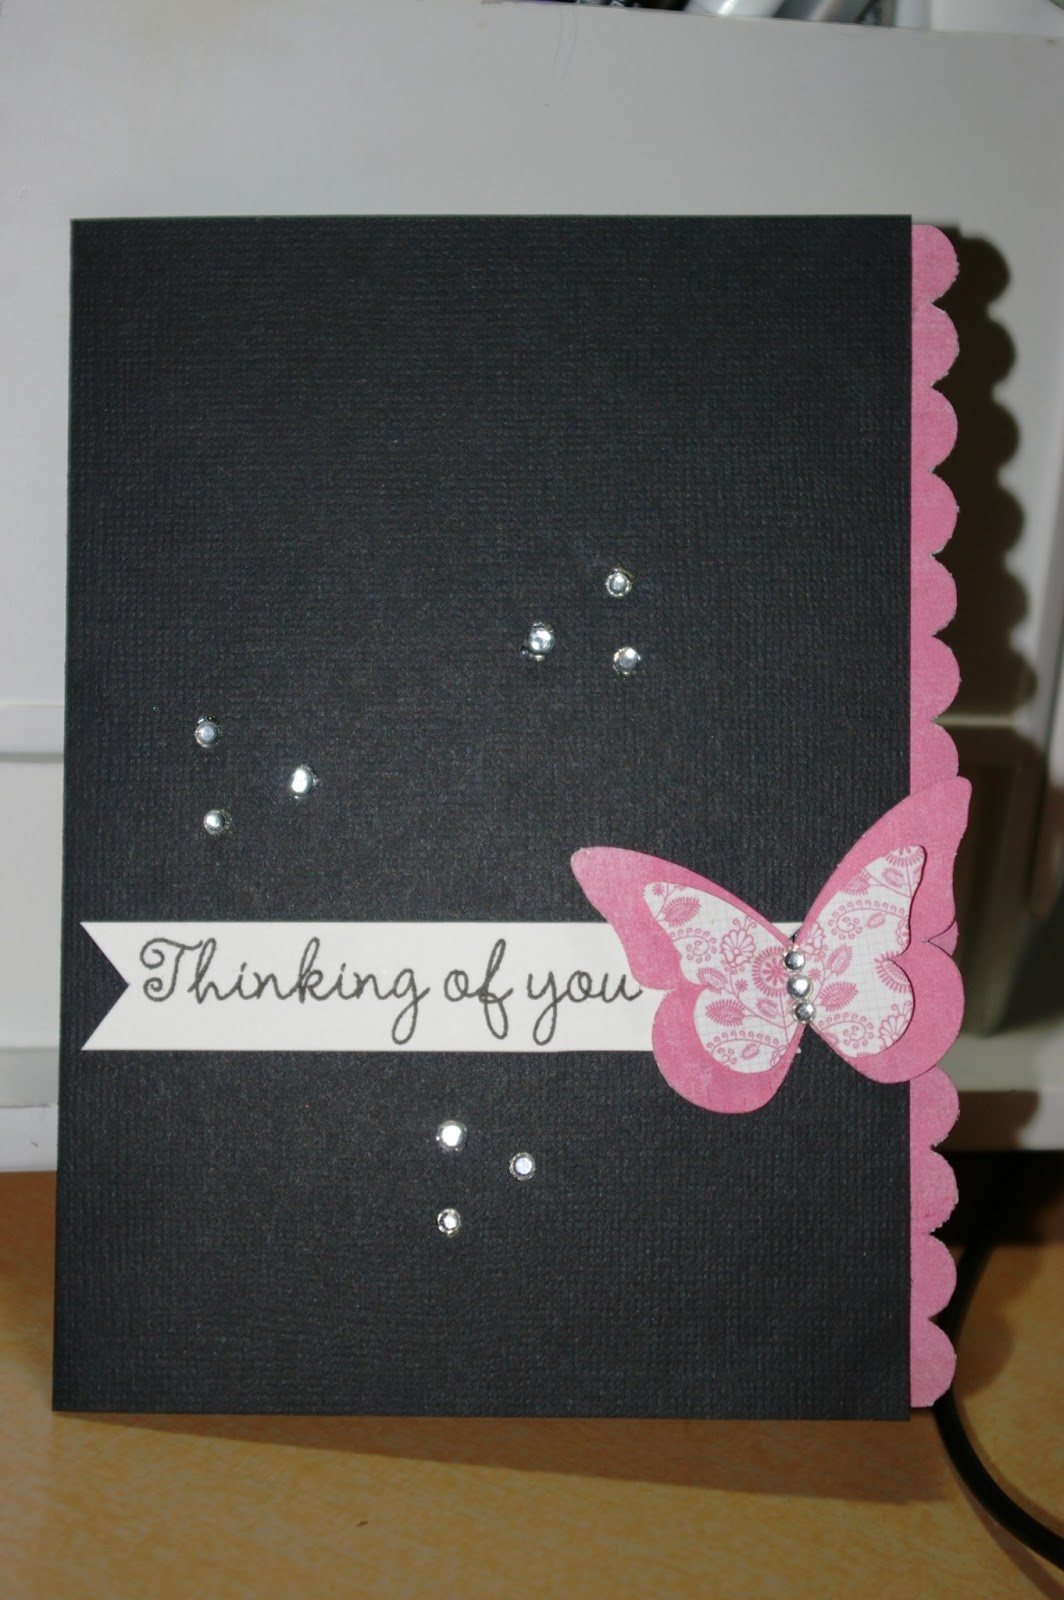
Sympathy Card
Well, well the day I knew was coming finally arrived. My colleague passed away. I know that it's for the best because he was not doing well, but it's never easy. I needed a card for his family so I went back to my Pinterest board for some inspiration, which, as happens a lot, I found in a card by Rita of Rita's Creations. This was one posted for challenge #91 on Freshly Made Sketches. I really do love her style.
Lately, I've really been drawn to pink. I don't know why because I'm not really a girly girl and pink has never really been a color I've favored. But I really like how it looks with the black. For the sentiment, I pulled out the Sympathy4you set by The Stamps of Life for the sentiment. I stamped it with some Versafine ink on some white linen card stock, then cut the edges into banner. I secured it under the butterflies I created on the Silhouette using an Echo Park cut and the pink Authentique paper from the Lively 6x6 pad I used in a card I made a few days ago. By using the two sides of the paper, I was able to the right look for the card. I cut the front of the card about .375 of an inch shorter than the back and added a scalloped border punched with my Stampin' Up border punch. I then finished it off with some scattered rhinestones added with my Irock.
For the inside, I stamped another sentiment from that same set with the Versafine. I thought it still needed something, so I inked up the butterfly from the Teresa Collins Spring Fling set, but decided to stamp it off one so it wouldn't be so stark on the inside. With that, I called the card done.


Lately, I've really been drawn to pink. I don't know why because I'm not really a girly girl and pink has never really been a color I've favored. But I really like how it looks with the black. For the sentiment, I pulled out the Sympathy4you set by The Stamps of Life for the sentiment. I stamped it with some Versafine ink on some white linen card stock, then cut the edges into banner. I secured it under the butterflies I created on the Silhouette using an Echo Park cut and the pink Authentique paper from the Lively 6x6 pad I used in a card I made a few days ago. By using the two sides of the paper, I was able to the right look for the card. I cut the front of the card about .375 of an inch shorter than the back and added a scalloped border punched with my Stampin' Up border punch. I then finished it off with some scattered rhinestones added with my Irock.
For the inside, I stamped another sentiment from that same set with the Versafine. I thought it still needed something, so I inked up the butterfly from the Teresa Collins Spring Fling set, but decided to stamp it off one so it wouldn't be so stark on the inside. With that, I called the card done.

Monday, June 24, 2013
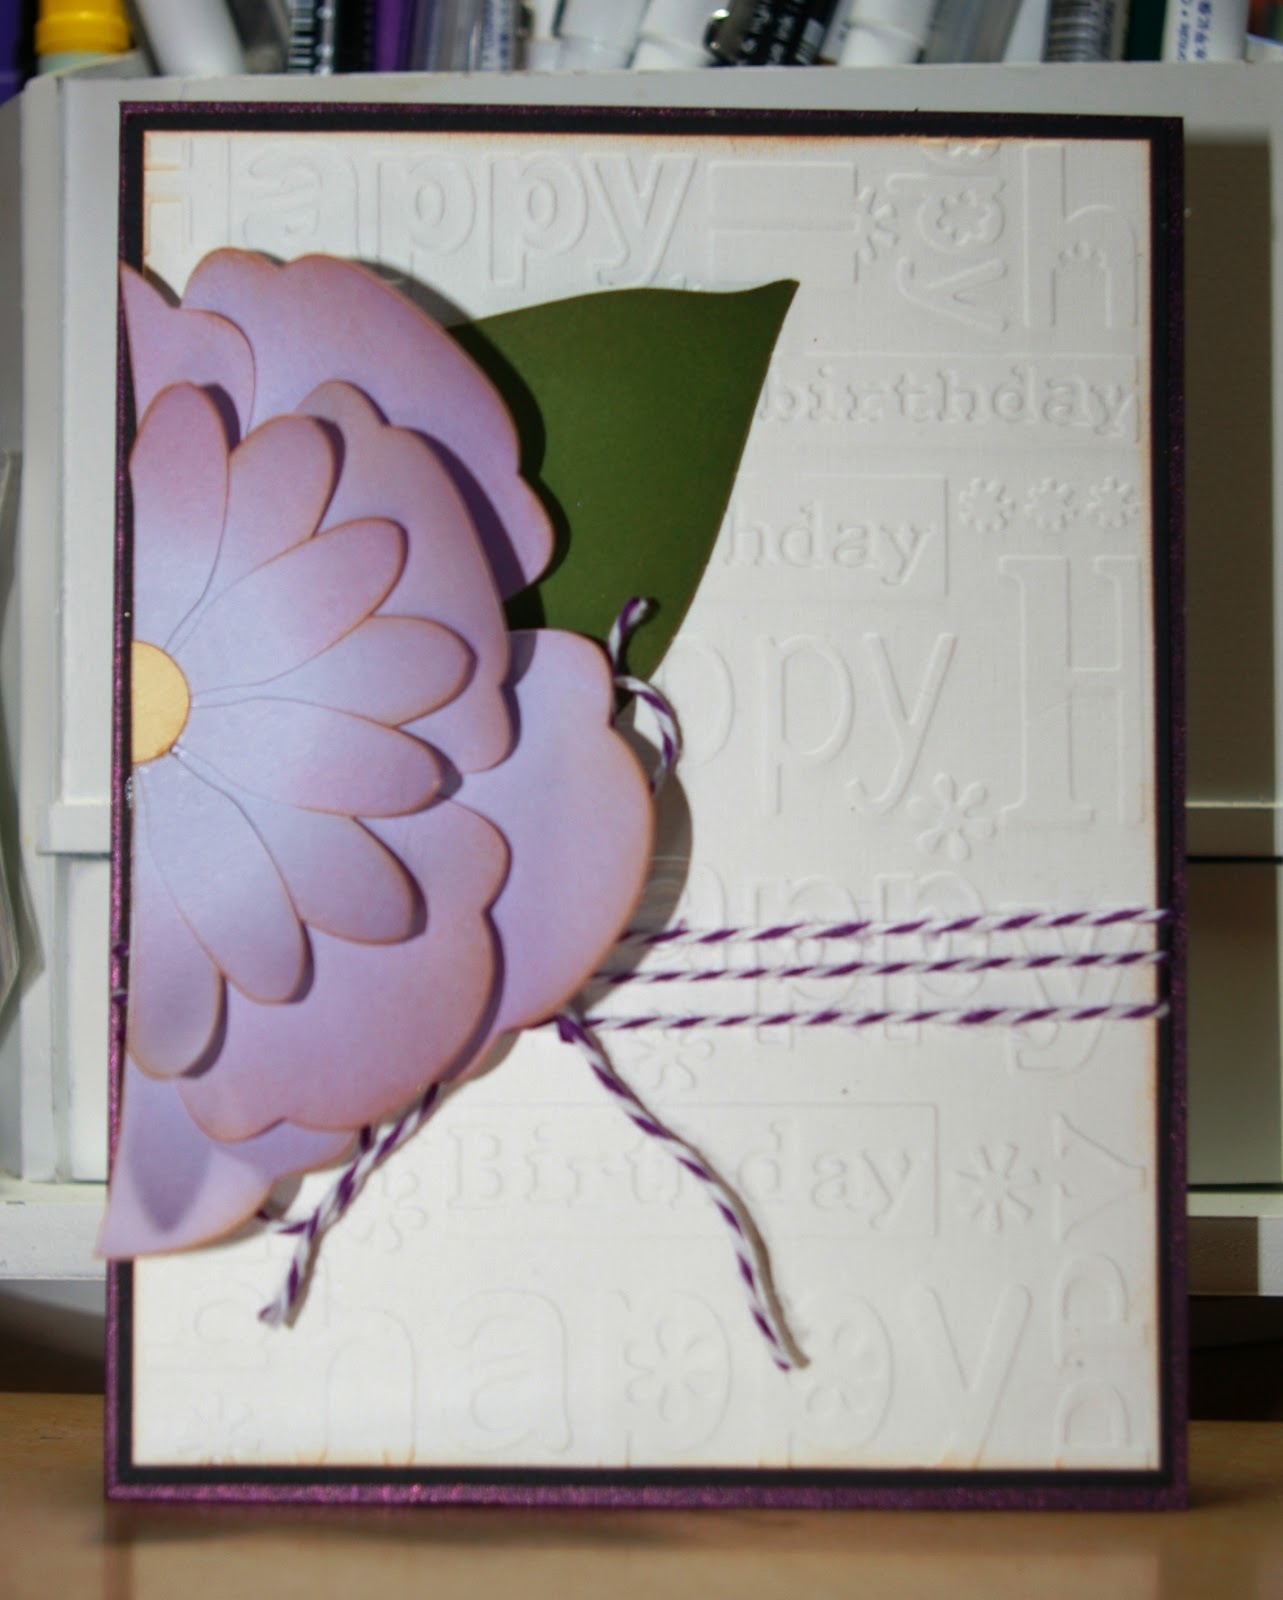
Happy Birthday Card
Last week was my mother-in-law's birthday so I went trolling on Pinterest for some inspiration and found a lovely birthday card pinned from Jaydekay on Splitcoaststampers.com. I just loved the look of this card. Of course, I don't have the lovely retired Sizzix die, but I do have a Cameo and lots of 3rd flowers. I finally selected this 3rd layered flower, which is Design ID #38042, from Patty Young/MODKID. I cut it out of a random piece of card stock from my stashed then inked the flower with Spun Sugar Distress Ink. I finished inking all the edges of the flower, center and leaf in Tea Dye Distress Ink. Then it was just a matter of running the white card stock through the Happy Birthday Cuttlebug embossing folder and tied it all together with some Hemptique baker's twine. I decided it all needed matting with black before I adhered it all to my purple card stock card base.

Thursday, June 20, 2013
Another I'm Wild About You Card
Continuing on having fun with the Critters on the Savannah set from Lawn Fawn, I just had to do a second run at a card I've previously scraplifted. I just love this card that was on the Lawn Fawn blog back in April. I previously tried my hand at it in this post before I ever owned this set so I was excited to try again now that I have the set.
I had already cut out and colored this cut little rhino and the birds, so I decided to focus just on them, which meant that landscape seemed a bit of a better layout than the vertical. I cut out a speech bubble with my Cameo so I could stamp the sentiment. I just picked up the Trendsetter 6x6 pad by Fancy Pants on sale at Craft Warehouse and it was still sitting on my craft room desk, so I decided to use it for the background paper. So then it was just a matter of a little Martha Stewart baker's twine and a few pop dots to finish it off.

I had already cut out and colored this cut little rhino and the birds, so I decided to focus just on them, which meant that landscape seemed a bit of a better layout than the vertical. I cut out a speech bubble with my Cameo so I could stamp the sentiment. I just picked up the Trendsetter 6x6 pad by Fancy Pants on sale at Craft Warehouse and it was still sitting on my craft room desk, so I decided to use it for the background paper. So then it was just a matter of a little Martha Stewart baker's twine and a few pop dots to finish it off.

Thursday, June 13, 2013
Happy Birthday Card Inspired by Rocky Mountain Papercrafts
My sister-in-law's birthday was last week so, of course, I needed to make her a cute card. I was flipping through a Pinterest board when this oh so cute card by Allisa at Rocky Mountain Papercrafts caught my eye. I knew it was the perfect one. So I flipped through my 6x6 paper pads and decided that Jillibean Soup's Apple Cheddar Soup was the right one for this card. I choose the wood grained paper and the little flowers. I then teamed them up with some plain brown card stock as a mat, some plain cream card stock for the sentiment and cream card base. I couldn't find the right color to mat the flower, but then I found the perfect paper for that in my Fancy Pants Park Bench 6x6 pad. I cut a flower with my Cameo and made a shadow for it. Once I had it all assembled, I stamped my sentiment in Momento Espresso Truffle in using Technique Tuesday's Swanky Sentiments and stamped a flourish in Momento Toffee Crunch ink using a flourish from the Teresa Collins Spring Fling stamps. It still needed a little something, so I dug a blingy brad from my stash and added a few Darice gems. That finished it off nicely.


Tuesday, June 4, 2013
Happy Birthday Card Inspired by the Paper Players Challenge
I was really inspired by Nance Leedy's card from the Paper Players Challenge #147. I loved how she stamped the large sunflower over the card and through I would give it a try with the Swallowtail stamp from Stampin' Up. I simply adore that stamp. I used four colors of card stock from DCWV's Pastel stack: white, yellow, blue and green. Then I stamped the image using Momento's Toffee Crunch ink and colored it in with some colored pencils. I resized a card from the 3x4 Life Cards by Lori Whitlock in the Silhouette store (Design ID #25178) to make it super tiny and stamped the sentiment from a set of stamps I bought from Boxer before they closed. I then tied the tag using some Hemptique twine onto some sheer yellow ribbon.


Isn't it funny how sometimes you finish a card and you know exactly what you would do differently? The minute I saw this card sitting on the shelf across the craft room, I thought I should have swapped the blue and yellow. They would be more impact if they were in the opposition positions.
Thursday, May 9, 2013
Your Fortune Is... Love
For National Scrapbooking Day, I did a little shopping and picked up a cute Lawn Fawn stamp set called Good Fortune with matching dies. Coincidentally, that night I was trolling through the blog posts from the week when I found this cute card using the set on the Lawn Fawn blog. So I was inspired to pull out the set this week and try my hand at a card using this set.
I stamped the carton and thought it needed a little sprucing up. So I took the solid heart from the set and jazzed it up. I then stamped, colored and cut the chopsticks to go with it. I finished it off by cutting and coloring two of the cookies and made sentiments to fill them using the little stamps included. I used more of the Love Me 6x6 pad paper from My Mind's Eye to mat it and added some Martha Stewart baker's twine. But I still thought it needed a little something, so I cut another cute little tag on my Cameo and stamped the love stamp from Inkadinkado Heartful of Love set. Fun and cute!

I stamped the carton and thought it needed a little sprucing up. So I took the solid heart from the set and jazzed it up. I then stamped, colored and cut the chopsticks to go with it. I finished it off by cutting and coloring two of the cookies and made sentiments to fill them using the little stamps included. I used more of the Love Me 6x6 pad paper from My Mind's Eye to mat it and added some Martha Stewart baker's twine. But I still thought it needed a little something, so I cut another cute little tag on my Cameo and stamped the love stamp from Inkadinkado Heartful of Love set. Fun and cute!

Wednesday, May 8, 2013
Love Card
It's a busy week so I needed a little "down" time and when I saw this card on Pinterest, I knew it was the perfect way to wind down and I loved the non-traditional colors for a love card. So I checked out Allison Ohran's blog Sweet Impressions. She's got a lot of cute inspiration there. Tonight, I think being tired probably hurt my creativity. I started with stamping some hearts, but I didn't have my heart in it (okay so I'm so tired I'm making puns now). So I switched over to some super cute paper from the Love Me 6x6 pad from My Mind's Eye. I actually love this set so much that I bought two of them (it didn't hurt that they were a super good buy too). So I cut the hearts and heart shadows out with my Cameo. I found a cute little tag to cut too. Then I stamped the word love from my Inkadinkado Heart Full of Love set. Then I finished it off with some scrap paper for the base, mat and background and ran the background through my Honeycomb Cuttlebug folder and put it all together with some sparkly crochet thread since I didn't have the right baker's twine.


Monday, May 6, 2013
With Sympathy, a Design Principles Card
 Today, I'm sharing the second card from the first lesson in the Design Principals class I'm taking. I really deviated quite a bit from the card she showed, but at the same time tried to stay true to the concepts she showed. This one was fun because I got to use a lot of supplies I haven't used in a long time or even ever. The background is an old Rubber Stampede stamp (probably the first background stamp I ever bought) and I stamped it on the card with Old Paper Distress Ink. I then cut the "shield" out with my Cameo. The sentiment is one I picked up when Boxer Scrapbooks was going out of business and the butterfly is from the Teresa Collins Spring Fling Stamps. It's the first time I've used either of those sets. I used Timber Brown StazOn ink then colored the butterfly with my colored pencils. I added a little more Old Paper ink to the edge of the shield and then used pop dots so I could run some Hemptique twine behind it. It was a fun card to make and I really like how it turned out.

Saturday, May 4, 2013
Butterfly Card
There is one thing about Pinterest that really frustrates me: when people pin things such that I cannot find the original source. Sometimes this is because the person making the pin doesn't understand how Pinterest works. The person is reading a blog and sees something she likes. She pins it not realizing that you have to pin from the specific entry, otherwise Pinterest will simply take me back to the most recent post of the blog. Then I have to sort through all the entries to find the one that is really for the item that caught my attention. Sometimes, however, I cannot access the original source because I simply don't have access. The Stampin' Connection is a good example. I cannot log in to see the sources, but I can see the pictures on Pinterest. Sometimes the artist is smart and leaves me a breadcrumb in the form of a watermark that at least lets me know who I can give credit to for the inspiration. That's the case here. I loved this butterfly card I saw on Pinterest. Of course, it was a Stampin' Connection link so I could see where it had been pinned from. But the watermark is from Carrie Gaskin, the Artistic Avenger. She stopped blogging in October last year and some of the pictures on her blog simply would not load for me, so I couldn't find if she had posted on her blog about it. It was really kind of a shame too because from the few pictures I did get to load, I can tell I would have found even more inspiration.
The only paper on here that wasn't from my scraps bin is the green pattern paper peeking in the background. It's from the 6x6 pad called For the Record 2 by Echo Park and designed by Lori Whitlock. The butterflies were cut on my Cameo using the Echo Park butterfly design. I cut out only the base and then inked them with various shades of Distress Ink. I used a french curve to draw the butterfly path and then poked the holes with my stylus and my Stampin' Up paper piercer template to make sure the path remained reasonably evenly spaced. I finished it off with Hemptique baker's twine instead of ribbon and some glossy accents down the middle of each butterfly.
I've left off the sentiment on this one because I'm not quite sure what I want to use it for. I think it could do well as a birthday card, a sympathy card or even just a thinking of you card. So for now, I'll leave those possibilities open.

The only paper on here that wasn't from my scraps bin is the green pattern paper peeking in the background. It's from the 6x6 pad called For the Record 2 by Echo Park and designed by Lori Whitlock. The butterflies were cut on my Cameo using the Echo Park butterfly design. I cut out only the base and then inked them with various shades of Distress Ink. I used a french curve to draw the butterfly path and then poked the holes with my stylus and my Stampin' Up paper piercer template to make sure the path remained reasonably evenly spaced. I finished it off with Hemptique baker's twine instead of ribbon and some glossy accents down the middle of each butterfly.
I've left off the sentiment on this one because I'm not quite sure what I want to use it for. I think it could do well as a birthday card, a sympathy card or even just a thinking of you card. So for now, I'll leave those possibilities open.

Friday, May 3, 2013
Fly High
Today I'm sharing another card I made from inspiration found while browsing through older posts on Rita's Creations. She made this delightful kite card that I just loved. I don't have the stamp set she used, but I did have a kite shape to cut on my Cameo. I used my french curves to draw the hills out of a piece of paper from the Sunny Side 6 by 6 pad by Pebbles. I couldn't draw a straight or curved line to save my life without a straight edge or a french curve. I used a Darice embossing folder called Cloudy Sky for the background. The blue and white papers are from my scraps stash. The brown cardstock has a linen texture and is from the Paper Company. The green background paper is from the 6 by 6 paper pad called Vanity Fair by My Mind's Eye. I used some baker's twine from Hemptique to finish it off. I haven't added a sentiment yet. I think I'll probably save that for the inside only on this card.


Tuesday, April 23, 2013
Just a Note card
Here's another card that came together pretty quickly. I found the inspiration on Mary Fish's blog with a card she received from Lisa Pretto Ibinger. I didn't have the dark polka dot ribbon, but I did have this sweet green ribbon that reminds me of Spring. So I switched it up to make the whole card feel more in line with the glorious Spring weather. I cut the negative on the flower out with my Cameo. I used a Hero Arts set for the sentiment. I just love their stamps. They are such a great quality.


Monday, April 22, 2013
Thinking of you card
When I saw all the amazing cards with the Swallowtail stamp from Stampin' Up, I just had to buy that stamp. I broke it out tonight and started playing with it. I found a cute card on Pinterest and traced back to the source at the Flowerbug blog. I skipped the heat embossing and went just with Chocolate Chip ink on cardstock. I love that. The whole card actually came together very quickly, but used four different stamp sets! Of course, there was the Swallowtail stamp from Stampin' Up. For the sentiment, I used an Inkadinkado stamp set called Expressions and Frames. The small butterfly is from the Teresa Collins Spring Fling Stamps set. Finally, the floral stamp is from the Heidi Grace Designs set called Paradise. I cut a vellum butterfly on my Cameo using an Echo Park design purchased in the Silhouette store. I added some ribbon from my stash and called it good.


Wednesday, April 17, 2013
A New Birthday Card
Now that I'm caught up again on Project Life, it's time to work on my stash of cards again. I found a lot of inspiration via Pinterest this weekend and I'm excited to start making my own versions. I started with this one tonight from Flowerbug Inkspot's blog. I loved the card. It was so fresh and pretty. My own version isn't quite right. If I remake it, I'm definitely making the sentiment oval smaller, but I do like the embossing in the background. Instead of buttons, I used some brads from my stash, but it was pretty simple to make with a few cute flowers cut on the Cameo and a flourish for the stem. The sentiment is from the Inkadinakado set Expressions and Frames and I used a flourish from the Cloud9 Design set Chocolate Chalet. The paper is all from my scraps stash and I used the Sizzix Dots and Flowers set for the dry embossing. Quick and easy!


Monday, April 1, 2013
Using My Tools
I don't know about you, but I find that I use my Cameo to make almost everything now. It's rare for me to pull out punches or use my dies. So when I was trolling my pins on Pinterest, I found this card from the Icreate blog and thought, "I can do that, but can I do it without the Cameo?" Well, turns out I could. I had the Sizzix Flower & Leaf #3 die and the Asterisks die from Provo Craft that let me cut out the leaf patterns and the little flower. I just cut a small square and used my Fiskars' circle punch to cut the little circle. Once it was all put together, I topped it off with an Imaginisce gem and the sentiment stamped from the Fiskars' All Year Greetings set using Quick Quotes Powder Puffs ink in Green with Envy. It went together so easily and quickly.


Monday, March 18, 2013
A Card a Day...
Yesterday after I broke my elliptical machine (Well, really I just wore out the tension strap on it. Fortunately, a replacement will be here by the end of the week), I finished another inset layout for Week 9, the week I went to San Antonio. If you follow my blog, you know that I leave a card a day for the hubby while I'm gone. He saves them up and gives them back to me at the end of the week. I thought it would be perfect to save them in their own inset layout for the week. I wasn't feeling too creative and I didn't think that they needed a whole lot to go with them, so I kept it pretty clean and simple, which is pretty much my trademark anyway. I inked and painted the edges of the pages to keep them consistent with the other pages for this set. I cut my title and inked it up as well, give the words "blues" a little extra color. I then just added a little bit of the washi tape I've used on the other pages and added just a little of the new heart washi tape from Recollections I picked up recently at half-price (love that!). With that, I called it complete and closed the book on it. I think I have maybe one more double page layout from that trip before I'm done with it.


Sunday, March 17, 2013
My 500th Post and Week 11
I cannot believe that this is my 500th post. That just seems a bit crazy, but that's what Blogger says so it must be true. How cool is it that it falls on St. Patrick's Day? So how do you celebrate the day?
Me? Since I managed to get all the laundry done yesterday and finish up Project Life for last week (that's right, I'm still on track), I decided to spend this day doing other things I enjoy. I have corned beef bubbling in the crock pot and dear hubby has some good beer (that I will not be drinking - yeck). After a quick run to the store for kitty food so Chewie doesn't throw a fit about not getting any canned cat food today, I'll be kicking up my feet and reading a library book on my Kindle app. I have to say that it's nice to be able to check out library books at any time, but I do sort of miss the trip to the library. The convenience of electronics just can't quite replace the pretty amazing experience of walking down the stacks and being seduced by smell of paper and ink and the visual smorgasbord of colors.
So, as I said, Project Life Week 11 is in the book already. I finished it up last night while I listened to the Hawks make history with the most road wins in the regular season with a nail-biter of a 6th round shoot out win against the Thunderbirds. Way to go Chase De Leo! I used that Portfolio collection from Pink Paislee again. I'm pretty much down the dregs of it so this may be it's last appearance. I love, love, love (ha!) using the Amy Tangerine date stamp. Then I spent some time playing with my cameo. I chopped down an arrow from the Ali Edwards design from the Studio Calico cut set from the Cut It Up class. I loved the arrow, but I needed a shorter version. But the piece I love the most is probably the hat I created from a hat card design. I made some extra cuts here and there and welded the words "hat trick" to celebrate Brendan Leipsic's hat trick. So when all is said and done, here's this week in history in our house:


Me? Since I managed to get all the laundry done yesterday and finish up Project Life for last week (that's right, I'm still on track), I decided to spend this day doing other things I enjoy. I have corned beef bubbling in the crock pot and dear hubby has some good beer (that I will not be drinking - yeck). After a quick run to the store for kitty food so Chewie doesn't throw a fit about not getting any canned cat food today, I'll be kicking up my feet and reading a library book on my Kindle app. I have to say that it's nice to be able to check out library books at any time, but I do sort of miss the trip to the library. The convenience of electronics just can't quite replace the pretty amazing experience of walking down the stacks and being seduced by smell of paper and ink and the visual smorgasbord of colors.
So, as I said, Project Life Week 11 is in the book already. I finished it up last night while I listened to the Hawks make history with the most road wins in the regular season with a nail-biter of a 6th round shoot out win against the Thunderbirds. Way to go Chase De Leo! I used that Portfolio collection from Pink Paislee again. I'm pretty much down the dregs of it so this may be it's last appearance. I love, love, love (ha!) using the Amy Tangerine date stamp. Then I spent some time playing with my cameo. I chopped down an arrow from the Ali Edwards design from the Studio Calico cut set from the Cut It Up class. I loved the arrow, but I needed a shorter version. But the piece I love the most is probably the hat I created from a hat card design. I made some extra cuts here and there and welded the words "hat trick" to celebrate Brendan Leipsic's hat trick. So when all is said and done, here's this week in history in our house:


Subscribe to:
Posts (Atom)