Today's card came together in a snap. I had the Lost and Found Two 6x6 paper pad from My Mind's Eye sitting on my craft desk. I love the paper in it even though it's a bit more distressed and fancy than what I usually like. I loved this blue script paper and I thought it would be nice as a background so I cut it to just cover the entire card.
I've been watching a lot of Nichol Maguirk's videos lately and I love how she uses vellum. So I ran some vellum through the largest frame from the Femme Frames from Mama Elephant. I layered it over the blue paper then cut down my watercolored image from Simon Says Stamp Stamptember exclusive Tim Holtz stamps using the Lawn Fawn Stitched Journalling Card. I added it to the top of the vellum then finished the card off with some Pretty Pink Posh sequins.
I picked this card for today because today is my sister-in-law's birthday. We had been best friends before I married her husband's brother and we became sisters. Now we don't talk as much as we used too and this card kind of reminded me of that. Happy birthday Val. I hope it's a good one. Coincidentally, it's also my Uncle Jim's birthday. So I'm sending big birthday hugs to him too.
Showing posts with label My Mind's Eye. Show all posts
Wednesday, October 1, 2014
Tuesday, September 30, 2014
Life Is Sweeter with You in It
I love the die cut inlay craze that's so popular right now. I'm not the best at it so don't look too closely at this card. I used the scalloped frame from the Simon Says Stamp Frames die set to cut through this cute polka dot paper from the Miss Caroline 6x6 paper pad from My Mind's Eye. I then die cut the same frame into some leftover watercolor paper. I then tried to inlay the watercolor paper into the polka dot paper. That was a funny experience. By the way, if you try to inlay with polka dots and something doesn't look quite right, check if you didn't get one piece of the paper turned the other way. Yeah, my dots didn't line up. Thankfully my tape was very forgiving and I was able to peel the paper off and turn it around. No one would have known, well except for the fact that I can't keep my big mouth shut.
The rest of the card was a breeze. I die cut out my stamped piece from the Simon Says Stamp Stamptember Tim Holtz exclusive using the straight frame from the same Simon Says Stamp Frames die set but used my We R Memory Keepers Corner Chomper to round the corners. I liked that better with the curves of the other frame. I then adhered the panel with pop dots and called it day.
Monday, September 29, 2014
You Are Sew Special to Me
For today's card, I used another image from the now (sadly) sold out Stamptember set from Tim Holtz. This card came together so fast once I saw sketch 155 for Freshly Made Sketches. I had the Miss Caroline 6x6 paper pad from My Mind's Eye sitting on my desk and these two designs from it just called out to be used to together. I used the frame from My Favorite Things Blueprints #13 to cut out both sheets and then cut down the floral print to layer over the other. I little Sky Lawn Trimmings finished off the seam. I then cut my image out with the pennant shape from Lawn Fawn's Stitched Party Banners and finished it off with some of the same Lawn Trimmings and adhered it with pop dots. Perfect!
Monday, September 22, 2014
Wish You Were Here
What a weekend! I took Friday off and, for the first time in probably close to two years, I didn't actually work because I hired someone who took over some of the day to day things that required that I work. I thought I would have a lot of time to play in my craft room with a long weekend, but we filled it up with other things. That said, I can't tell you how much more relaxed I feel. So nice! The hubby and I spent the whole day on Friday playing. We checked out the new Cabellas just a bit north of us, ate the most amazing ice cream at Salt & Straw and watched the home opener of my favorite WHL team. It was so nice to have a whole day just doing things together.
On Saturday I cleaned the house while he worked and then we went back for game number two courtesy of some tickets in the suite that hubby's boss gave us. Yesterday I ran a few errands and finished up the Mojo Monday card in enough time to get it posted to the challenge but not up on the blog because my parents came over for Sunday night dinner. I love that.
I had eagerly purchased the Simon Says Stamp Stamptember exclusive Tim Holtz blueprints stamps. These are the first Tim Holtz blueprint stamps I've bought. I've looked at them several times and put them on wishlists, but I've never actually picked any up until now. But these ones were too good to miss (if you are thinking about them yourself, hurry over to Simon Says Stamp - they are a limited release for Stamptember only so there's only few days left, that is, if they aren't sold out already).
I stamped the image in Archival Ink in Jet Black, then watercolored it with my Distress Ink Markers. I was just playing with the stamps, but then I saw the Mojo Monday #363 sketch and I knew it was perfect for that. The paper comes from the Lost and Found 2 6x6 paper pad from My Mind's Eye. That paper pad is perfect for a masculine card. I finished it off with some ribbon and a button threaded with crochet thread, all from my stash.
I've entered this card over at Mojo Monday in challenge number 363. That challenge is now closed, but there's a new one every Monday so check it out if you are looking for some inspiration and fun.
Sunday, August 10, 2014
Miyako and Kate
While at my conference, I saw a notation on Sandy Allnock's blog about a sale on her stamps at Whimsy Stamps so I quickly snapped up a Miyako and Kate stamp before it was gone for good. I cannot believe how incredibly fast it got here. I think I ordered it on Wednesday morning and it was here when I got home on Thursday. Lightning fast! So I had to ink it up. I'm not ready to do something quite so detailed with copics yet, but I was willing to give watercolor a try. So I pulled out my Distress Ink markers and did a little coloring. I even posted a sneak peak on social media. Once it was done, I didn't like the shoes. I had these glossy black mary jane's in my head, but they seemed too dark for the rest of the image. I added some Glossy Accents, but I still don't like how they turned out. It was good enough that wasn't willing to scrap it altogether, so I cut it out using the Femme Frames dies from Mama Elephant. Then I used a piece of the 6x6 Kate & Co. paper from My Mind's Eye for the larger frame and mounted it on a white card base. Super simple and cute, but it means the sentiment has to be on the inside because I totally wasn't thinking about what I was going to do for that.
Friday, February 7, 2014
Sweet Treat Carton Inspired by Sabine on the Lawnscaping Challenge Blog
When I saw this sweet milk carton design from Sabine on the Lawnscaping Challenge Blog, I just knew I had to give it a try myself. It was so stinking cute! For my version, I choose some blue paper from My Mind's Eye Twinkle, Twinkle Little Boy 12x12 paper pad that I love so much I bought two. Then it was just a lot of stamping, coloring and fussy cutting from a few Lawn Fawn stamps sets including Critters on the Farm (thanks Mom for the cow, sheep and hay) and Critters from the 'Burbs (tree). Then I just cut some green paper with my Martha Stewart fringe scissors (thanks again Pat) since the cute new grass die from (who else?) Lawn Fawn doesn't hit the stores until later this month. I downloaded the milk carton from Silhouette and cut it out on my Cameo. I put it all together and filled it with some chocolate before sealing it up. But the top just seemed a little too plain. So I cut a cute scalloped edge with Deco Scallop border punch from EK Success on two sides of a small strip of white card stock. Once it was glued in place, I punched a couple of holes with my We R Memory Keepers chomper and threaded through some twine I had left over from the packaging of a Citrus Twist kit. Super cute!
Friday, January 24, 2014
Inspired by Laura Williams on Papercrafts & Scrapbooking
I was trolling through the blogs I read (hmm... I wonder how many times I've written that?) when I saw this clean and simple, but oh so wonderful card made by Laura Williams on the Papercrafts & Scrapbooking blog. I had marked it to pin to my Pinterest Card Layout board for some day when I needed some quick inspiration, but it struck me that it was the perfect card to use a new set I just received from Technique Tuesday called Say It - Hello.
On a side note: After a disastrous try of a kit club a while back, I shied away from them for a long time. But then I finally broke down and joined two stamp clubs (Stamps of Life and Studio AE from Technique Tuesday) and the Project Life kit from Citrus Twist. I must say that each of them is exactly what I expect from a good monthly club and have revived my belief in the concept. I also love that with both Studio AE and Citrus Twist I can add extras for no extra shipping. Stamps of Life charges extra shipping, but it's very reasonable and they give you a discount on the stamps that pretty much evens it all out.
Back to our regularly scheduled post: I couldn't believe how quickly this card came together. I pulled out a rainbow of Distress Ink: Fired Brick, Spiced Marmalade, Mowed Lawn, Broken China and Dusty Concord. Then I stamped them using my Martha Stewart stamp press just to make sure I lined them up well. Once I had that done, I noticed the "Just Saying" sentiment stamp and light bulb went off. A little VersaFine Tuxedo Black ink added the right touch. I rummaged through my box of card blanks and narrowed it down to a sunny yellow or this beautiful teal. Teal won out in the end through. I used my We R Memory Keepers Corner Chomper to round a few corners then added that last touch with some enamel dots from the Cut & Paste line from My Mind's Eye.
I have to say that I really liked this one (even the hello I heat embossed in VersaMark on the inside, but you don't get to see that here).
On a side note: After a disastrous try of a kit club a while back, I shied away from them for a long time. But then I finally broke down and joined two stamp clubs (Stamps of Life and Studio AE from Technique Tuesday) and the Project Life kit from Citrus Twist. I must say that each of them is exactly what I expect from a good monthly club and have revived my belief in the concept. I also love that with both Studio AE and Citrus Twist I can add extras for no extra shipping. Stamps of Life charges extra shipping, but it's very reasonable and they give you a discount on the stamps that pretty much evens it all out.
I have to say that I really liked this one (even the hello I heat embossed in VersaMark on the inside, but you don't get to see that here).
Thursday, January 23, 2014
Inspired by Simon Says Stamp and Freshly Made Sketches #120...
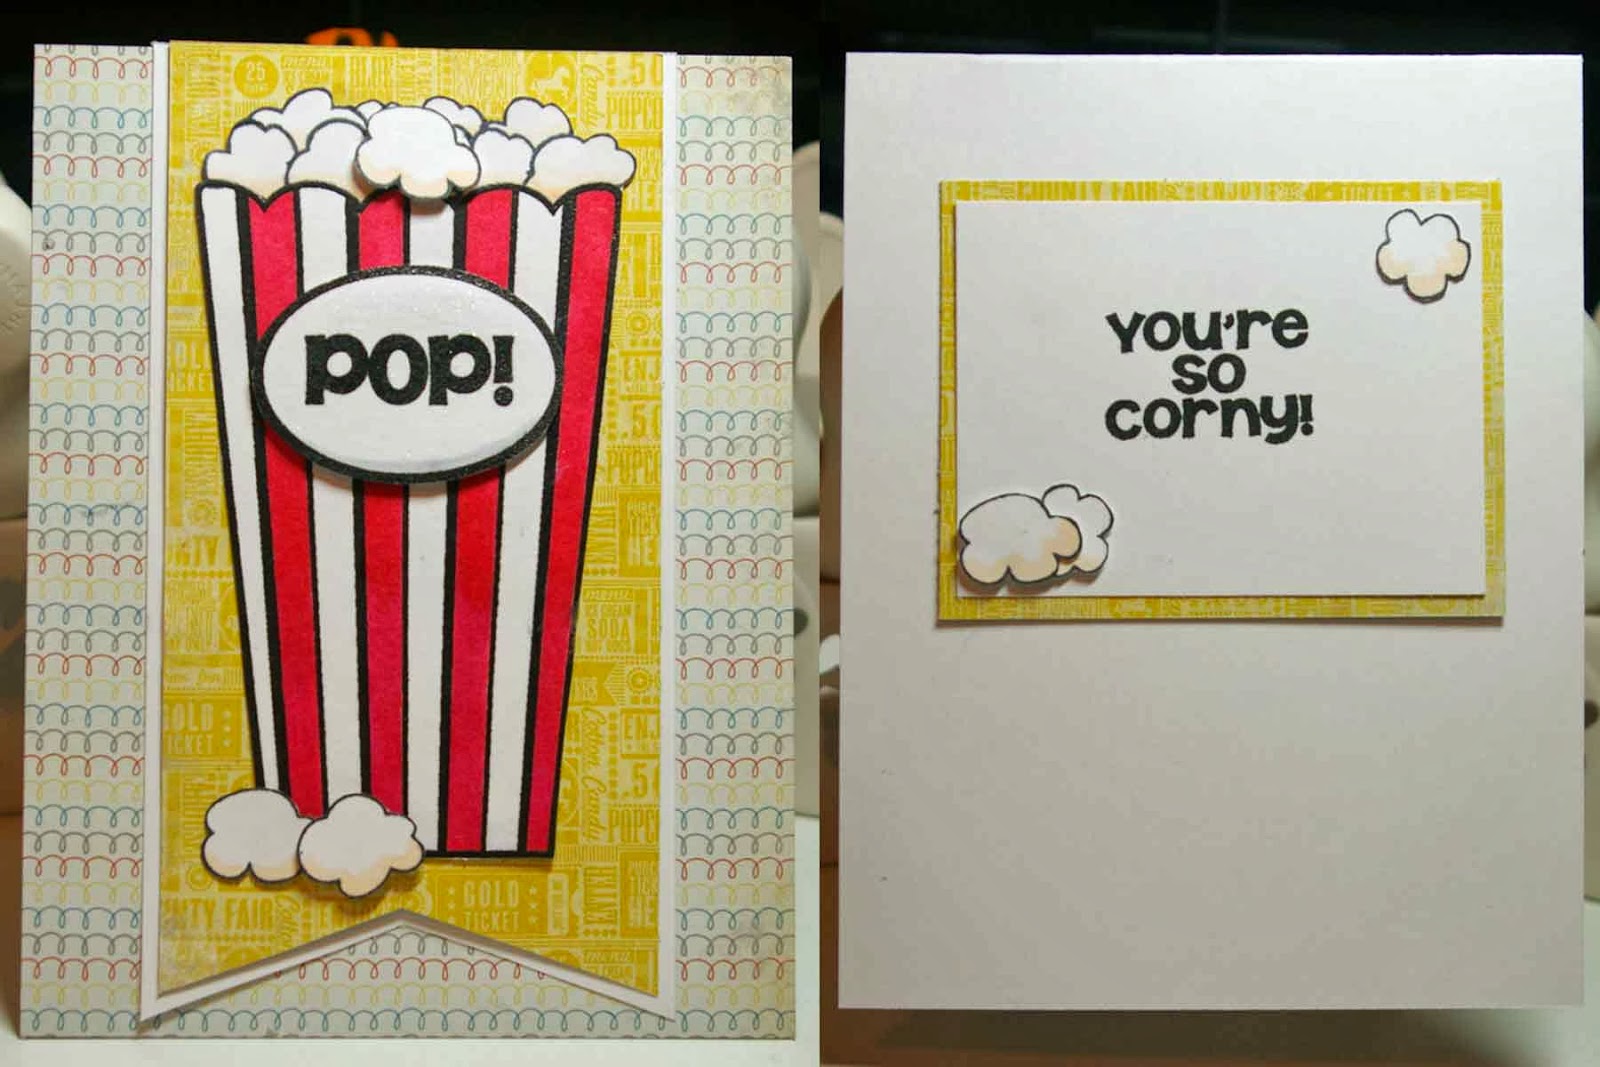
I was trolling through my blogs looking for inspiration that would encourage me to overcome this lingering headache (at times migraine) of the last couple of days and do something in my craft room when I came across the new Simon Says Stamp challenge on their blog to make something funny. Well, I have a lot of punny stamps including this month's Stamps of Life set, popcorn2stamp, which has been sitting on my craft desk waiting to be stamped on something.
So I set about stamping the popcorn container with Momento ink on some white card stock and colored it with my Spectrum Noir pens. I masked the container off and stamped some popcorn on the top (after cutting a bunch of popcorn masks too). Then I wasn't quite sure what to do with it. I didn't really have any creative mojo so I pulled up the sketch for Freshly Made Sketches to see if it gave me any ideas and decided I could make it work.
So I flipped through my 6x6 paper pads until I found some paper I liked in the Dilly Dally pad by My Mind's Eye. Then it was just a matter of trimming my banner, gluing the background paper to my card stock, adding my banner and layering my popcorn box and some individual popcorn. I used a few pop dots for some dimension and then decided the label needed a bit of sparkle with some Wink of Stella.
For the inside, I stamped my sentiment in VersaFine Black Onyx and then matted it on a scrap of the paper from the banner and added a few more pops of corn.
Tuesday, August 6, 2013
Denver Cards - Day Two
For today's card, I visited Tracy Casil's blog Learn to Stamp after being inspired to scraftlift the card she made that was shown on Stampin' Pretty the other day. For this card, I used a 6x6 pad from My Mind's Eye called Love Me, plus some scrap pink card stock and a white card stock base. I again used Word to create my sentiment and the Silhouette to cut the hearts out of my patterned paper and the card stock. I used my Martha Stewart border punch on the edge of the pink card stock then layered my pattern paper on top of it. Then all I had to do was layer the hearts then adhere them to the card. I found a cute sparkly button in my stash and tied some Queen & Co. bakers twine through it. I punched the little pink heart out from a Fiskars (I think) heart punch. Finally I layered my sentiment on the pink card stock with the pennant edges cut before adhering it to my card. I found the cute little heart in my stash (I think it's from Queen & Co. too if I recall correctly) to finish it. Fun!
Thursday, May 9, 2013
Your Fortune Is... Love
For National Scrapbooking Day, I did a little shopping and picked up a cute Lawn Fawn stamp set called Good Fortune with matching dies. Coincidentally, that night I was trolling through the blog posts from the week when I found this cute card using the set on the Lawn Fawn blog. So I was inspired to pull out the set this week and try my hand at a card using this set.
I stamped the carton and thought it needed a little sprucing up. So I took the solid heart from the set and jazzed it up. I then stamped, colored and cut the chopsticks to go with it. I finished it off by cutting and coloring two of the cookies and made sentiments to fill them using the little stamps included. I used more of the Love Me 6x6 pad paper from My Mind's Eye to mat it and added some Martha Stewart baker's twine. But I still thought it needed a little something, so I cut another cute little tag on my Cameo and stamped the love stamp from Inkadinkado Heartful of Love set. Fun and cute!
Wednesday, May 8, 2013
Love Card
It's a busy week so I needed a little "down" time and when I saw this card on Pinterest, I knew it was the perfect way to wind down and I loved the non-traditional colors for a love card. So I checked out Allison Ohran's blog Sweet Impressions. She's got a lot of cute inspiration there. Tonight, I think being tired probably hurt my creativity. I started with stamping some hearts, but I didn't have my heart in it (okay so I'm so tired I'm making puns now). So I switched over to some super cute paper from the Love Me 6x6 pad from My Mind's Eye. I actually love this set so much that I bought two of them (it didn't hurt that they were a super good buy too). So I cut the hearts and heart shadows out with my Cameo. I found a cute little tag to cut too. Then I stamped the word love from my Inkadinkado Heart Full of Love set. Then I finished it off with some scrap paper for the base, mat and background and ran the background through my Honeycomb Cuttlebug folder and put it all together with some sparkly crochet thread since I didn't have the right baker's twine.
Friday, May 3, 2013
Fly High
Today I'm sharing another card I made from inspiration found while browsing through older posts on Rita's Creations. She made this delightful kite card that I just loved. I don't have the stamp set she used, but I did have a kite shape to cut on my Cameo. I used my french curves to draw the hills out of a piece of paper from the Sunny Side 6 by 6 pad by Pebbles. I couldn't draw a straight or curved line to save my life without a straight edge or a french curve. I used a Darice embossing folder called Cloudy Sky for the background. The blue and white papers are from my scraps stash. The brown cardstock has a linen texture and is from the Paper Company. The green background paper is from the 6 by 6 paper pad called Vanity Fair by My Mind's Eye. I used some baker's twine from Hemptique to finish it off. I haven't added a sentiment yet. I think I'll probably save that for the inside only on this card.
Wednesday, May 1, 2013
Happy Birthday Card
I spent quite a bit of time over the weekend looking at old blog posts of new blogs I've started following. One of the new blogs I picked up was Rita's Creations. She's a Stampin' Up demonstrator and I don't have a lot of that product, but her style is pretty universal and beautiful. I like the challenge of trying to recreate the beautiful work she does in the supplies I have on hand, which is great because I have a huge stash and I really want to put it to use.
So for this card inspired by her post here, I used that NEVER-ENDING 6x6 pad from My Mind's Eye called Stella and Rose. I feel like I have been using that pad forever and yet I still have a lot of it left. For this card I used two coordinating papers with a cream background and a sentiment from the Fiskars Happy Birthday set stamped in Night of Navy Stampin' Up ink. I fished a button out of my stash and added some embroidery thread to finish it off.
Thursday, April 25, 2013
So Wild ... About You
I had some time to play in my craft room this week as I listened to hockey playoffs. I usually hate fussy cutting things because, well, I'm impatient. Since I had lots of time on my hands in my room this week, I did spend some time fussy cutting for this card inspired by one I saw on the Lawn Fawn blog a few weeks ago. I love their Critters on the Savannah set, but it's one I don't own (yet) so I had to settle for using the Quinn's ABCs set for the inside sentiment on my card. Thankfully I have a Recollections set I bought on clearance at Michael's a while back that I thought would make a decent substitute for the animals. I used some cute Love Me paper from My Mind's Eye for the background. I pulled some polka dot paper from my scraps bin that I'm pretty sure is DCWV from an old (really old, but still very useful) Spring Stack. I finally had a really good reason to use my animal print embossing folder from Sizzix that I bought several years ago on a trip to St. Louis where I went way out of my way to visit an Archiver's. Despite my loathing of fussy cutting, I'm really surprised t how quickly it all came together.
Friday, March 15, 2013
And sometimes it doesn't look like the inspiration at all...
Still on my quest to re-fill my stash, or at least keep it from being depleted any further, I found another pin on Pinterest for a "thinking of you" type card. It was from one of my favorite card blogs I'm in Haven. I love her clean cards and this one was no exception. I started off casing using some pages from that Stella and Rose 6x6 paper pad from My Mind's Eye that I love so much. I cannot believe how many things I have made from that pad already and I still have lots of paper left.
When I was looking for something to do the branch and birdies, I found I didn't have something spot on, but I had something pretty close in a branch design and a cute bird from Echo Park. Then it all went a bit of different direction with the decision to mat the card with a bit of a twist by using my ticket edge Stampin' Up punch that's been in my stash for a long time. I finished it off with the perfect sentiment from the Fiskars' All Year Greetings set using the Night of Navy ink from Stampin' Up that my friend Nancy gave me.
Altogether it was another very easy card to put together in that all the pieces just seemed to fall in place. But this one turned out very different than the piece that inspired it.
Wednesday, February 27, 2013
You Are So Loved
I absolutely fell in love with the sentiment on this card on I'm in Haven. It was so wonderful that I just had to try my own hand at it. I opted to use more paper from the My Mind's Eye 6 x 6 paper pad called Love Me and a flower cut from some DCWV cardstock using a rose pattern I downloaded from Silhouette. Of course, once again, I didn't have the stamp but I didn't let that stop me. I typed the sentiment in my Silhouette software using the Vivaldi font, flipped the sentiment horizontally and printed it on inkjet transparency. I then used that as a rub-on to put the sentiment on my card. I've never done it before, but this won't be the last time I use that technique. It was super simple to do and really has opened up some new creative opportunities.
Tuesday, February 26, 2013
A Beautiful Sentiment
I just loved the sentiment on this card on I'm in Haven's blog and the layout of the card. Since I didn't have the stamp, I recreated it using Word and simply printed it on my paper. I added the word "love" using half of a "true love" stamp from my Creative Imaginations "Love" set. Then I was so excited to use one of my very favorite papers from the My Mind's Eye Love Me 6x6 paper pad. I just love, love, love this paper. So with a simple piece of red ribbon and some black paper backing, I made my own version.
Thursday, January 31, 2013
Love That Lattice
I found this cute monochromatic card on Pinterest using a lattice die. The original is on Linda Higgins' blog. I really liked the simplicity of the monochromatic color scheme, but, of course, that wasn't what I replicated. Instead I focused on the lattice work. I used the intersect feature in the Silhouette Design Studio with a lattice background I had downloaded earlier. It turned out pretty good matted on the printed paper from the Fiddlesticks 6x6 pad from My Mind's Eye. I added a sentiment from my new Inky Antics stamp set using Brocade Blue ink from Stampin' Up and finished it off with a button and some ribbon from my stash. Cute.
Wednesday, January 30, 2013
Fun Pinwheels
I love the pinwheel trend that's been going on. They are so cute and whimsical. So even though I've done a similar card before, I just had to case this one from I{heart}2stamp. It's so cute although I forgot how hard it is to get the pinwheels to keep their shape. This pinwheel and the grass were cut from designs bought in the Silhouette store. The paper is all from the Stella and Rose 6x6 paper pad from My Mind's Eye. The first version included a stamp from Inky Antics, a new stamp set I picked up from the going out of business sale at Stampin' Cat Studio (so sad to see another local store close).
But I decided to make a second version with a slightly different background paper so I changed up the sentiment too. This one is from the Birthday Wishes set from Inkadinkado.
Saturday, January 19, 2013
What a Difference Color Makes
I found this cute card on Pinterest and followed the link back to Julie Marshall's blog Stamping Impressions. I just loved the cut out hearts, but I wasn't a huge fan of the green, so I tried blue using paper from the Love Me 6x6 pad from My Mind's Eye. It was cute matched up with a sentiment stamped from Creative Imaginations' Wedded Bliss set.
But I still didn't think it was quite all I thought it could be, so I switched to a red paper from that same Love Me pad with a different sentiment, this time from from Creative Imaginations' Love set. That was the difference I was looking for.
Subscribe to:
Posts (Atom)