Showing posts with label Wink of Stella. Show all posts

Thursday, November 6, 2014

It's Your Birthday with Newton's Nook Inky Paws Challenge

Wow, it's been a while since I posted but I've headed into the busiest time of the year at work and I'm just dog tired by the time I get home every night and weekends are busy now too.  I'm sure you all know how that goes.  But I wanted to pop on here to share the card I made for the Inky Paws Challenge over at Newton's Nook.  I love their challenges almost as much as I love their stamps.  This one was all about sparkle and you know how I love that.  You can find the challenge here.

For this only slightly more than one layer card, I used a technique from a class I took a month ago to do some partial die cutting.  I stamped the oh so cute kitty in a box from Newton's Birthday Bash and colored him with my copics.  Then I very carefully cut around the kitty and slid my Simon Says Stamp Brilliant Gifts die behind it.  I cut out the present die from the card, then again from black card stock and some DCWV glitter cardstock.  Then it was just a matter of rebuilding the presents behind the kitty.  I added some Wink of Stella to the kitty's box and covered it with Glossy Accents.

Sunday, October 12, 2014

Happy Meow-oween, Take Two

After I finished my card for the Inky Paws Challenge over at Newton's Nook, I just had to start working on an idea that had been percolating while I made my challenge card.  I inked up the Newton's Day Dream stamp but then wiped off the flowers.   I then stamped it on my card stock and then again twice more on two post-it notes so I could have both sky and land masks.  I masked the kitty before I inked up the small pumpkin from Newton's Perfect Pumpkin and stamped it on both sides. I also cut two more masks for the pumpkins.  Once the kitty and pumpkins were stamped and masked, I used Lawn Fawn's Starry Backdrops inked in Versamark and then heat embossed in clear embossing powder to make the starry background.  I used a variety of Distress Inks to sponge on the background starting with Squeezed Lemonade at the horizon, adding Seedless Preserves and finishing in Chipped Sapphire at the top and then blending back down.  I wiped the excess ink off the stars and removed my kitty mask to replace it with the one to let me finish the ground.  I sponged on Shabby Shutters and Mowed Lawn Distress Ink for the ground, leaving me with just white pumpkins and kitty.

My sister's cat Gus, a gorgeous house panther, isn't doing well.  She's pretty sure he has kidney failure and, since he's 16, it's probably a pretty good guess.  She's taken him to the vet for blood work and, when I was working on this, we were waiting for the results.  So I decided that Gus would be my inspiration for this kitty.  Not much technique involved in coloring an all black kitty, but I still had fun with my new Prismacolor colored pencils and gamsol.  The pumpkins were a bit more of a challenge on the coloring scale.  I was going to finish them off with one of the pumpkin faces that come in the Newton's Perfect Pumpkin set, but, of course, I can't for the life of me find it. I had pulled it off to size the stamp for the pumpkin and then set it aside to finish the coloring and now I can't find it.  That happens to me all the time and the stamps eventually turn up stuck the back of another package or the side of my pencil case or whatever.  My bet is that it will turn up just after I finish my last Halloween card of the year....

To finish off my panel, I wanted to do something a little simple.  I bought the Simon Says Stamp Frames dies because I love the frame it cuts out.  I saw so many ways it would be useful and I thought it would be perfect for this. So first I cut the panel down using the largest stitched die from My Favorite Thing's Blueprints #13 set and then centered up the Simon Says Stamp Frame Die over my panel and die cut it.  I then die cut a white piece with the same frame.  Then it was just a matter of piecing them all back together on my card base.  Once I had it together, I added my sentiment from the Newton's Perfect Pumpkin set and washed the sky in Wink of Stella. 
After the card was done, I was left with a starry frame that was perfect to frame Chewie!  Of course, she would sit still so I could get an in-focus picture.  This was the best I could get...

Sunday, September 28, 2014

Time to Celebrate with Mojo Monday

So, as I mentioned before, I stamped out all of the Tim Holtz Simon Says Stamp Stamptember exclusive blueprints stamps and watercolored them all with Distress Ink.  So then I just had to finish putting the cards together.  Easy peasy, right?  Well, no.  I needed some inspiration for the layout.  Thankfully, there are couple of fabulous weekly sketch blogs.  Today, Mojo Monday, sketch #364 came to my rescue.  Go check it out here. 

This card came together quickly after I saw the sketch.  I used the polka dot paper from the Echo Park 6x6 paper pad Note to Self cut to the same size as the card base.  I found a coordinating pattern that I liked.  I used the postage stamp dies from Simon Says Stamp to cut out both my stamped image and a square from the paper.  For my stamped image, though, I didn't have the right size frame in the die pack.  No problem.  I made my first cut lining up where I wanted the bottom to be with the bottom of the stamp.  I then moved my piece to line up were I wanted the top to be and cut again, getting a smaller rectangle by making two cuts than the die would normally produce.

I fished a button out of my stash and finished it off with some crochet thread.  It seems a little busy to me.  I'm not really sure I like it, but it's good enough as a reminder that today is a big day to celebrate.  My parents are celebrating their 51st wedding anniversary today.  Love you Mom and Dad!

Saturday, September 20, 2014

Have a Moo-tiful Birthday!

I love that hockey season is back in full swing:  last night the home opener and tonight the first game at home in my easy chair watching on the big screen.  Yes, this is the life.

The only big dilemma in my life right now is whether to drive to Seattle on Thursday night to take Sandy Allnock's class on coloring funny people at Impress.  I so want to go, but it's a long trip and I'm a bit of a introvert.  I have a hard time sometimes convincing myself to go do new things even when I know I will enjoy it.  So in the next couple of days, I have to make up my mind.

In the meantime, I've finished up with the last of the Birthday Farm Animals stamp set she designed for Simon Says Stamp.  I've had so much fun coloring these cuties.  Today's card came together pretty quickly too.  There's a flag shaped die in the My Favorite Things Blueprints #13 that I had been looking at and thought would be perfect for the cow stamp, so I had already cut it out the other day.  Then it was just a matter of picking only two of the fun patterns in the Sunny Side 6x6 paper pad from Pebbles to build my card.  I added some baker's twine I found in my stash, a little Wink of Stella to the banner, and the now almost required Pretty Pink Posh sequins and Glossy Accents. 

Friday, September 5, 2014

The Last Baby Card with Newton's Nook Wild Child

Okay, so the title may be a bit misleading because I'm sure sometime in the future there will be another baby card from this set because it's so adorable.  But, for now, here's the last baby card I've made with the Newton's Nook Wild Child set that I colored the weekend we went to Seattle for Sandy Allnock's class.

I used paper from the Day Dreamer 6x6 paper pad from Dear Lizzy/American Crafts but I wanted to change things up a bit.  I had bought the Pretty Pink Posh Stitched Border Dies a while back with the idea of cutting some fun edges to my cards, but had yet to break them out.  I had an idea of adding the sparkly polka dots on the background of the white paper that colored the image on, but it didn't look right, so I ended up fussy cutting the image out.  I just used the patterned paper cut with the border and cut the border again on my card base. 

I used that American Crafts Project Life banner to cut out the banner to stamp with the sentiment from the set.  I added some Lawn Fawn Sky Lawn Trimmings to the top with a Glue Dot holding the bow in place. A few pop dots gave some dimension to the image and the banner.  Then I decided to try my sparkly dots on the inside bottom of the card since it would show through to the outside at the bottom.  I used a dot stencil to pounce on some VersaMark and some JudiKins embossing powder in White Diamonds.  It worked much better there, but is harder than heck to photograph with a curved front panel...
 

Tuesday, September 2, 2014

So in Love with Birthday Hogs and Kisses

I absolutely love this Birthday Farm Animals set from Simon Says Stamp designed by the talented Sandy Allnock.  I just had to order it (in fact, I mistaken ordered two to my mother's benefit).  When it came in the mail, I had to get inky.  I had been playing with copics that day but had switched to colored pencils and decided that the colored pencils would be perfect for this cute little hog. 

I picked out the pretty chevron type paper from the Pebbles Sunnyside 6x6 paper pad for this card and used the colors to help in my decision making for the balloon and hat.  I, of course, added a bit of Wink of Stella to the hat and the balloon and topped the balloon with Glossy Accents.  I used the Lawn Fawn Stitched Journaling Card to cut out my panel and finished the card off with some Doodlebug sequins in Swimming Pool.  In retrospect, I would have left of a lot of the sequins.
 

Monday, August 25, 2014

Where's the Mojo?

I've been home the last two days and yet really haven't had the mojo to get some serious crafting done.  Yesterday, I chalked it up to being tired from the whirlwind trip to Seattle.  I did some playing, but not a whole lot.  I expected today to be a marathon day in the craft room and, yet, I didn't really get much done.  I finished up a card and then decided I needed to clean my craft room a bit.  Hubby was home today so I mentioned a shelf I would like built for my craft room and we talked through a bit of a move around.  Well that, of course, meant a trip to Lowe's.  While there, I got the call that my intern died over the weekend.  I was shocked.  He had the flu last week and I sent him home to rest (and keep the rest of us from being exposed).  We emailed every day but it didn't seem like it was anything out of the usual for a flu and now he's just gone.  It seems a bit unreal.

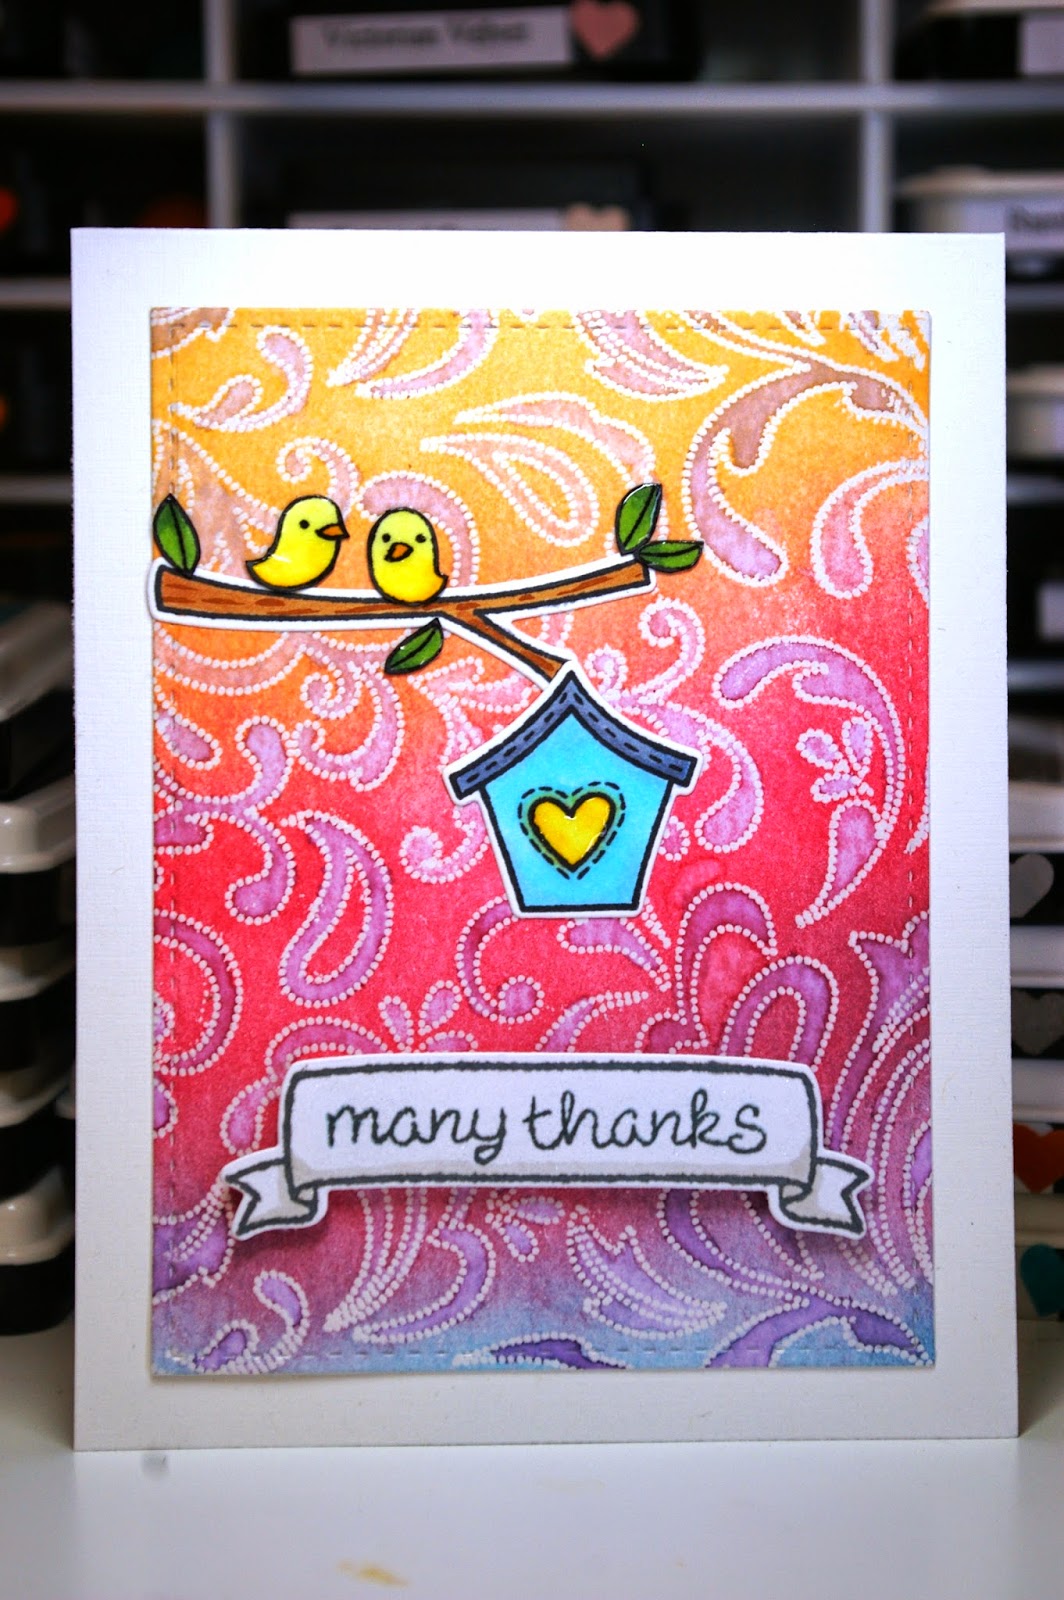
So needless to say, I'm not feeling very crafty right now.  I've finished cleaning my craft room and I think that's all that's going to get done today.  But at least I have this card I finished up to share with you.  I posted the background I was working on it back on Instagram on Sunday.  It's a background stamp I bought at Impress while I was there for Sandy's copic class.  I stamped it with Versamark ink and heat embossed it with some clear embossing powder. I sponged on three colors of Distress Ink in overlapping stripes (I just love those new mini round applicators - I get much nicer results).  Then I added some watered down Distress Ink over the flourishes but then toweled it off after a minute or so.

I cut the completed panel down with the smallest frame from Mama Elephant's Femme Frames.  I practiced my copic coloring on images from Lawn Fawn's Home Sweet Home set then cut them out (fussy cutting for the birds and leaves and dies for the branch, banner and house).  I stamped the banner in Smoke ink from Simon Says Stamp, but the rest were the standard Memento Tuxedo Black ink.   Once it was all cut out, it was just a manner of gluing them in place and adding some pop dots on the sentiment. Then because I'm obsessed with Wink of Stella and Glossy Accents lately, I added Wink of Stella to the banner and Glossy Accents to the bird, the leaves and the heart on the bird house.

Friday, August 22, 2014

Congrats!

Yesterday I found out that a friend is engaged!  So, of course, I needed to make a card and yesterday I blogged about my failed attempt.  Of course you know I was in a hurry because I needed to pack for a quick trip to Seattle to take a class by the amazing Sandy Allnock.  In fact, as this post goes live, I'll be on my way with my mom and sister for the girls' trip. 

But, I still needed a card.  I inked up the Hero Arts Antique Flower Background again and this time, changed the order of the inks and got exactly what I was meaning to have in the first card.  I found a cut for Congrats for my Cameo and cut four to layer together.  I adhered them together and then to the background and then to my card base.  I added some Wink of Stella and some Glossy Accents to finish it off.  Fun and fast!


Thursday, August 21, 2014

Sometimes a Failure is a Success

I was working on quick card tonight, but the idea I had didn't quite turn out.  I was trying to do a nice color background with Distress Ink over the Hero Arts Antique Flower Background stamp to make a quick congratulations card, when it turned out a bit grey and not at all the cheery look I was going for with this one.  Boo.  But the more I looked it, the more I thought it would work for something just a little different. 

I looked around my craft desk and saw the banner from the Dotted dies from Avery Elle and the many thanks sentiment from the Hero Arts Sending Smiles set and a new idea was born.  I made a quick banner stamped with Slate ink from Simon Says Stamp and added a little wood veneer heart (with Wink of Stella and Glossy Accents, of course) and, all of the sudden, that failed background was perfect. 

Monday, August 18, 2014

We Make Such a Pear!

Today I continued to play with my Stampendous Fresh Fruit stamp set.  I had already stamped my pear, masked it off, stamped a second and added the stems and colored the whole thing the other day.  So I just had to fussy cut the image and decide what to do it with it.  Fortunately, it all came together very quickly tonight.  I used the Femme Frames set from Mama Elephant to cut a scrap of green paper from my scrap bin and the smaller frame to cut another piece of paper from the Jillibean Soup Homemade 6 Bean Soup 6x6 pad.  I just layered these on my white card base.  I found a cute die cut called from the Pinked Elle-ments set from Avery Elle to make a cute flag for the sentiment from the set.  Then it was just adding that to the edge of my pears and adding the whole thing with some pop dots to the front on the card.  I decided to finish it off with some Wink of Stella and Glossy Accents like I had for the apple card.

You Are the Apple of My Eye

Since I managed to catch up Project Life over the weekend (love doing one month at a time), I had a little time last night to play in my craft room after cleaning it up (because why should it stay clean?). I decided I wanted to use up some stamp sets that I've bought but not really used.  I have them sitting in box near my craft desk for just this opportunity.  I pulled out one called Fresh Fruit from Stampendous and just started stamping images out in Memento Tuxedo Black ink.  I loved this apple image and the card practically made itself.  After I had stamped, colored and fussy cut the image, I pulled out my Paper Wishes Basic Notebook die and found the cutest quilt type paper in my Jillibean Soup Homemade Six Bean Soup 6x6 paper pad for the background.  I cut it down just smaller than a red A2 card base I had in my stash.  I then layered the die cut and added my sentiment.  I popped on my apple with pop dots, added a bit too much shadow under it, then topped the apple with some clear Wink of Stella and a lot of Glossy Accent.  I found some Peppermint Lawn Trimmings to tie on the top of the note paper and set it aside to dry. 

Saturday, August 16, 2014

Thanks for Things on My Craft Desk

This card was completely born from things sitting on my craft desk as I spent an evening doing odds and ends, like writing in cards, sending email, posting pictures and putting together a list of copic colors I wanted to pick up for an upcoming class.  By the time I was done, I pretty much ready to go to bed, but then I saw the Hero Arts Antique Flower Background stamp and some JudiKins White Diamond Embossing Powder sitting on my desk.  It was calling my name.  So I found a scrap of black paper, stamped it with some Versamark ink and added the embossing powder.  It was so pretty.  I cut it out with the stitched frame from Mama Elephant's Femme Frames (although you can't really tell) and then cut a white background with the scalloped frame from that set.  I wasn't sure about the sentiment, but the Scripty Thanks die from Lawn Fawn was still on my desk, so I pulled out some beautiful blue paper from Pop Tone that I've been hoarding since Paper Zone closed down and I knew I wouldn't have a local supplier anymore.  But now that I've seen how pretty the Audrey Blue paper is from Simon Says Stamp, I'm feeling more comfortable about using my stash.  I die cute the thanks several times and inlayed then stacked them.  I think if I were to do the card again, I'd put the sentiment in the bottom left corner rather than the middle.  I finished it off with some clear Wink of Stella and some Glossy Accents.

Monday, August 4, 2014

Wishing You Were Here Card Three Featuring Newton's Nook

Today is the last card with the images I stamped from the Newton's Summer Vacation set from Newton's Nook.  Because this card has a beach theme, it fits the current challenge over at Newton's Nook to make a beached themed card.  If you haven't played along yet, go check it out on their blog here.  There's still time to play along and, if you've already played along, why not do another?

I kept this card pretty simple because I absolutely loved the sunburst pattern paper from the A Perfect Summer 6x6 pad from Echo Park. After cutting that slightly smaller than my card base, I adhered it to the card.  After coloring my image, I die cut it with the Lawn Fawn Stitched Journaling Card die and added it with some pop dots to the card base.  I added some Doodlebug sequins to the corners.  I brushed the umbrella and towel with Wink of Stella and topped the sun glasses with some Glossy Accents to finish of the card. 

Thursday, July 31, 2014

Happy Bird-day Featuring Newton's Nook

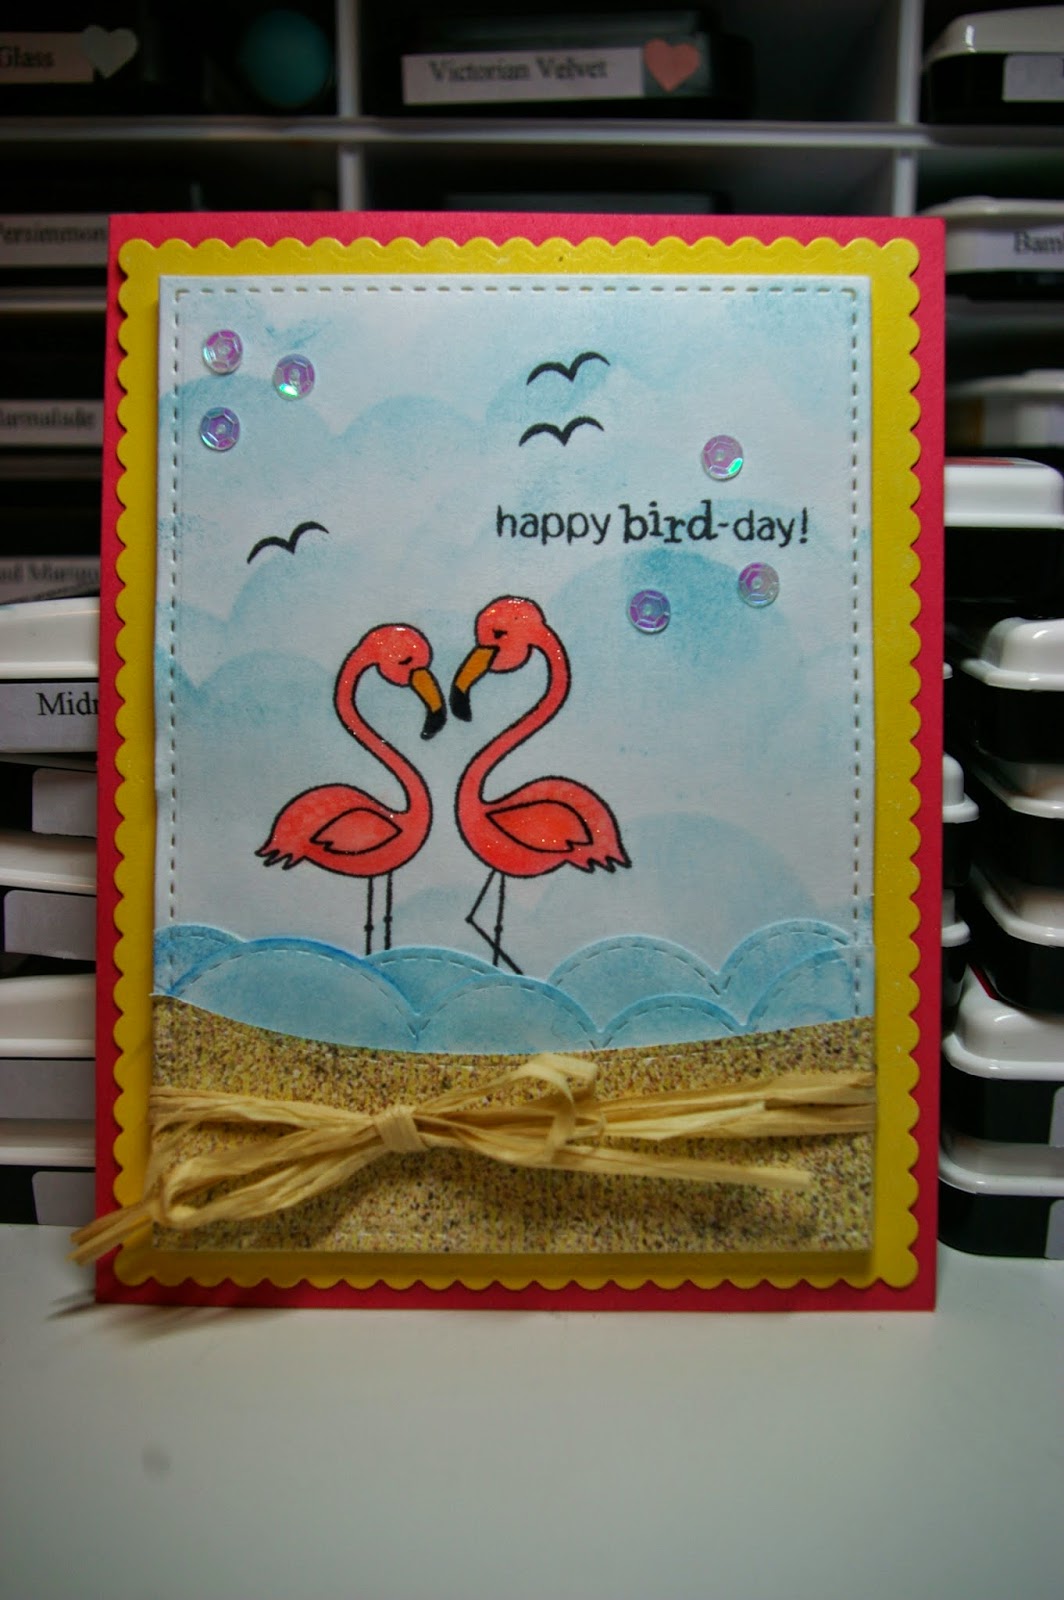
I had so much fun playing with my Newton's Nook stamps, that I thought I would keep going.  For today's card, I wanted to play with the Landscape Trio dies from Mama Elephant.  It took me forever to get these dies.  They were always sold out; I mean everywhere!  I've always thought that the scalloped one would work well for surf too so I cut it out a couple of times, inked it up with some Distress Inks and used one of the sloped dies to cut out some more of the DCWV paper for the beach.  On the background panel, I stamped the double bird stamp and colored with copics.  I covered it with a mask and used the negative from the die cuts for the surf to sponge in some background clouds in the sky.  I added a few birds to the background.  I had to cheat for these. I had pulled the bird stamp off the Flirty Flamingos set, but when it came time to stamp I could not find them anywhere!  I'm sure they will turn up when I clean off my craft desk (it's embarrassing to admit this, but this happens all the time).  So I used the birds from Lawn Fawn's Life Is Good set.  I layered everything together and then ran it through my die cut machine using the stitched frame from Mama Elephant's Femme Frames, which I also finally find this week after stalking the various websites for a long time to try to find a place where it, too, wasn't sold out (Ellen Hudson had it in the Basics set).  I then used some cute yellow paper from the Echo Park 6x6 paper pad A Perfect Summer to cut out the larger frame.  I tied some raffia around the beach and then used pop dots to place the panel on the yellow paper and adhered that to the card base.  I added Wink of Stella and Glossy Accents to the flamingos.  I added white Wink of Stella to the "surf" and some clear sequins to finish it off.  Because it's a beach themed card, it fits the challenge over at Newton's Nook to create a beach themed card.  You can find lots of inspiration on their post here.  The challenge is open until August 8th, so go check it out and play along!

Wednesday, July 30, 2014

Wish You Were Here Featuring Newton's Nook

This week and next week are going to be crazy busy at work. I'm basically covering the work of three people for two weeks and one of those weeks I won't even be in this state. So, although, we're really short handed, I decided to take last Friday off.  I had been scheduled off since the beginning of the month to use some use-it-or-lose-it time before I lose it at the end of this month and I had worked long hours all week so I really needed a break, plus hubby had the day off.  We spent some time together doing a lot of nothing, which was nice.  He worked on Saturday, so I had thought about going into the office, but I also realized that I had things around the house I wanted to get done since I knew I was going to be working long hours and wouldn't to have any time this week or next.  So I stayed home and cleaned the house, snuggled a furball or two (at the same time!) and watched a few crafty videos in between loads of laundry.  It was the perfect break to feel like I was human again and not just a working machine.  Then I it was time to spend some time in my craft room to exercise a different part of my brain with some new goodies I've picked up recently.

Specifically, Newton's Nook recently released some new (adorable) stamp sets.  I'm such a sucker for Newton so I had to pick up Newton's Summer Vacation and my sister loves flamingos so, of course, I had to get Flirty Flamingos.  When I was catching up on my blog reading, I noticed Newton's Nook had a new challenge to create a beach themed card and thought it was the perfect opportunity to play with my new stamps.  You can find out all about the challenge over on the Newton's Nook blog here.  It's open until August 8th so go check it out and play along.

For my card, I started with the Flirty Flamingos set.  I inked up the solo flamingo in Memento Tuxedo Black ink and colored it with copics.  I then created mask for my flamingo so I could sponge in some waves with Distress Ink and sponge daubers and then colored in some sand and sky with my copics.  I used the Amy Tangerine dies to cut a polaroid shape.  I stamped the sentiment from the Newton's Summer Vacation and colored in the little heart with the same copics used for the flamingos.  I remembered having some "sand' paper and found in an old DCWV Summer Stack.  I used the Dotted Die from Avery Elle to cut out that paper and mounted my "polaroid" on it.  To finish it off, I added a few Doodlebug sequins, some Glossy Accents on the floaty ring and a some Wink of Stella on the waves. 


Sunday, July 27, 2014

Sending My Love Using the July 2014 Simon Says Stamp Card Kit

I don't have much left of the July 2014 Simon Says Stamp Card Kit, but I had some leftover envelopes from a previous card that were the inspiration for this card.  I thought this full sheet of text paper was subtle enough that I could stamp directly on it.  I chose to use black so it would have the best chance of standing out.  I used Lawn Fawn's Jessie's ABCs to spell out the "my" and then used the heart from the set inked in the Lipstick Red ink that came with the kit.  I added a little Wink of Stella and some Glossy Accents to make the heart pop.  When I started putting the card together, I decided the patterned paper needed a bit of a frame, so I pulled out some random blue paper from my stash that seemed to match the pattern paper pretty well.  I then just layered up the envelopes to finish it off.


Friday, July 25, 2014

Happy Hello Card

I think this is probably one of my favorite cards of the recent batch.  I am still trying to use up the last of the Simon Says Stamp July 2014 card kit and I saved this cute hello paper (I really loved it and would have hoarded it if I wasn't so bound and determined to use up the kit).  For this card, I pulled out my Lawn Fawn Scripty Hello die and the heart die from the Large Stitched Journaling Card dies.  I die cut the hello and heart from card stock in rainbow colors plus black. I then layered them together so that from the side, there's this cute little rainbow effect.  I cut the paper down to just a bit under the standard A2 card size and adhered it to a card base from Soft Navy card stock (love that Simon Says Stamp card stock).  I then added the heart and the hello, covered them with Wink of Stella and then coated the top in Glossy Accents.  I love, love, love this card in person. 


Monday, July 21, 2014

Thanks Card Using a Watercolor Technique

The other day when I posted the card that I made trying the reverse stamping technique I saw on Catherine Pooler's blog I mentioned that I wasn't really in love with how the panel turned out originally.  So I immediately tried something a little different.  I simply painted on Distress Inks using a watercolor brush and then used my heat tool to move them around while they dried.  I loved how it turned out.  I cut it down to fit on my card with a mat.  I used a piece of black card stock to mat it before taping it to my white card base.  I used my Lawn Fawn Scripty Thanks die to cut several thanks from some extra black card stock, then glued the layers together.  I adhered that to my card front.  I used black Wink of Stella to add some shimmer to the sentiment and some clear sequins to finish off the card.

 
 Here's a close up of the layered and shimmery sentiment:

Sunday, July 20, 2014

Hello Card Inspired by Jennifer McGuire

As I posted before, I was completely enthralled watching Jennifer McGuire use Distress Inks with embossing folders.  You can see her beautiful work and check out her video here.   I immediately knew I had to give it a try by making several panels.  For this card, I used a Darice Basketweave embossing folder with my Distress Inks (this time I think Seedless Preserves, Picked Raspberry and Peacock Feathers).  Once my panel was finished, I wasn't sure what to do with it.  After all, it was the last of four panels I made using the same technique.  So it sat on my desk for while, but in the hurricane of craft products on my desk I got an idea (if you remember this picture from my social media feed):
In fact, you can see the card in progress on my craft mat.  It started with the Lawn Fawn Large Stitched Journaling Card.  It's meant to cut a 4 by 6 panel for Project Life, but I've seen it used on cards on videos and blogs (although I can't remember where I specifically saw it), so I pulled it off the card and used it to cut the panel for my card.  I then used that piece of Soft Navy card stock from Simon Says Stamp that you can see on the right side of my picture to make a card base.  I used the We R Memory Keepers Corner Chomper to round the corners of the panel to match.  For the sentiment, I cut out the word hello several times with the Lawn Fawn Scripty Hello die (see the paper on the right) then stacked them.  I brushed the finished product with white Wink of Stella for a little glitter, then adhered it to my embossed panel.  I added that on top of my card base, then finished it off with some Doodlebug sequins (although I'm not sure I like the color on the finished the card and I may switch them out for clear ones) and some Glossy Accents on the hello. 

 
 Here's a close up of the sentiment:

Tuesday, July 15, 2014

Sending Lots of Love Using the Simon Says Stamp July 2014 Card Kit

A while back I posted a picture of my craft desk with what's left of my July 2014 Card Kit from Simon Says Stamp: 
Well, actually, there's some extra there too in that some of the card stock is from own stash, but the 6x6 papers there are all that is left of the paper except for one sheet of Neenah Desert Storm card stock.  The Lawn Fawn packaging in the back was from the You've Got Mail set that I had pulled out for an idea I had for today's card.  I colored the mailbox from that stamp set and fussy cut it out.  I knew the background needed something so I used the little dotted border stamp from the stamp set in the kit and some Simon Says Stamp Fog ink (the lightest of their grey colors) to add a little grounding in the background.  I then stamped the sentiment using Lipstick Red ink that came in the kit and added the Lots of Love using some Soft Navy ink I had bought myself.  I stamped the smallest envelope stamp onto some patterned paper from the kit then fussy cut it out.  I added a little heart stamp from the kit, topped with Wink of Stella and some Glossy Accents.  Then I drew a dashed line for the envelope.  The mailbox was taped flat to the card, but I used pop dots for the mail.  I used some striped paper from the card kit for a mat and some Soft Navy card stock for the card base.