In fact, you can see the card in progress on my craft mat. It started with the Lawn Fawn Large Stitched Journaling Card. It's meant to cut a 4 by 6 panel for Project Life, but I've seen it used on cards on videos and blogs (although I can't remember where I specifically saw it), so I pulled it off the card and used it to cut the panel for my card. I then used that piece of Soft Navy card stock from Simon Says Stamp that you can see on the right side of my picture to make a card base. I used the We R Memory Keepers Corner Chomper to round the corners of the panel to match. For the sentiment, I cut out the word hello several times with the Lawn Fawn Scripty Hello die (see the paper on the right) then stacked them. I brushed the finished product with white Wink of Stella for a little glitter, then adhered it to my embossed panel. I added that on top of my card base, then finished it off with some Doodlebug sequins (although I'm not sure I like the color on the finished the card and I may switch them out for clear ones) and some Glossy Accents on the hello.
Showing posts with label Darice. Show all posts
Sunday, July 20, 2014
Hello Card Inspired by Jennifer McGuire
As I posted before, I was completely enthralled watching Jennifer McGuire
use Distress Inks with embossing folders. You can see her beautiful
work and check out her video here. I immediately knew I
had to give it a try by making several panels. For this card, I used a Darice Basketweave embossing folder with my Distress Inks (this time I think Seedless Preserves, Picked Raspberry and Peacock Feathers). Once my panel was finished, I wasn't sure what to do with it. After all, it was the last of four panels I made using the same technique. So it sat on my desk for while, but in the hurricane of craft products on my desk I got an idea (if you remember this picture from my social media feed):
In fact, you can see the card in progress on my craft mat. It started with the Lawn Fawn Large Stitched Journaling Card. It's meant to cut a 4 by 6 panel for Project Life, but I've seen it used on cards on videos and blogs (although I can't remember where I specifically saw it), so I pulled it off the card and used it to cut the panel for my card. I then used that piece of Soft Navy card stock from Simon Says Stamp that you can see on the right side of my picture to make a card base. I used the We R Memory Keepers Corner Chomper to round the corners of the panel to match. For the sentiment, I cut out the word hello several times with the Lawn Fawn Scripty Hello die (see the paper on the right) then stacked them. I brushed the finished product with white Wink of Stella for a little glitter, then adhered it to my embossed panel. I added that on top of my card base, then finished it off with some Doodlebug sequins (although I'm not sure I like the color on the finished the card and I may switch them out for clear ones) and some Glossy Accents on the hello.
Here's a close up of the sentiment:
In fact, you can see the card in progress on my craft mat. It started with the Lawn Fawn Large Stitched Journaling Card. It's meant to cut a 4 by 6 panel for Project Life, but I've seen it used on cards on videos and blogs (although I can't remember where I specifically saw it), so I pulled it off the card and used it to cut the panel for my card. I then used that piece of Soft Navy card stock from Simon Says Stamp that you can see on the right side of my picture to make a card base. I used the We R Memory Keepers Corner Chomper to round the corners of the panel to match. For the sentiment, I cut out the word hello several times with the Lawn Fawn Scripty Hello die (see the paper on the right) then stacked them. I brushed the finished product with white Wink of Stella for a little glitter, then adhered it to my embossed panel. I added that on top of my card base, then finished it off with some Doodlebug sequins (although I'm not sure I like the color on the finished the card and I may switch them out for clear ones) and some Glossy Accents on the hello.
Saturday, July 19, 2014
Thinking of You Inspired by Jennifer McGuire
As I posted before, I was completely enthralled watching Jennifer McGuire
use Distress Inks with embossing folders. You can see her beautiful
work and check out her video here. I immediately knew I
had to give it a try by making several panels. For this card, I used the Darice Heart Background with my Distress Inks (Peacock Feathers and Seedless Preserves I think) to make the lovely embossed panel. I wasn't quite sure how I was going to use it on a card, but the idea came to me when I made a mess of a my craft desk. I hate when it's messy but I do have to admit that I'm more creative when things are chaotic on my desk. Somehow the mess of supplies leads me to think of things I might not have thought of if I hadn't seen random things laying together.
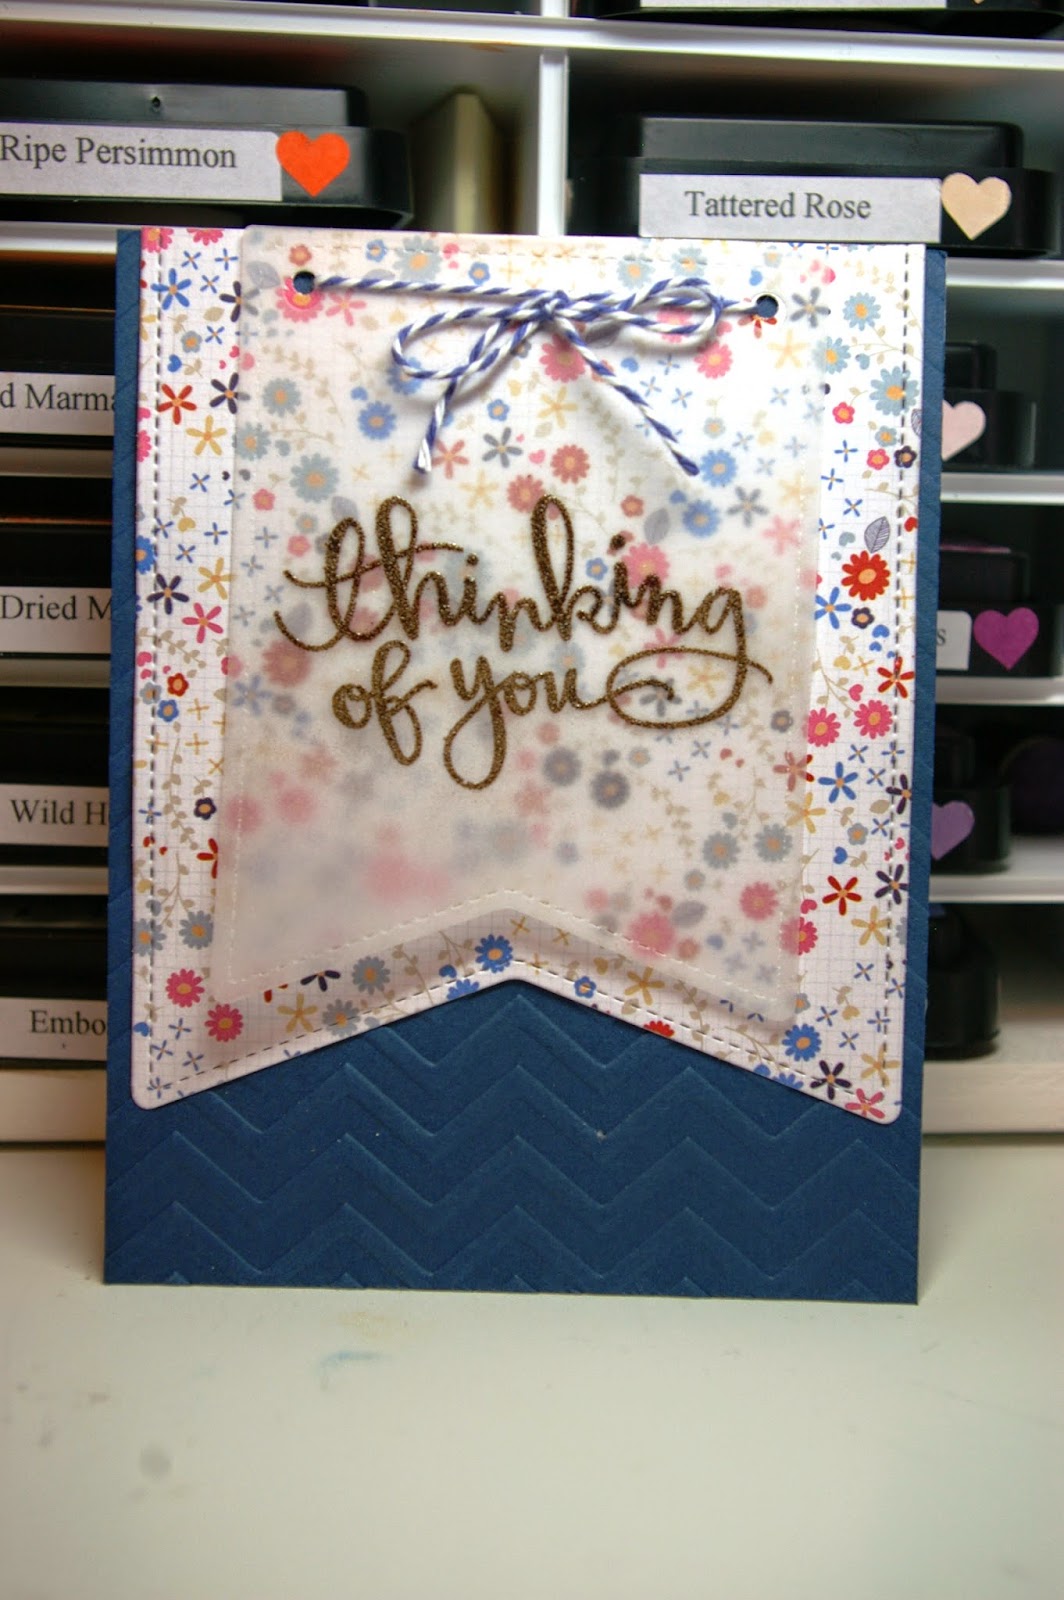
It all started with the Lawn Fawn Stitched Party Banners dies and I thought about using the smallest banner shape for my sentiment. But I didn't want to cover over all the texture and color, so I found some vellum in my stash. Fortunately, I have several weights of vellum because the first piece was way too heavy. It really was too opaque for what I wanted. But then I found the lighter weight pack and realized it was perfect. After cutting out my banner, I used the stamp from the Simon Says Stamp July 2014 Card Kit inked in Versamark and heat embossed with some Ranger Super Fine White Embossing Powder to finish the sentiment. I then marked the holes in the banner on my panel and used my Crop-a-dile to hole punch in the back panel. I used some Sky hemp cord from Lawn Fawn for a bow and then cut my panel just a bit smaller than the width of my card base made from a half of a sheet of Simon Says Stamp Soft Navy card stock. Once I had adhered it to the card base, I decided it really didn't need any further embellishment.
Wednesday, July 16, 2014
Thinking of You Using the Simon Says Stamp July 2014 Card Kit
In my quest to use up my Simon Says Stamp July 2014 Card Kit, I had another piece of floral paper that I had used with the envelope stamp, but still had quite a bit of the sheet left. I decided it would be good time to use my new Lawn Fawn Stitched Party Banners die. I used the largest banner die to cut a banner out of the floral paper. I then used the smaller banner die with vellum. I then stamped the sentiment with some Versamark ink and used Ranger Walnut Stain Embossing Powder to finish off the sentiment. I layered the banners together, hole punched some matching holes in the floral paper then tied the two layers together with some Hemptique baker's twine. I ran a piece of Soft Navy card stock from Simon Says Stamp through the Darice Chevron Background embossing folder for a little added texture. I then layered the embossed card stock on my card base and topped it off with the banner pieces I had previous tied together.
Monday, July 7, 2014
I Thank My Lucky Stars for You
I started looking through the papers in the July 2014 Simon Says Stamp card kit when I got an idea to use the paper with my Simon Says Stamp Star Parade die and a background embossed with my Darice Stars embossing folder. It turns out, I didn't use a whole lot of paper from the kit other than card stock, but I like how it turned out. For the sentiment, I pulled out the Lawn Fawn Lucky Stars stamp and used some white embossing powder to really make it pop. I added some sequins (okay a lot of sequins) to finish it off.
Thursday, June 5, 2014
Withholding Judgment
So I'm not so sure about today's card. I had this idea but it didn't quite translate the way I had it in my mind. So I'm not in love with this card. I keep looking at it thinking that it needs something, but I'm not sure just quite what. So I'm going to sleep on it and take another look at it tomorrow. In the meantime, what got me started tonight was the newest sketch over at Freshly Made Sketches, another challenge block that I stalk read every week, but haven't participated in for a while. I really liked Rita's sketch this week and I've had this Happy Trails set from Lawn Fawn that I picked up at CKC about two months ago, but haven't broken out yet. But now that I've played with the set, I really, really want to go camping, but the RV is in the shop. Boo.
I had stamped the stars from the Lawn Fawn Lucky Stars set, heat embossed the stars with some Versamark and clear embossing powder, stamped the car and trailer from Lawn Fawn's Happy Trails set, inked the starry night background and grass with some colors of Distress Ink, and had the car and trailer pretty much colored with Copics when my husband came in my craft room. He immediately commented on how cute it was (which he rarely does when something is in progress). So I felt like I was on the right track, especially when I added Wink of Stella to the starry night, but it just fell apart after that. I love the starry background embossed with the Darice Stars folder using paper from the Lemon Lush 6x6 pad from Studio Calico. I wasn't sure on the banners because I couldn't find a paper I liked, so I just colored them with a marker to match. Basically I like each of the elements by itself, but they just don't really come together right... So you just may see this card again soon when I figure out what's not quite right. Do you ever have that happen to you?
Saturday, May 10, 2014
Thinking of You - Inspired by Watercolor for Card Makers
Today's card is again inspired from the class I'm taking on watercolor for card makers. I'm a bit behind in putting together cards. I have a stack of card background done from watching the videos in the class, but I'm just now working through turning those into actual cards. Good thing too since I have a long list of cards I'm going to need this month and next.
For this first card, Jennifer McGuire, one of my favorite crafters to watch, showed how to mask a stamp to leave the stamped image uncolored against the watercolored background. While she demonstrated the true craft product to do that called liquid frisket, she also showed how to use rubber cement. Do you think I can find rubber cement? No. I've been all over town and no one has it. So this morning when I couldn't sleep, I got up and started playing with my inks. I thought "I wonder if I can be careful enough to do the technique without a mask?" Well, you be the judge...
I used one of my favorite background stamps called This is My Favorite. It's a wood mounted stamp from Hero Arts. I don't buy wood mount anymore because of the space they take, but for this one, I broke my own rule and it was a great exception. I use it all the time in Project Life and was happy to break it out for this technique. I used some Vintage Sepia Versafine ink after learning that it works with watercolors (something I previously didn't know) and then my watercolor set, which is a very inexpensive set I picked up a Michaels long before I ever knew I would be taking this class. I have a feeling that a better set will find it's way onto my wish list for my birthday or Christmas, but for now, this (less than $5 with a coupon) set is getting the job done. I finished the card off with a sentiment from Inky Antics' Delivery Benton set also stamped in the Vintage Sepia ink and some Darice sequins that were laying on my craft table. Then I just couldn't help myself, I had to put Wink of Stella on the butterflies (but you can't really tell that here).
For this first card, Jennifer McGuire, one of my favorite crafters to watch, showed how to mask a stamp to leave the stamped image uncolored against the watercolored background. While she demonstrated the true craft product to do that called liquid frisket, she also showed how to use rubber cement. Do you think I can find rubber cement? No. I've been all over town and no one has it. So this morning when I couldn't sleep, I got up and started playing with my inks. I thought "I wonder if I can be careful enough to do the technique without a mask?" Well, you be the judge...
I used one of my favorite background stamps called This is My Favorite. It's a wood mounted stamp from Hero Arts. I don't buy wood mount anymore because of the space they take, but for this one, I broke my own rule and it was a great exception. I use it all the time in Project Life and was happy to break it out for this technique. I used some Vintage Sepia Versafine ink after learning that it works with watercolors (something I previously didn't know) and then my watercolor set, which is a very inexpensive set I picked up a Michaels long before I ever knew I would be taking this class. I have a feeling that a better set will find it's way onto my wish list for my birthday or Christmas, but for now, this (less than $5 with a coupon) set is getting the job done. I finished the card off with a sentiment from Inky Antics' Delivery Benton set also stamped in the Vintage Sepia ink and some Darice sequins that were laying on my craft table. Then I just couldn't help myself, I had to put Wink of Stella on the butterflies (but you can't really tell that here).
Thursday, January 16, 2014
Flying By - Take Two
So as I mentioned, I wasn't very happy with the card that I made inspired by Lawn Fawn's blog post here. So I tried a second version. This time, I played with a technique I've been wanting to try for a while. I used my Darice Cloudy Sky embossing folder to emboss some white paper, but before I ran it through my Sizzix, I swiped the folder with some Broken China Distress Ink. Then when it came out of the Sizzix, I had white puffy raised clouds on a blue sky.
Instead of trying to stamp the little dotted lines, I stamped my sentiments on plain white paper and then cut it to resemble little banner. A quick punch of the smallest hole on my Crop-a-dile gave me a way to tie on my baker's twine so I could give the illusion of the paper airplanes flying the banners of the sentiment. I used a few pop dots to give the planes and banners a little dimension. This time I matted the whole thing with some scraps of DCWV paper form the Everyday Stack left over from making a couple of envelopes with my We R Memory Keepers Envelope Punch Board.
I honestly liked this card better (and really loved the inking technique with the embossing folder), but I still thought it needed some tweaking (and you can get a sneak peek of what's to come in the left side of the picture.
Instead of trying to stamp the little dotted lines, I stamped my sentiments on plain white paper and then cut it to resemble little banner. A quick punch of the smallest hole on my Crop-a-dile gave me a way to tie on my baker's twine so I could give the illusion of the paper airplanes flying the banners of the sentiment. I used a few pop dots to give the planes and banners a little dimension. This time I matted the whole thing with some scraps of DCWV paper form the Everyday Stack left over from making a couple of envelopes with my We R Memory Keepers Envelope Punch Board.
I honestly liked this card better (and really loved the inking technique with the embossing folder), but I still thought it needed some tweaking (and you can get a sneak peek of what's to come in the left side of the picture.
Tuesday, October 15, 2013
Oh Deer - Inspired by Owl Be Craftin' with Tracy
My father-in-law has been in the hospital and the new the recovery center for a while so hubby and I went to visit him on Sunday. I made him a get well card that we took with us. It's funny how inspiration works. I started by looking at this cute card on Tracy's blog Owl Be Crafting. As I started working on my version, I thought I would do a Christmas card and somehow it completely morphed into this get well soon card.
I started with embossing some DCWV blue card stock using a Darice embossing folder called Cloudy Sky. In then brushed on some white Color Box ink onto the clouds. I then stamped the cute little tree from the Lawn Fawn set Critters in the Forest set onto some paper from the Snap Color Vibe 6x6 paper and cut it out with the matching dies. I was about to make it snowy when the card took an abrupt turn when I saw the cute little deer from the Into the Woods set from Lawn Fawn. I just had to use it. I stamped it onto some brown card stock I added the deer on top of some greed card stock cut to look like a hill and stamped with the grass from the Lawn Fawn set Critters in the Burbs in Mowed Lawn Distress ink.
I then used the banner die from the Lawn Fawn Stitched Journaling Card to cut the cute little banner that I stamped with the Oh Deer sentiment from the Into the Woods set. For the inside, I added together two from the Stamps of Life Umbrella4you set for the perfect sentiment.
I started with embossing some DCWV blue card stock using a Darice embossing folder called Cloudy Sky. In then brushed on some white Color Box ink onto the clouds. I then stamped the cute little tree from the Lawn Fawn set Critters in the Forest set onto some paper from the Snap Color Vibe 6x6 paper and cut it out with the matching dies. I was about to make it snowy when the card took an abrupt turn when I saw the cute little deer from the Into the Woods set from Lawn Fawn. I just had to use it. I stamped it onto some brown card stock I added the deer on top of some greed card stock cut to look like a hill and stamped with the grass from the Lawn Fawn set Critters in the Burbs in Mowed Lawn Distress ink.
I then used the banner die from the Lawn Fawn Stitched Journaling Card to cut the cute little banner that I stamped with the Oh Deer sentiment from the Into the Woods set. For the inside, I added together two from the Stamps of Life Umbrella4you set for the perfect sentiment.
Tuesday, July 16, 2013
Butterfly Birthday Card
I needed a birthday card but realized I was out so I did a little trolling of my Pinterest board for cards to find some inspiration and settled on the Hugs and Kisses card by Jane Beljo posted on the "Create" blog. I used my Silhouette to cut three sizes of the butterfly then ran the largest and smallest through a Sizzix embossing folder. For the background, I used some Jillibean Soup paper and a scrap of brown to punch a border with an EK Success border punch. I found a scrap of ribbon in the drawer although I have no idea where it originally came from but it was perfect for this paper. I added a sentiment stamped with an old Fiskars stamp I found when sorting through my stamps the other day (part of that challenge to use all one's stamps or stamps sets or purge them) and then finished it off with some rhinestones from Darice.
Friday, June 21, 2013
Yet Another I"m Wild About You Card
I just couldn't resist lifting this beautiful card I found on the Lawn Fawn blog for the release of the Critters on the Savannah stamp set. I just had to try my hand at it and it gave me another chance to use my Spectrum Noir pens. I am really starting to love those pens. I forgot how much fun it is to color.
For this card, I used the giraffe that I had colored when I cut the whole set, but then I got to have fun stamping and the coloring the background using a mask to stamp the multiple trees. The only thing I regret is that I put the grass background just a little too high. But other than that, I love the card, particularly the little Darice studs in the bottom corner.
Sunday, June 2, 2013
Congrats Grad Layout
During Week 21 of Project Life, we celebrated my sister-in-law graduating from college. While at her party, I took a great picture of her and my mother-in-law hugging. I knew it needed to have it's own layout in the week. I started my scrolling through my Pinterest board of scrapbook layout ideas where I pin pages and sketches that I think will inspire me. That's were I found a page created by Rhonda of Scrappity Dappity Doo based upon a sketch posted by Quick Quotes. I thought it was the perfect place to start.
I again used the Basic Grey Fact line I've been using for my Project Life pages for Week 21. For this layout, I used some of the paper to cut a tag and created a hidden envelope for it. A bit of baker's twine makes it easy to slide it out of the hidden pocket. I took a heart from the 11 Hearts by Lori Whitlock set in Silhouette (Design ID #24813) and opened the nodes. I moved a few of the nodes around to get a more stylized heart. I then duplicated it and move a bit of the nodes on the second one so they would be similar, but not exactly the same. Then it was just cutting my scraps, layering them together until I had a layout I liked. I added my favorite brown Thickers called Marquis and then finished it off with some Darice studs in a brown color. This was my finished page:
Labels:
American Crafts,
baker's twine,
Basic Grey,
Darice,
Design ID # 24813,
Fact,
Hemptique,
Lori Whitlock,
Marquis,
Pinterest,
Project Life,
Quick Quotes,
Scrappity Dappity Doo,
Silhouette,
studs,
Thickers
Saturday, June 1, 2013
Craft Room Upgrade Layout
For Week 21 of Project Life I knew I wanted to do a layout commemorating the work we've done on my craft room lately. I had some video footage of our cat Chewie climbing the ladder we had in the room to replace the light fixture and a picture of another of our cats, Smoke, climbing the ladder that I wanted to include. I saw this really great idea of using a QR code to access videos stored on YouTube that I thought I would give a try. I simply uploaded my video to YouTube then fed the web address into a QR code generator program. I then printed the QR Code it gave me onto paper (I used photo paper) and added it to my layout. Now all I have to do is open up my code reader app on my phone or iPad to watch Chewie climbing the ladder any time I want. It was super easy to do so I'm pretty sure you are going to see a lot more QR Codes showing up in my layouts and in Project Life in the future.
For the layout, I was inspired by a sketch from the Sketch Savvy blog from April. I used paper from the Basic Grey Fact line to match my Project Life layouts for the week since this page would be inserted into that part of my book. I used the Eric Thickers for my title (I just got these at Michaels earlier this week and I was excited to use them). The little tab above the middle picture and the chevrons on either side of the title were cut from files I bought for my cameo and I finished it off with some hand stitching across the bottom using some Hemptique baker's twine. It was super easy to do because I was able to easily poke evenly spaced holes using my new Tim Holtz Ideology rule (that I also picked up at Michaels this week with a coupon so I could replace my beloved E K Success ruler that I've used so much that the markings are starting to disappear). I wasn't completely happy with it but then I added a few Darice gems and it all just seemed to look right.
So here's what it looks like now that it's in the book:
Tuesday, May 21, 2013
Thinking of You card
I found a little time in my craft room to scraplift this delightful card I found on the I Create blog. I loved the simple style and I could not believe how quickly this card came together. I made the flower out of some leftover scraps from the mat stack Mango Frost by DCWV. I ran it through my Big Kick using the Provo Craft Asterisks dies. I finished it off with a sentiment from the All Occasions set by Inkadinkado. Then it was just a little pen work, an Eye Candy gem and some little gems from Darice to finish it off. Quick, easy and cute!
Friday, May 3, 2013
Fly High
Today I'm sharing another card I made from inspiration found while browsing through older posts on Rita's Creations. She made this delightful kite card that I just loved. I don't have the stamp set she used, but I did have a kite shape to cut on my Cameo. I used my french curves to draw the hills out of a piece of paper from the Sunny Side 6 by 6 pad by Pebbles. I couldn't draw a straight or curved line to save my life without a straight edge or a french curve. I used a Darice embossing folder called Cloudy Sky for the background. The blue and white papers are from my scraps stash. The brown cardstock has a linen texture and is from the Paper Company. The green background paper is from the 6 by 6 paper pad called Vanity Fair by My Mind's Eye. I used some baker's twine from Hemptique to finish it off. I haven't added a sentiment yet. I think I'll probably save that for the inside only on this card.
Tuesday, April 30, 2013
Rainbow Birthday Wishes
I absolutely loved this card I found via Pinterest from SplitCoast Stampers from Yours Truly. She tells the story of having to rescue the rainbow from her card when she messed up stamping the sentiment (now who hasn't done that before?), but I think her "rescue" turned out amazing and I just had to try it for myself. I used seven shades of Distress Ink and a lot of post-it notes for masking. I love how it turned out with the Darice rainbow studs sprinkled on it. The sentiment is from that Inkadinkado Garden Flowers stamp set. It's funny how many stamps sets I have with sentiments, but I find there are several that I use all the time: this one and the Fiskars All Occasions set are probably the most used sets I own. I added a few more studs and little dot of Stardust Stickles to finish it off. Quick, easy and adorable!
Saturday, April 13, 2013
Hallie's Birthday Card
Yesterday, my eldest niece finally got her birthday card and I realized I had not posted it yet. It was a fun card inspired by this post on Beak Talk. I wanted to make sure it was in fun bright colors so decided to use the Sunny Side collection from Pebbles. I just love the colors and patterns in that 6 by 6 pad. For the background I used the Large Petal embossing folder from Darice. The sentiment comes from the Fiskars set All Year Greetings. I just love that set. It's so versatile. But the card still needed a little something, so I added some Diamond Stickles for a little bit of bling. What girl doesn't love a little bit of bling?
Friday, April 12, 2013
Happy Birthday Rayna
My youngest niece turns 11 today, so I made her a sweet card to celebrate. I took my inspiration from one of my favorite blog, Karen Thomas' Luv to Stamp. Karen took a bit of a break from blogging and I'm so happy to see that she's back. I love her style so much.
For this card, I used some paper I picked up from Paper Zone just before they went out of business (oh how I miss that store). I cannot for the life of me remember the manufacturer, but I love it's flecked tones. The pick paper is a Pop Tone that Paper Zone used to sell too. The burgandy-ish (is that even a word?) color is from DCWV. The ribbon I picked up on sale at Michaels quite some time ago. The washi tape I bought there much more recently. I'm pretty sure the heart tape is from Recollections and the pink tape is either from Queen and Co or Recollections. The butterflies were cut on the Cameo using the Echo Park design and the shape is one that I bought from Silhouette and altered on the Cameo. I embossed the smallest butterfly with an embossing folder from the "Phrases" set by Darice. I think it's so wonderful that you would never know that the embossing on there is the beginning of the word "Thank." The sentiment is from a Hero Arts set I bought at Michaels. I finished it off with a few Liquid Pearls and called it good.
Friday, March 1, 2013
Wood Grain Fun
I've wanted a wood grain patterned embossing folder for a long time, but no one sold one in town and I never got around to buying one off the Internet. But I was at Craft Warehouse the other day and was so happy to see that they are carrying a whole line of Darice embossing folders. I just couldn't help but buy the wood grained pattern I had wanted for so long. So then when I was trolling Splitcoaststampers where I stumbled across this fabulous masculine valentine using wood grain, I just had to try my own hand at it. I embossed the card, then cut out a heart using my Cameo. I then drew in some texture in the opening using my colored pencils and added my "carving." I finished it off with a metal piece from my stash and some Martha Stewart baker's twine. Pretty simple to do but I love the masculine feel of it.
Turns out this was hubby's favorite card of them all.
Wednesday, December 12, 2012
Loved this one...
I just loved this card that I found on Pinterest and followed through to the original source here. It was so beautiful. I completed missed the white on white background, but I like how my card turned out. I modified a butterfly pattern I had purchased in the Silhouette Design Studio store. Then cut it out in a rainbow of colors, added some lovely Darice and Imaginesce gems, stamped my sentiment from the Inkadinkado All Occasions set and then finished it off with some dots of black ink. So pretty!
Monday, December 10, 2012
Another Happy Birthday
Here's another in my quest to finish off my card list. This time, I'm inspired from another find on Pinterest that led me to Arlene of Waterdots. This simple and elegant card was easy to make. I immediately recognized the Spots and Dots embossing folder from Cuttlebug. I rounded the corners with my Crop-A-Dile Corner Chomper. The sentiment is again from the All Occasions set from Inkadinkado. I added some Martha Stewart Crafts baker's twine and a few metal dots from Darice to finish it off. Fun and fast. Just the way I like them.
Subscribe to:
Posts (Atom)