After the memorial on Saturday, the hubby and I attended my boss', although I really consider him a friend, wedding. This one has been a long time coming and I was delighted to attend (even though I'm really not a fan of social events and get really anxious about them). It was an Episcopalian ceremony. I've never attended one and it was quite beautiful (although the incense was a little much for my head). It was an amazing sight to see him so happy and so in love.
The reception was nice. It was a beautiful night outside. I tried the pear cider (delicious) and chatted with some co-workers. Kids ran around playing with a basket of balls that David brought out for them. It was such a beautiful night and the best part was seeing David so very happy. I can't think of a more deserving person.
I decided to make a card for him (he very specifically said no gifts). I thought about doing something whimsical, but then changed my mind for something more formal. I don't have many traditional wedding stamps, but I did find this delightful silhouette in an Inkadinkado wedding set. I used some Verafine Onyx Black ink and heat embossed it with some clear embossing powder. I used a dies from my new My Favorite Things Blueprints #13 set for the flag. I embossed the vellum with a Victorian folder from Cuttlebug and then used the large stitched die from the Blueprints set to cut it down to size. I stamped the sentiment on the card base using a stamp from the Simply Sentimental set from Newton's Nook. Then it was a matter of laying it together, added a little Lawn Trimmings in Silver Sparkle to finish it off.
Showing posts with label Inkadinkado. Show all posts
Monday, September 15, 2014
Saturday, June 7, 2014
Looking for My Mojo
I just don't get it. I have the whole day to myself because hubby has catering to do today. I've been looking forward all week to a whole day to play in my craft room without feeling guilty about taking away from time we could spend together. Now that it's here, apparently my mojo took the day off just when I had planned to make a handful of cards to have ready to encourage my friend as she goes through her upcoming surgery and chemo and reconstruction. I could be in my craft room, but I've been folding clothes, changing sheets on the bed, trying to fix a slow drain... When cleaning the house appeals more than playing with paper, something is wrong. Does this ever happen to you? If so, what do you do about it?
I've got my usual tricks: reading blogs, watching YouTube videos, surfing Pinterest and remaking something someone else has done. But I think my favorite is shopping. I just love shopping for new supplies (as evidenced by my craft room), but there's a pretty limited selection here in town so I'm forced to look online for a lot of my supplies. So today, when I couldn't really find my mojo, I noticed that Simon Says Stamp was running a 20% off sale on their branded products (use code "Twenty" through 11:59 EST on 6/8). I found some things I like and have wanted for a while, put them in my cart, got all the way to the checkout and stopped. I still don't know why. I know that each of things I picked out are things I will love to play with and am excited to play with, but I just stopped. So weird.
But, maybe just the act of shopping did the trick. I started playing with my Art Impression watercolor stamps and Distress Markers. Just as I finished a panel, I heard the buzz of the dryer. So I set the panel aside and headed off to fold some more laundry. When I got back, I discovered that I must have set the panel on a slight angle because some of the water ran and pooled, ruining part of the design. Grrrrrr..... After thinking about tossing the whole thing, I decided I would try to save it by covering the puddled ink with a banner with a sentiment stamped from the Inkadinkado All Occasions set on some watercolor paper. I then matted it with a pop of red and then used a pre-made card base in a swirl pattern. I'm not sure it's totally successful, but maybe it will grow on me and hopefully my mojo will return.
I've got my usual tricks: reading blogs, watching YouTube videos, surfing Pinterest and remaking something someone else has done. But I think my favorite is shopping. I just love shopping for new supplies (as evidenced by my craft room), but there's a pretty limited selection here in town so I'm forced to look online for a lot of my supplies. So today, when I couldn't really find my mojo, I noticed that Simon Says Stamp was running a 20% off sale on their branded products (use code "Twenty" through 11:59 EST on 6/8). I found some things I like and have wanted for a while, put them in my cart, got all the way to the checkout and stopped. I still don't know why. I know that each of things I picked out are things I will love to play with and am excited to play with, but I just stopped. So weird.
But, maybe just the act of shopping did the trick. I started playing with my Art Impression watercolor stamps and Distress Markers. Just as I finished a panel, I heard the buzz of the dryer. So I set the panel aside and headed off to fold some more laundry. When I got back, I discovered that I must have set the panel on a slight angle because some of the water ran and pooled, ruining part of the design. Grrrrrr..... After thinking about tossing the whole thing, I decided I would try to save it by covering the puddled ink with a banner with a sentiment stamped from the Inkadinkado All Occasions set on some watercolor paper. I then matted it with a pop of red and then used a pre-made card base in a swirl pattern. I'm not sure it's totally successful, but maybe it will grow on me and hopefully my mojo will return.
Monday, May 26, 2014
Thinking of You
The inspiration from this card came from a mash-up of two sources: the card Kristina Werner made with Ferro and some heat embossing on vellum that Nichol Magouirk did in a recent video. But for my card, I didn't use Ferro this time. Instead, I used two products that have been sitting in my stash for a couple of weeks from some recent sale shopping I've done: Claudine Hellmuth Studio Multi-Medium Matte and some Distress Stickles dry glitter. I used the Heidi Swapp dotted stencil, brushed on a layer of medium, lifted my stencil, cleaned it and sprinkled on the glitter. Once it dried, I trimmed the piece to fit my card base with a small mat. Then I stamped the tag from Lawn Fawn's Winter Gifts set with Versamark and heat embossed it with white embossing powder. Then I added the sentiment from Inkadinkado's Expressions and Frames set following the same method. To finish it off, I decided on a red poppy when scrolling through my cut files in my Cameo library. I loved this one and I think it was just the right finishing piece (with a little Wink of Stella in the center of course).
Saturday, May 24, 2014
Happy Birthday - Inspired by Kristina Werner
There are a handful of people in the crafting industry that I find seriously inspiring: Jennifer McGuire for her endless supply of techniques she teaches, Nichol Maguoirk for her amazing use of colored pencils and Gamsol, Vicky Papaioannou for her fabulous art journal pages (and lovely accent), Michelle Short for her clean and simple style (and lovely accent), Catherine Pooler who is a new discovery for me and I'm loving her personality, Ali Edwards for her thoughtfulness, Melissa Stinson who introduced me to Citrus Twist kits (I'm still heartbroken that she's "retiring" because she and Michelle have shown me that one doesn't have to be formally trained and can have a "day job" - or in Michelle's case a day job and school on top of it - and still be quite amazing)... Oh, I'm sure there a few others that I'll be kicking myself later that I didn't mention, but if I couldn't only see one artist's work for inspiration, it just might have to be Kristina Werner. I've only been stalking following her for a while now, but I'm constantly amazed by how fabulous her work is both in the products she designs but also in her coloring and finished cards. They are simply amazing. I've been so inspired to try to so many of the things she's done (although my budget might squeak a bit at how much I ended up buying because of it).
For today's card, that's exactly the case. I saw her use Ferro to make a simple card the other week. Although I had seen Ferro used before in someone else's video, it was her video that has stuck in my mind. So when I popped into Runaway Arts and Crafts during my lunch walk last week to get hydro cortisone, I was so excited to see several bottles of Ferro in beautiful colors, but I was drawn to the Steel bottle. So pretty.
So, for today's card, I made the background with the Ferro and a simple dotted stencil from Heidi Swapp. I adore how pretty it is in real life. For the focal point, I wanted to replicate this cute tag I saw Kelly Marie Alvarez of Lawn Fawn make in a recent release video. I stamped the tag from Winter Gifts, fussy cut out the inside and then used the Color Box Dahlia Art Screen with some Distress Ink to get the cute petals on the tag. Then I stamped the tag again, die cut it with the matching dies and glued my "internal" tag portion on top. I added the Happy Birthday stamp from the Inkadinkado Framed Expressions set stamped in Archival ink over the top then finished it off with pop dots and a scrap of ribbon.
For today's card, that's exactly the case. I saw her use Ferro to make a simple card the other week. Although I had seen Ferro used before in someone else's video, it was her video that has stuck in my mind. So when I popped into Runaway Arts and Crafts during my lunch walk last week to get hydro cortisone, I was so excited to see several bottles of Ferro in beautiful colors, but I was drawn to the Steel bottle. So pretty.
So, for today's card, I made the background with the Ferro and a simple dotted stencil from Heidi Swapp. I adore how pretty it is in real life. For the focal point, I wanted to replicate this cute tag I saw Kelly Marie Alvarez of Lawn Fawn make in a recent release video. I stamped the tag from Winter Gifts, fussy cut out the inside and then used the Color Box Dahlia Art Screen with some Distress Ink to get the cute petals on the tag. Then I stamped the tag again, die cut it with the matching dies and glued my "internal" tag portion on top. I added the Happy Birthday stamp from the Inkadinkado Framed Expressions set stamped in Archival ink over the top then finished it off with pop dots and a scrap of ribbon.
Tuesday, October 29, 2013
An Inky Thank You
I just had to do one more card with the Inky Antic's Delivery Benton set. I really do love this set and I'm sure I'll be pulling it out again soon even after the use it's seen the last couple of days. It's the same combination of Versafine ink, embossing powder and Spectrum Noir pens. I opted for a sentiment from the Inkadinkado Thank You Words stamped in Versafine ink for the sentiment and added a strip of American Crafts ribbon I found in my stash that seemed to be just the perfect blend of colors.
Wednesday, July 17, 2013
Swallowtail Thank You Card
The hubster had to work on Saturday because they had a busy day of caterings. He then went on to explain that it was even busier than expected because one of the employees was in a car accident while making a delivery. He asked me to make a thank you card for a woman who witnessed the accident and stayed to get the employee some help. I knew just the card I wanted to try. I saw it on Julie Davidson's blog recently and was excited to try it out. It's a cute card, but let me tell you, it took some work. The outside was pretty easy. Just stamp the Stampin' Up Swallowtail stamp with some Momento Espresso Truffle ink. Then, I just colored my little heart out with some colored pencils. I added the sentiment in the same ink using a stamp from Inkadinkado's Thank You Words set. Then I mounted that on some pink paper from Authentique's Lively collection in the 6x6 pad.
Then I had to set that aside to work on the card base and the inside. I drew out the card base in Silhouette and added a quarter inch extra to the long side to give me room to sandwich the two sides. I added a perforated line at the standard 4 1/4 inch to fold the extra 1/4 inch part easily. Then I duplicated it and horizontally flipped it so I would have two mirrored sides to sandwich together so it looked like this:
I cut that out of card stock and used my bone folder to fold over the small flaps so that they would be inside the card. I then cut seven large and small butterflies with three of each size flipped horizontally so they could be sandwiched together. The larger cuts worked with the large butterfly in the Teresa Collins Spring Fling stamp set. Once they were stamped, I sandwiched the mirrored stamps with a clear acetate strip between them so they would "float" and set them aside to dry. I skipped the stamping on the smaller butterflies and made just two sandwiches of those with the acetate. I did a little more coloring on the larger butterflies. Then, using really sticky tape, I taped the acetate holding the butterfly sandwiches to the flap of one card and then stuck the two halves of the card together. I punched two pink border strips from the same pink paper and glued those to either side of the flaps to hide them. I used the extra butterflies on the card base. The card is super cute, but a lot of work!
Friday, July 5, 2013
Thanks Watercolor Card
Yesterday I shared a card I made using watercolor. It was my first time playing with that technique. I decided to take my "practice" piece and turn it into a card even though I thought it was pretty basic looking. Although I didn't originally plan to use it, I think there's something magic in our first efforts at something. They usually are never the best we ever do (unless it's our last attempt), but firsts are special. So I thought I would turn it into a card for someone special. I'm sure she'll appreciate what it's like to make a first attempt. I added just a touch of glitter with the Zig brush I talked about yesterday and some Hemptique twine. Once it was all put together, I realized I actually liked it.
Saturday, June 15, 2013
Happy Birthday Card Inspired by Our Change of Art
I'm back to share yet another card for last week's birthdays. I had another co-worker's birthday to celebrate and I wanted something colorful for her, so when I saw this card by Jennifer Rzasa on Our Change of Art, I knew it would be the right choice. I decided to use the Sunnyside 6x6 paper pad by Pebbles for this card because of the bright and pretty color palette. I created the shape in the Silhouette software by drawing a square with curved edges and then placing smaller squares in opposite corners to form the peaks. Then I welded it together and created a shadow for matting. Easy peasy lemon squeezy.
Then all I had to do was cut my seven shapes and seven mats, glue them together and adhere them to the card with pop dots. I stamped the sentiment from the Inkadinkado Expressions and Frames set and it was done. Fun and quick!
Sunday, June 9, 2013
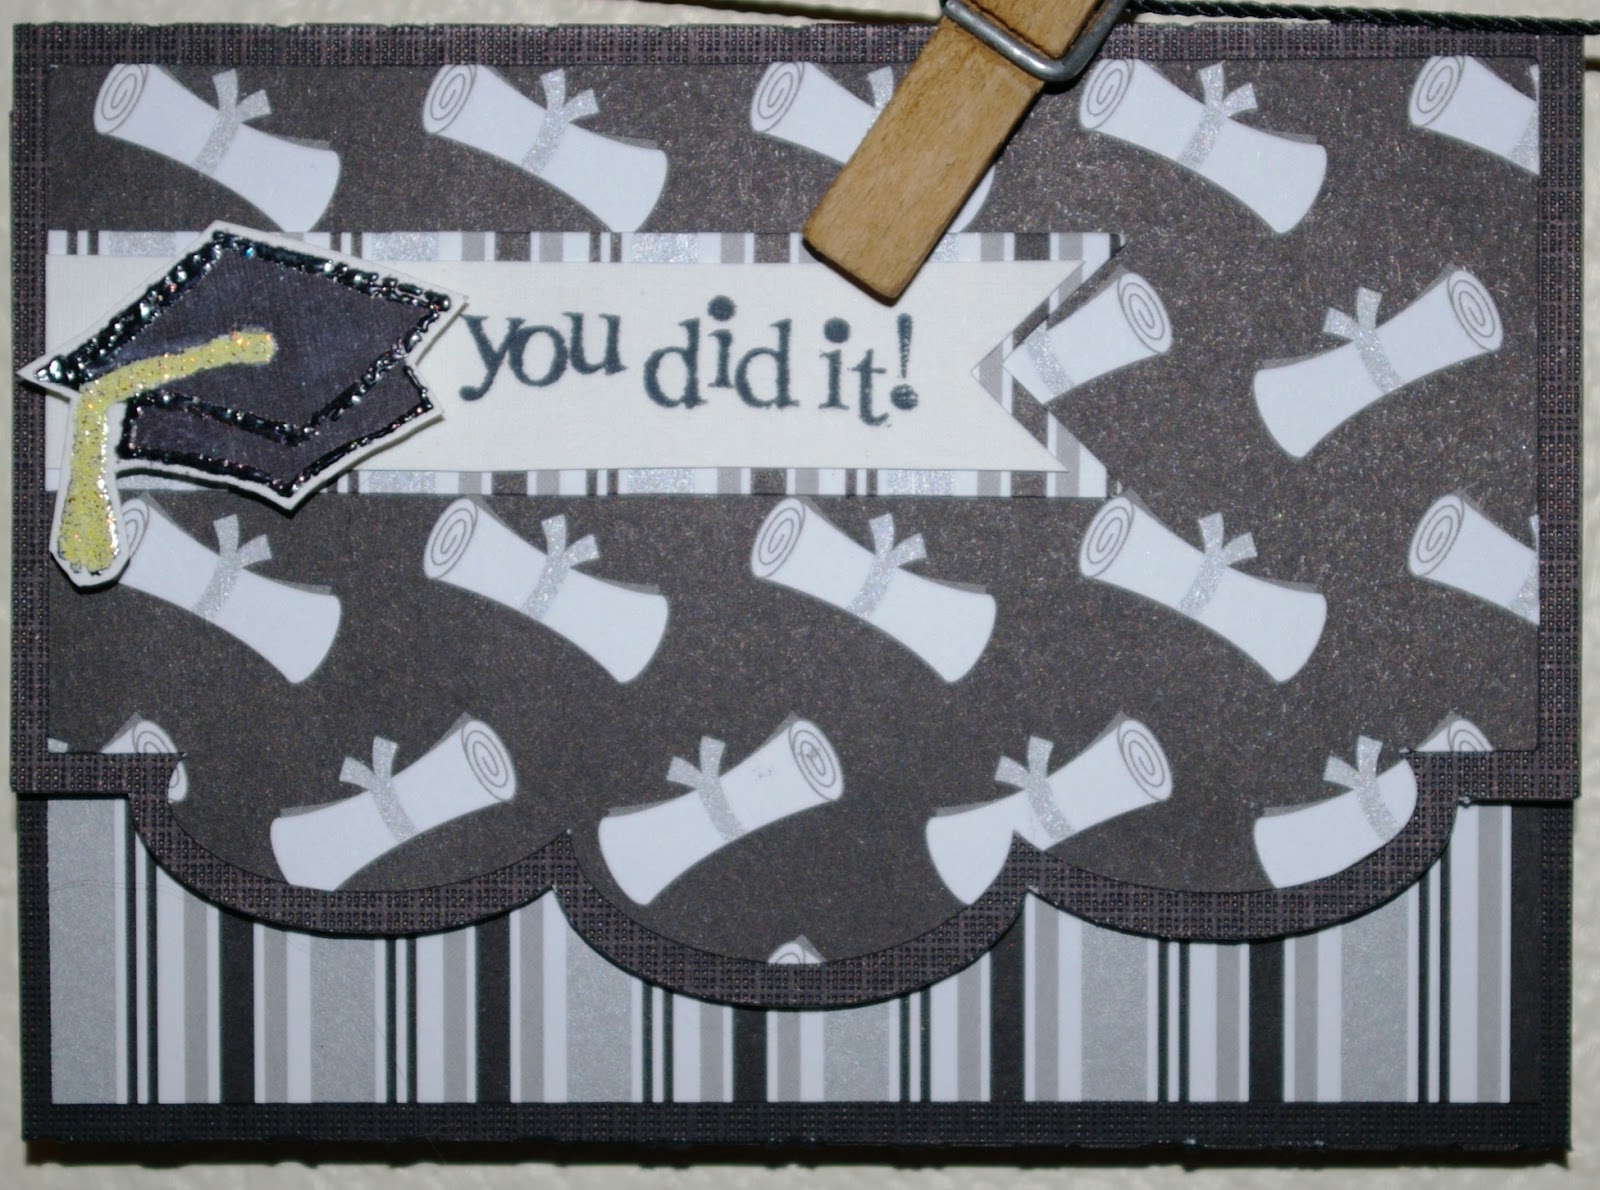
Congrats ... You did it!
This post is courtesy of my sister-in-law who was kind enough to send me a picture of the card because, silly me, I gave it to her before I took a picture of it.
I was browsing our local Craft Warehouse where I found the cutest graduation paper from Doodlebug. So I snapped up a piece of their Diploma Day paper from the Cap and Gown collection. So cute! Then I trolled for inspiration and found it in this card by Flowerbug's Inkspot. It was also a good opportunity to breakout a stamp set I bought a while back knowing that this day was coming: TPC Studio's Graduation set. I also used a sentiment on the inside from the All Occasions set from Inkadinkado. I can't believe how often I find myself pulling that set out. It really is quite versatile. I also took this opportunity to use a card base from the DCWV Shimmer box of cards. I always seem to forget that I have these, but I noticed them on the shelf when I was hunting out the DCWV shimmer paper I used for the red around the circle. It seemed like a match made in heaven.
Friday, June 7, 2013
A Graduation Card Inspired by Doodlebug Design
I was trolling Craft Warehouse for supplies and found this great graduation paper from Doodlebug Design. Knowing that I was going to need a few graduation cards this year, I bought a sheet of the paper called Cap and Gown. I then started surfing my Pinterest board with card inspiration ideas and found that I had actually pinned some ideas from Doodlebug Design's blog. Once I saw this cute money holder card, I knew what I was going to be trying my hand at. I found a card I had in my Silhouette designs (3 scallops edge card - although I could not find in the store today when I was looking for the design number). I thought it was the perfect base. I then cut out the card base out of black card stock and cut the Doodlebug paper for the top of the card. I stamped the cap out of my TPC Studio Graduation set and embossed it in black and then the tassel in yellow. I colored the cap in with some Spectrum Noir pens to finish it off. The sentiment was stamp with my new Momento Brilliance ink on a sentiment from the All Occasions set from the Inkadinkado and finished it off perfectly.
Tuesday, May 21, 2013
Thinking of You card
I found a little time in my craft room to scraplift this delightful card I found on the I Create blog. I loved the simple style and I could not believe how quickly this card came together. I made the flower out of some leftover scraps from the mat stack Mango Frost by DCWV. I ran it through my Big Kick using the Provo Craft Asterisks dies. I finished it off with a sentiment from the All Occasions set by Inkadinkado. Then it was just a little pen work, an Eye Candy gem and some little gems from Darice to finish it off. Quick, easy and cute!
Thursday, May 9, 2013
Your Fortune Is... Love
For National Scrapbooking Day, I did a little shopping and picked up a cute Lawn Fawn stamp set called Good Fortune with matching dies. Coincidentally, that night I was trolling through the blog posts from the week when I found this cute card using the set on the Lawn Fawn blog. So I was inspired to pull out the set this week and try my hand at a card using this set.
I stamped the carton and thought it needed a little sprucing up. So I took the solid heart from the set and jazzed it up. I then stamped, colored and cut the chopsticks to go with it. I finished it off by cutting and coloring two of the cookies and made sentiments to fill them using the little stamps included. I used more of the Love Me 6x6 pad paper from My Mind's Eye to mat it and added some Martha Stewart baker's twine. But I still thought it needed a little something, so I cut another cute little tag on my Cameo and stamped the love stamp from Inkadinkado Heartful of Love set. Fun and cute!
Wednesday, May 8, 2013
Love Card
It's a busy week so I needed a little "down" time and when I saw this card on Pinterest, I knew it was the perfect way to wind down and I loved the non-traditional colors for a love card. So I checked out Allison Ohran's blog Sweet Impressions. She's got a lot of cute inspiration there. Tonight, I think being tired probably hurt my creativity. I started with stamping some hearts, but I didn't have my heart in it (okay so I'm so tired I'm making puns now). So I switched over to some super cute paper from the Love Me 6x6 pad from My Mind's Eye. I actually love this set so much that I bought two of them (it didn't hurt that they were a super good buy too). So I cut the hearts and heart shadows out with my Cameo. I found a cute little tag to cut too. Then I stamped the word love from my Inkadinkado Heart Full of Love set. Then I finished it off with some scrap paper for the base, mat and background and ran the background through my Honeycomb Cuttlebug folder and put it all together with some sparkly crochet thread since I didn't have the right baker's twine.
Tuesday, April 30, 2013
Rainbow Birthday Wishes
I absolutely loved this card I found via Pinterest from SplitCoast Stampers from Yours Truly. She tells the story of having to rescue the rainbow from her card when she messed up stamping the sentiment (now who hasn't done that before?), but I think her "rescue" turned out amazing and I just had to try it for myself. I used seven shades of Distress Ink and a lot of post-it notes for masking. I love how it turned out with the Darice rainbow studs sprinkled on it. The sentiment is from that Inkadinkado Garden Flowers stamp set. It's funny how many stamps sets I have with sentiments, but I find there are several that I use all the time: this one and the Fiskars All Occasions set are probably the most used sets I own. I added a few more studs and little dot of Stardust Stickles to finish it off. Quick, easy and adorable!
Monday, April 22, 2013
Thinking of you card
When I saw all the amazing cards with the Swallowtail stamp from Stampin' Up, I just had to buy that stamp. I broke it out tonight and started playing with it. I found a cute card on Pinterest and traced back to the source at the Flowerbug blog. I skipped the heat embossing and went just with Chocolate Chip ink on cardstock. I love that. The whole card actually came together very quickly, but used four different stamp sets! Of course, there was the Swallowtail stamp from Stampin' Up. For the sentiment, I used an Inkadinkado stamp set called Expressions and Frames. The small butterfly is from the Teresa Collins Spring Fling Stamps set. Finally, the floral stamp is from the Heidi Grace Designs set called Paradise. I cut a vellum butterfly on my Cameo using an Echo Park design purchased in the Silhouette store. I added some ribbon from my stash and called it good.
Wednesday, April 17, 2013
A New Birthday Card
Now that I'm caught up again on Project Life, it's time to work on my stash of cards again. I found a lot of inspiration via Pinterest this weekend and I'm excited to start making my own versions. I started with this one tonight from Flowerbug Inkspot's blog. I loved the card. It was so fresh and pretty. My own version isn't quite right. If I remake it, I'm definitely making the sentiment oval smaller, but I do like the embossing in the background. Instead of buttons, I used some brads from my stash, but it was pretty simple to make with a few cute flowers cut on the Cameo and a flourish for the stem. The sentiment is from the Inkadinakado set Expressions and Frames and I used a flourish from the Cloud9 Design set Chocolate Chalet. The paper is all from my scraps stash and I used the Sizzix Dots and Flowers set for the dry embossing. Quick and easy!
Saturday, March 16, 2013
Not quite right...
I really liked the simplicity of this card I found on Pinterest and tracked back to My Paper Secret. The colors were beautiful and clean and the card was elegant in its simplicity. But unfortunately, it didn't translate well when I tried my own hand at it. I have a stash of pre-made card bases, but none that seemed quite right except this green one. I loved how it looked with this scrap of pink DCWV paper from my stash of scraps from other projects. I tried several options for the center button: green, white, blue, pink, but the one that looked the best to me was this yellow.
Where I think it all went wrong is in the stem and sentiment. I'm not very artistic. I can't draw a straight line without a ruler and I can't draw a curved line without a french curve. So I drew one in pencil to give me an idea of the right balance of curve. Slight problem, I didn't like the first curve so I tried to erase it, but I got a smudge on the card. Sigh...
So then I find the right curve, but when I went back to add my green stem, I couldn't quite get all the pencil erased. It's like it's actually under the ink. I added the sentiment from my Inkadinkado All Occasions set in Green Galore Stampin' Up ink to run across like leaves as in the inspiration piece, but I really should have used a darker color. It's just too close in color to the rest. Then when I was really being OCD about the still visible pencil line, I managed to erase a bit of my sentiment in my zeal to erase the pencil marks. Well double sigh to that... I was able to fix it a bit by coloring in with my stem pen, but it just really didn't quite come out like I had it all envisioned. Oh well, it's the thought that counts.
Where I think it all went wrong is in the stem and sentiment. I'm not very artistic. I can't draw a straight line without a ruler and I can't draw a curved line without a french curve. So I drew one in pencil to give me an idea of the right balance of curve. Slight problem, I didn't like the first curve so I tried to erase it, but I got a smudge on the card. Sigh...
So then I find the right curve, but when I went back to add my green stem, I couldn't quite get all the pencil erased. It's like it's actually under the ink. I added the sentiment from my Inkadinkado All Occasions set in Green Galore Stampin' Up ink to run across like leaves as in the inspiration piece, but I really should have used a darker color. It's just too close in color to the rest. Then when I was really being OCD about the still visible pencil line, I managed to erase a bit of my sentiment in my zeal to erase the pencil marks. Well double sigh to that... I was able to fix it a bit by coloring in with my stem pen, but it just really didn't quite come out like I had it all envisioned. Oh well, it's the thought that counts.
Thursday, March 14, 2013
Sometimes it all comes together...
I decided to put aside my scrapbooking tonight to make a few cards. I realized my stash was getting a little depleted. So I turned to my Pinterest board for cardmaking for some inspiration. First, I have to say that I was completely shocked when I realized how many people are following my little cardmaking layout inspiration board. I guess there are a lot of cardmakers out there that get inspiration from the same things that inspire me.
The card I picked tonight comes from a blog called Glenda's Paper, Scissors, & Rocks (cute name, huh?). I loved the simple elegance of the card. I pulled the Beautiful Moments 6x6 pad from Carta Bella that I picked up at Craft Warehouse on sale a bit back. It has some absolutely lovely patterns in it and I knew immediately they would be perfect for casing Glenda's card.
And that brings me to the title of the post today. It all just came together. Sometimes it can take me a long time to make a single card because I can't decide on the paper or the sentiment or whatever, but today was one of those beautiful times when everything just all came together like it was meant to be. I think I spent all of ten minutes making this card and more than half of those were finding the right ink (Stampin' Up Chocolate Chip, but if I did it again, I think it would switch to Close to Cocoa), baker's twine (Hemptique) and color of Liquid Pearls (Bisque) to finish it off. Cutting the card, folding it, rounding the edges and two quick cuts of the Cameo to make some butterflies and I was done. Honestly this post took longer to write than the card did to make.
The only thing I really regret is that I put my Inkadinkado stamp on my block a little carelessly so it came out a little crooked on the card. But, oh well, that's what makes it unique.
The card I picked tonight comes from a blog called Glenda's Paper, Scissors, & Rocks (cute name, huh?). I loved the simple elegance of the card. I pulled the Beautiful Moments 6x6 pad from Carta Bella that I picked up at Craft Warehouse on sale a bit back. It has some absolutely lovely patterns in it and I knew immediately they would be perfect for casing Glenda's card.
And that brings me to the title of the post today. It all just came together. Sometimes it can take me a long time to make a single card because I can't decide on the paper or the sentiment or whatever, but today was one of those beautiful times when everything just all came together like it was meant to be. I think I spent all of ten minutes making this card and more than half of those were finding the right ink (Stampin' Up Chocolate Chip, but if I did it again, I think it would switch to Close to Cocoa), baker's twine (Hemptique) and color of Liquid Pearls (Bisque) to finish it off. Cutting the card, folding it, rounding the edges and two quick cuts of the Cameo to make some butterflies and I was done. Honestly this post took longer to write than the card did to make.
The only thing I really regret is that I put my Inkadinkado stamp on my block a little carelessly so it came out a little crooked on the card. But, oh well, that's what makes it unique.
Wednesday, January 30, 2013
Fun Pinwheels
I love the pinwheel trend that's been going on. They are so cute and whimsical. So even though I've done a similar card before, I just had to case this one from I{heart}2stamp. It's so cute although I forgot how hard it is to get the pinwheels to keep their shape. This pinwheel and the grass were cut from designs bought in the Silhouette store. The paper is all from the Stella and Rose 6x6 paper pad from My Mind's Eye. The first version included a stamp from Inky Antics, a new stamp set I picked up from the going out of business sale at Stampin' Cat Studio (so sad to see another local store close).
But I decided to make a second version with a slightly different background paper so I changed up the sentiment too. This one is from the Birthday Wishes set from Inkadinkado.
Tuesday, January 29, 2013
Best of Luck Card
I loved this shamrock design I found on Pinterest made by Erica Cerwin showcased on her blog Pink Buckaroo Designs. It was so cute so I just had to make my own version of it. I designed the shamrock hearts in the Silhouette Design Studio. It was fun to play with the hearts and then back it with this cute polka dot DCWV paper from the Spring stack from several years back. I finished it off with the cute sentiment from Inkadinkado's All Occasions set.
Subscribe to:
Posts (Atom)