Showing posts with label Pinterest. Show all posts

Friday, January 24, 2014

Inspired by Laura Williams on Papercrafts & Scrapbooking

I was trolling through the blogs I read (hmm... I wonder how many times I've written that?) when I saw this clean and simple, but oh so wonderful card made by Laura Williams on the Papercrafts & Scrapbooking blog.  I had marked it to pin to my Pinterest Card Layout board for some day when I needed some quick inspiration, but it struck me that it was the perfect card to use a new set I just received from Technique Tuesday called Say It - Hello.

On a side note:  After a disastrous try of a kit club a while back, I shied away from them for a long time.  But then I finally broke down and joined two stamp clubs (Stamps of Life and Studio AE from Technique Tuesday) and the Project Life kit from Citrus Twist.  I must say that each of them is exactly what I expect from a good monthly club and have revived my belief in the concept.  I also love that with both Studio AE and Citrus Twist I can add extras for no extra shipping.  Stamps of Life charges extra shipping, but it's very reasonable and they give you a discount on the stamps that pretty much evens it all out. 

 
Back to our regularly scheduled post:  I couldn't believe how quickly this card came together.  I pulled out a rainbow of Distress Ink:  Fired Brick, Spiced Marmalade, Mowed Lawn, Broken China and Dusty Concord.  Then I stamped them using my Martha Stewart stamp press just to make sure I lined them up well.  Once I had that done, I noticed the "Just Saying" sentiment stamp and light bulb went off.  A little VersaFine Tuxedo Black ink added the right touch. I rummaged through my box of card blanks and narrowed it down to a sunny yellow or this beautiful teal.  Teal won out in the end through.  I used my We R Memory Keepers Corner Chomper to round a few corners then added that last touch with some enamel dots from the Cut & Paste line from My Mind's Eye.

I have to say that I really liked this one (even the hello I heat embossed in VersaMark on the inside, but you don't get to see that here). 

Monday, October 14, 2013

Have a Roarin' Good Birthday Card

My nephew recently celebrated a birthday so I went on the hunt for a card for inspiration.  I found this adorable one from A Bit of This, A Bit of That I had pinned to my card layout board on Pinterest.  So I went hunting through my Lawn Fawn stamps for the ones for the card and got side tracked when I saw the Critters on the Savanna set and my original plan was abandoned in favor of a new idea.  I had a bit of fun with stamping, sponging and coloring with this one.  I used the lion, two little birds, tree, rock and grass from the Critters on the Savanna set and the hat and presents from Lawn Fawn's Year Two set.  I stamped all but the grass using Versafine ink then clear embossed it.  I stamped the grass with Mowed Lawn Distress Ink and clear embossed that.  I then sponged on the Mowed Lawn and colored in the trees and sky with Spectrum Noir pens.  I cut the banner from the Lawn Fawn Stitched Journaling Card die set and stamped on the sentiment from the Critters on the Savanna set.  Then it was just a matter of gluing it all together and adding some pop dots.  I then backed my scene with a mat of white and adhered that to a yellow card base from the DCWV Brights Box of Cards.

For the inside, I added a mat of white upon which I had stamped the little bird from Critters on the Savanna and the little hat from Year Two in Versafine.  I added some grass in Mowed Lawn Distress Ink and colored in the bird and hat with Spectrum Noir markers.  Too cute for a little boy who is too cute.

Thursday, October 10, 2013

Celebrate - Inspired by The Card Grotto

I needed a birthday card for my cousin's recent birthday and she just loves Mickey Mouse.  I looked for some inspiration on Google and I didn't really see anything.  So I started trolling through my Pinterest Card Layout Ideas board to see if something caught my eye.  When I came across this card from the The Card Grotto, I thought I could make a variation on the theme that would suit my needs. 

I had a cut file in my studio files for my Cameo that I had made a while back, that I decided would substitute well for the butterflies. I cut it from some black card stock from my stash. I cut a banner and stamped it with the sentiment from the Fiskars' Happy Birthday set using (what else?) Versafine ink. 

For the background, I cut a 4 by 5.25 piece of some paper from Creative Imaginations meant to be a Disney paper.  Then it was just a matter of gluing it all together. 
 

Friday, September 13, 2013

Happy Birthday Card - Inspired by I Create and Freshly Made Sketches

A friend at work is celebrated acknowledged her birthday this week so I needed a card to celebrate acknowledge it.  I turned to my lovely card layout board on Pinterest where I pin all the cards that I find in the blogs I read that I think I'll want to try my hand out or will inspire me.   This wonderful card from Jen of I Create for the Freshly Made Sketches sketch #89 caught my attention.  You can see the card here

For my version, I changed it up from a square card to a A2 size.  I stamped my rectangle of white linen card stock with some stamps from the Chocolate Chalet set from Cloud 9 Designs using Stampin' Up So Saffron ink.  I then topped that with a sentiment from the Fiskars Happy Birthday set using Versafine Onyx Black ink.  I cut little banners from some Jillibean Soup paper (yellow stripe) from the Southern Dumpling 6x6 pad and some Echo Park (yellow chevron) from the A Perfect Summer 6x6 pad. 

I then layered the stamped paper on some black card stock, added the banners and then adhered it all to the kraft paper. I added the Hemptique baker's twine and cute white button from my stash.  Then I was ready to at it to my A2 card base and call it cute!

Tuesday, July 16, 2013

Butterfly Birthday Card

I needed a birthday card but realized I was out so I did a little trolling of my Pinterest board for cards to find some inspiration and settled on the Hugs and Kisses card by Jane Beljo posted on the "Create" blog.  I used my Silhouette to cut three sizes of the butterfly then ran the largest and smallest through a Sizzix embossing folder.  For the background, I used some Jillibean Soup paper and a scrap of brown to punch a border with an EK Success border punch.  I found a scrap of ribbon in the drawer although I have no idea where it originally came from but it was perfect for this paper.  I added a sentiment stamped with an old Fiskars stamp I found when sorting through my stamps the other day (part of that challenge to use all one's stamps or stamps sets or purge them) and then finished it off with some rhinestones from Darice. 

Monday, June 24, 2013

Happy Birthday Card

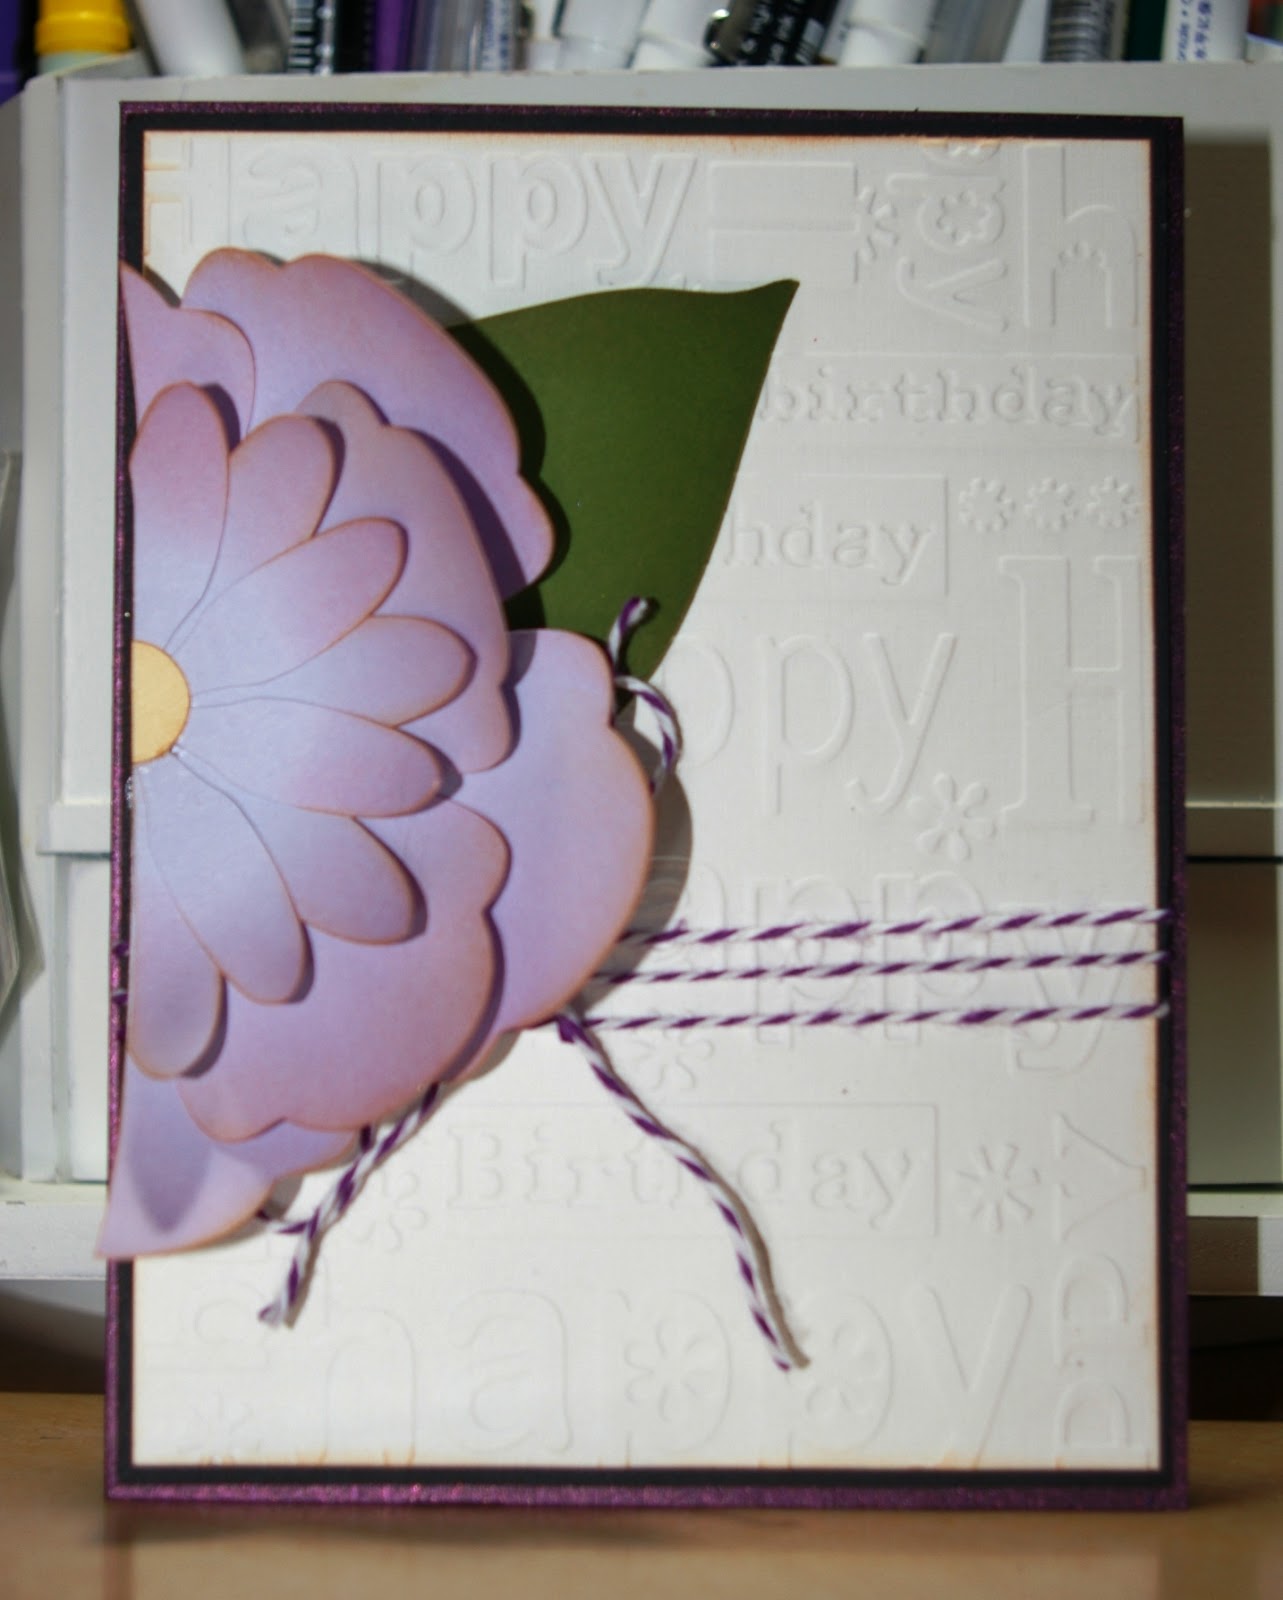
Last week was my mother-in-law's birthday so I went trolling on Pinterest for some inspiration and found a lovely birthday card pinned from Jaydekay on Splitcoaststampers.com.  I just loved the look of this card.  Of course, I don't have the lovely retired Sizzix die, but I do have a Cameo and lots of 3rd flowers.  I finally selected this 3rd layered flower, which is Design ID #38042, from Patty Young/MODKID.  I cut it out of a random piece of card stock from my stashed then inked the flower with Spun Sugar Distress Ink.  I finished inking all the edges of the flower, center and leaf in Tea Dye Distress Ink.  Then it was just a matter of running the white card stock through the Happy Birthday Cuttlebug embossing folder and tied it all together with some Hemptique baker's twine.  I decided it all needed matting with black before I adhered it all to my purple card stock card base. 

Thursday, June 13, 2013

Happy Birthday Card Inspired by Rocky Mountain Papercrafts

My sister-in-law's birthday was last week so, of course, I needed to make her a cute card.  I was flipping through a Pinterest board when this oh so cute card by Allisa at Rocky Mountain Papercrafts caught my eye.  I knew it was the perfect one.  So I flipped through my 6x6 paper pads and decided that Jillibean Soup's Apple Cheddar Soup was the right one for this card.  I choose the wood grained paper and the little flowers.  I then teamed them up with some plain brown card stock as a mat, some plain cream card stock for the sentiment and cream card base.  I couldn't find the right color to mat the flower, but then I found the perfect paper for that in my Fancy Pants Park Bench 6x6 pad.  I cut a flower with my Cameo and made a shadow for it.  Once I had it all assembled, I stamped my sentiment in Momento Espresso Truffle in using Technique Tuesday's Swanky Sentiments and stamped a flourish in Momento Toffee Crunch ink using a flourish from the Teresa Collins Spring Fling stamps.  It still needed a little something, so I dug a blingy brad from my stash and added a few Darice gems.  That finished it off nicely.

Tuesday, June 11, 2013

Congratulations Grad

I have one last graduation card to share.  My niece graduated from grade school last week and I wanted to do something to make it seem a little special for her.  I found this great card on Pinterest.  The original source comes from the Stampin' Connection, which I don't have access to so I can't share it. 

The card itself was super easy to put together.  I simply stamped the graduation cap from my TPC Studio's Graduation set on some blue paper using Momento black ink. I cut it out and then stamped the word "Congratulations" from my Cloud 9 Design Wedding set on some white card stock using StazOn ink in midnight blue.  I then cut out the word grad using the Aharoni font on my Silhouette using some Best Occasions glitter paper I've had for years.  I finished the card of with a little yellow cardstock from DCWV's Pastel Mat Stack and some blue cardstock from my stash.

Friday, June 7, 2013

A Graduation Card Inspired by Doodlebug Design

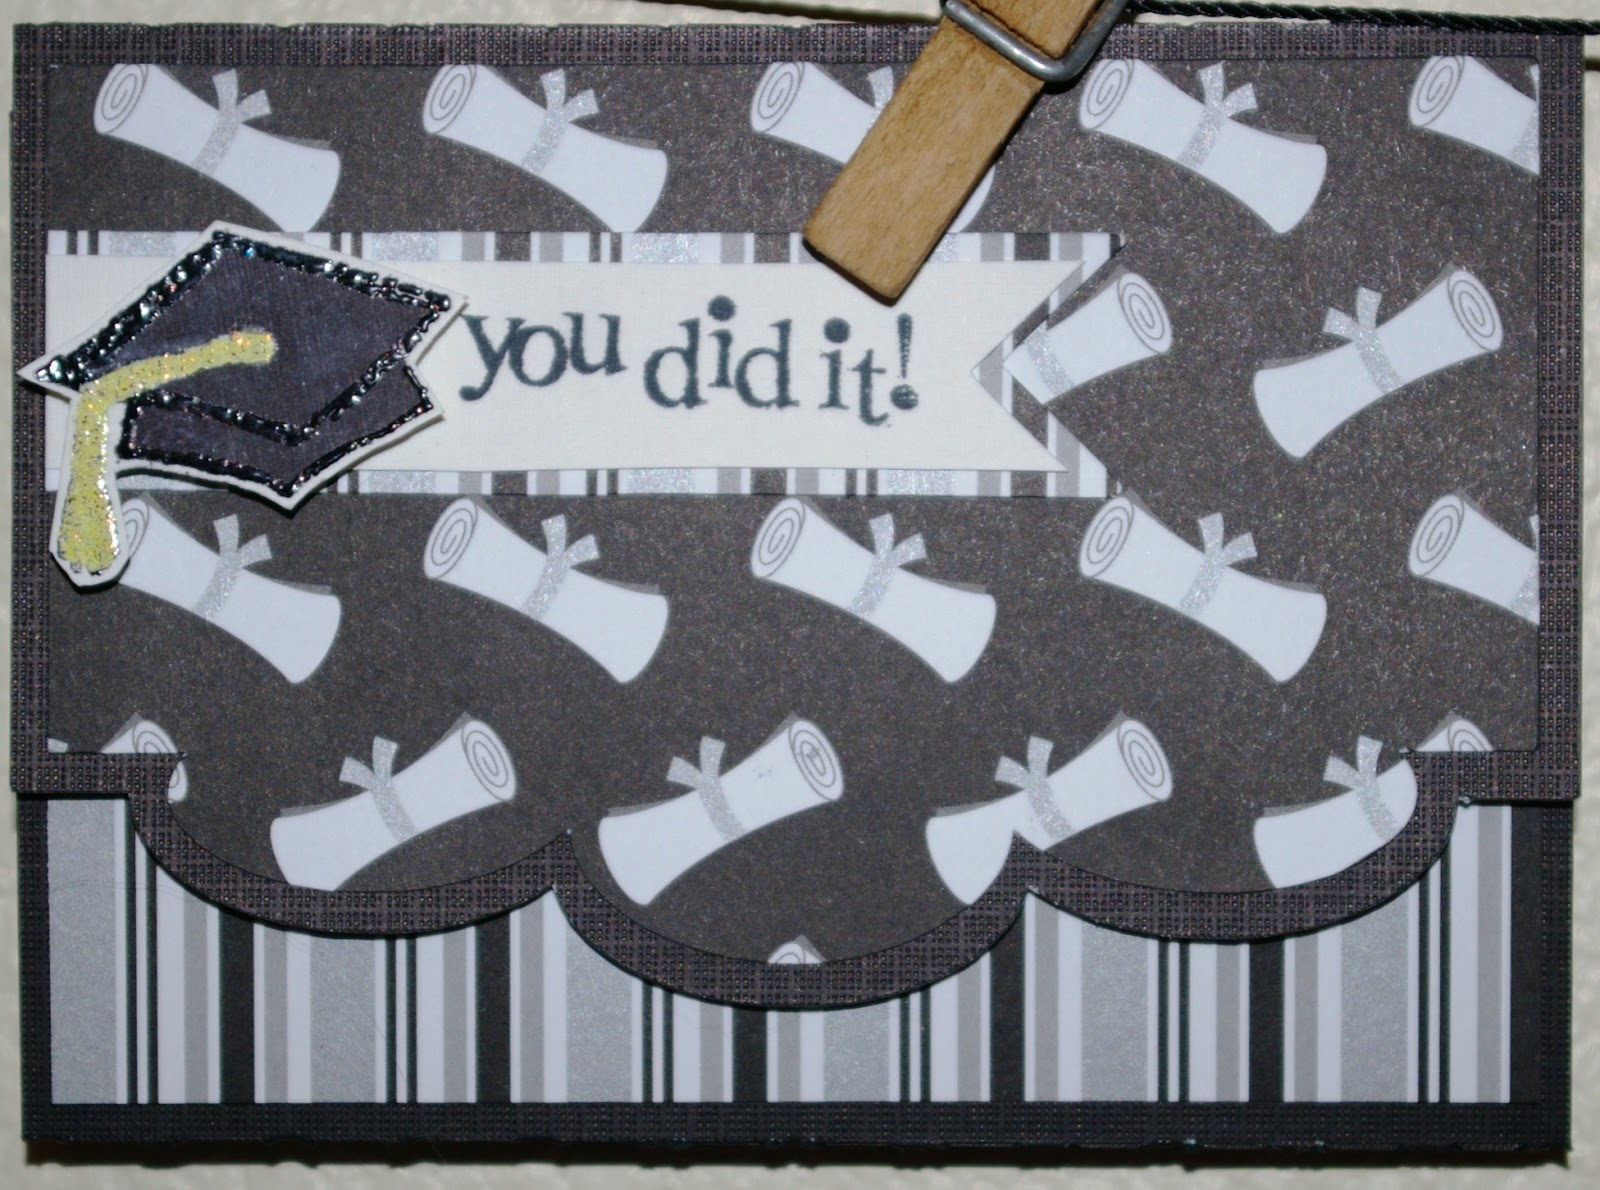
I was trolling Craft Warehouse for supplies and found this great graduation paper from Doodlebug Design.  Knowing that I was going to need a few graduation cards this year, I bought a sheet of the paper called Cap and Gown.  I then started surfing my Pinterest board with card inspiration ideas and found that I had actually pinned some ideas from Doodlebug Design's blog.  Once I saw this cute money holder card, I knew what I was going to be trying my hand at.  I found a card I had in my Silhouette designs (3 scallops edge card - although I could not find in the store today when I was looking for the design number).  I thought it was the perfect base.  I then cut out the card base out of black card stock and cut the Doodlebug paper for the top of the card.  I stamped the cap out of my TPC Studio Graduation set and embossed it in black and then the tassel in yellow.  I colored the cap in with some Spectrum Noir pens to finish it off.  The sentiment was stamp with my new Momento Brilliance ink on a sentiment from the All Occasions set from the Inkadinkado and finished it off perfectly.

Sunday, June 2, 2013

Congrats Grad Layout

During Week 21 of Project Life, we celebrated my sister-in-law graduating from college.  While at her party, I took a great picture of her and my mother-in-law hugging.  I knew it needed to have it's own layout in the week.  I started my scrolling through my Pinterest board of scrapbook layout ideas where I pin pages and sketches that I think will inspire me.  That's were I found a page created by Rhonda of Scrappity Dappity Doo based upon a sketch posted by Quick Quotes.  I thought it was the perfect place to start.

I again used the Basic Grey Fact line I've been using for my Project Life pages for Week 21. For this layout, I used some of the paper to cut a tag and created a hidden envelope for it.  A bit of baker's twine makes it easy to slide it out of the hidden pocket.  I took a heart from the 11 Hearts by Lori Whitlock set in Silhouette (Design ID #24813) and opened the nodes.  I moved a few of the nodes around to get a more stylized heart.  I then duplicated it and move a bit of the nodes on the second one so they would be similar, but not exactly the same.  Then it was just cutting my scraps, layering them together until I had a layout I liked.  I added my favorite brown Thickers called Marquis and then finished it off with some Darice studs in a brown color.  This was my finished page:

Wednesday, May 8, 2013

Love Card

It's a busy week so I needed a little "down" time and when I saw this card on Pinterest, I knew it was the perfect way to wind down and I loved the non-traditional colors for a love card.  So I checked out Allison Ohran's blog Sweet Impressions.   She's got a lot of cute inspiration there.  Tonight, I think being tired probably hurt my creativity.  I started with stamping some hearts, but I didn't have my heart in it (okay so I'm so tired I'm making puns now).  So I switched over to some super cute paper from the Love Me 6x6 pad from My Mind's Eye.  I actually love this set so much that I bought two of them (it didn't hurt that they were a super good buy too).  So I cut the hearts and heart shadows out with my Cameo.  I found a cute little tag to cut too.  Then I stamped the word love from my Inkadinkado Heart Full of Love set.  Then I finished it off with some scrap paper for the base, mat and background and ran the background through my Honeycomb Cuttlebug folder and put it all together with some sparkly crochet thread since I didn't have the right baker's twine. 

Monday, April 22, 2013

Thinking of you card

When I saw all the amazing cards with the Swallowtail stamp from Stampin' Up, I just had to buy that stamp.  I broke it out tonight and started playing with it.  I found a cute card on Pinterest and traced back to the source at the Flowerbug blog.  I skipped the heat embossing and went just with Chocolate Chip ink on cardstock.  I love that.  The whole card actually came together very quickly, but used four different stamp sets!  Of course, there was the Swallowtail stamp from Stampin' Up.  For the sentiment, I used an Inkadinkado stamp set called Expressions and Frames.  The small butterfly is from the Teresa Collins Spring Fling Stamps set.  Finally, the floral stamp is from the Heidi Grace Designs set called Paradise.  I cut a vellum butterfly on my Cameo using an Echo Park design purchased in the Silhouette store. I added some ribbon from my stash and called it good. 

Wednesday, April 17, 2013

A New Birthday Card

Now that I'm caught up again on Project Life, it's time to work on my stash of cards again.  I found a lot of inspiration via Pinterest this weekend and I'm excited to start making my own versions.  I started with this one tonight from Flowerbug Inkspot's blog.  I loved the card.  It was so fresh and pretty.  My own version isn't quite right.  If I remake it, I'm definitely making the sentiment oval smaller, but I do like the embossing in the background.  Instead of buttons, I used some brads from my stash, but it was pretty simple to make with a few cute flowers cut on the Cameo and a flourish for the stem.  The sentiment is from the Inkadinakado set Expressions and Frames and I used a flourish from the Cloud9 Design set Chocolate Chalet.  The paper is all from my scraps stash and I used the Sizzix Dots and Flowers set for the dry embossing.  Quick and easy!

Sunday, April 14, 2013

Week 15

Wow, week 15 is over and I have the base layouts done for it, but this week I need an insert because there were a couple of birthdays I really want to highlight this week.  So that will come later, but I'm sharing the base layout now, which I made with the Basic Grey Fact and Fiction lines.

A thought struck me today as I put this one in the book and looked back over these last fifteen weeks, I think this is the most I have documented in our lives in a consistent way.  Sure I have scrapbook pages I've made, but this is more comprehensive than anything I've done in the past and I'm really loving it even though today it didn't seem to come together as easily as previous weeks. I found myself doing other things today like making eight breakfast sandwiches, five omelets, a quiche, a casserole and banana muffins with lemon icing.  So now the freezer is stocked for quick breakfasts for work days again.  I also surfed Pinterest for hours, watched the Factory (love John Cusack movies!), and some B-grade TV movies, but I did manage to finish the layout.


Thursday, April 4, 2013

Inspired by Pinterest and Recollections

It's so unusual that I find something through Pinterest that actually uses a stamp set I have.  Usually I have to rethink it, so when I came across this cute little baby card, I did a double take.  I thought to myself, "I think I have that set."  Sure enough, I did!  I bought the Recollections stamp set at Michaels a few weeks back when they had it on clearance for a super buy. 

I made my own version of this cute baby card from Stamping Up North with Laurie.  I made a boy version using some DCWV paper from my stash.  I played with a button and bow on it, but it seemed a little too girlie for this boy card, so I left them off.  Pretty clean and simple, just the way I like them.   

Wednesday, April 3, 2013

Happy Birthday Dear Sis

Today is my sister's birthday so, of course, I needed a card.  I looked through my inspiration board on Pinterest and found a pin I just adored, but the person that pinned it, didn't track it back to the source, so I have no idea where it really came from.  So, whomever the artist is, thank you so much for the inspiration.

All the paper for the card comes from my never-empty scrap bin. The cupcake was cut with a design from the Silhouette Design Studio. I had some fun looking at all my embossing folders and finally settled on the Sizzix Dots and Flowers set for the background and two Cuttlebug folders:  Candy Cane Stripes for the "wrapper" and Musical Flourish for the "frosting."  Then I hand dotted the background with some acrylic paint.  It was pretty fun to make and I sure hope my sister loves it.

Monday, April 1, 2013

Using My Tools

I don't know about you, but I find that I use my Cameo to make almost everything now.  It's rare for me to pull out punches or use my dies.  So when I was trolling my pins on Pinterest, I found this card from the Icreate blog and thought, "I can do that, but can I do it without the Cameo?"  Well, turns out I could.  I had the Sizzix Flower & Leaf #3 die and the Asterisks die from Provo Craft that let me cut out the leaf patterns and the little flower.  I just cut a small square and used my Fiskars' circle punch to cut the little circle.  Once it was all put together, I topped it off with an Imaginisce gem and the sentiment stamped from the Fiskars' All Year Greetings set using Quick Quotes Powder Puffs ink in Green with Envy.  It went together so easily and quickly.  


Friday, March 29, 2013

Quilted Birthday Card

I'm happy to report that all my scrapbook pages have homes now.  I spent a little time reading Stacy Julian's Photo Freedom book because I had a huge stack of layouts just stacked up in a container and not in books.  I never put them away because I'm not a chronological scrapbooker but I also was unhappy with how the others were just in books with no organization at all.  I loved her organization style and it was the perfect solution to my dilemma.  I was stunned at how quickly I was able to sort out all my layouts and get them organized into their respective books.  My photos in the boxes are next up, but I thought I would take a break and do something creative with paper while I listen to the Winterhawks win.

But first, I had to spend a little time fixing some layouts that fell apart.  I have found that the tape runner I used prior to my beloved ATG gun just doesn't stick long term.  Pictures will just fall off the page and, in some instances, you can even see the glue through the paper.  It didn't take long to "repair" the pages and get them in their homes, which still left me some time to play with new things.

I saw this pin on Pinterest and checked out the quilted card on Stamping with Blue Moon Creations.  I was inspired to try it myself.  I pulled out some scraps of DCWV paper from past projects and did a lot of hand cutting of triangles.  Once I had the pattern set out, I glued it all to scrap piece of paper, then ran the whole thing through my Sizzix Ornate Swirls embossing folder.  A few mats also made of scrap paper and a stamped sentiment from a Hero Arts set I picked up recently on sale at Michaels finished it off beautiful, just like the 'Hawks just finished off the Everett Silvertips eleven to four, yes, that's right eleven, with a beautiful hat trick by Ty Rattie!  I cannot wait for tomorrow night's game.


Thursday, March 14, 2013

Sometimes it all comes together...

I decided to put aside my scrapbooking tonight to make a few cards.  I realized my stash was getting a little depleted.  So I turned to my Pinterest board for cardmaking for some inspiration.  First, I have to say that I was completely shocked when I realized how many people are following my little cardmaking layout inspiration board.  I guess there are a lot of cardmakers out there that get inspiration from the same things that inspire me.

The card I picked tonight comes from a blog called Glenda's Paper, Scissors, & Rocks (cute name, huh?).  I loved the simple elegance of the card.  I pulled the Beautiful Moments 6x6 pad from Carta Bella that I picked up at Craft Warehouse on sale a bit back.  It has some absolutely lovely patterns in it and I knew immediately they would be perfect for casing Glenda's card. 

And that brings me to the title of the post today.  It all just came together.  Sometimes it can take me a long time to make a single card because I can't decide on the paper or the sentiment or whatever, but today was one of those beautiful times when everything just all came together like it was meant to be.  I think I spent all of ten minutes making this card and more than half of those were finding the right ink (Stampin' Up Chocolate Chip, but if I did it again, I think it would switch to Close to Cocoa), baker's twine (Hemptique) and color of Liquid Pearls (Bisque) to finish it off.  Cutting the card, folding it, rounding the edges and two quick cuts of the Cameo to make some butterflies and I was done.  Honestly this post took longer to write than the card did to make.

The only thing I really regret is that I put my Inkadinkado stamp on my block a little carelessly so it came out a little crooked on the card.  But, oh well, that's what makes it unique. 

Thursday, January 31, 2013

Love That Lattice

I found this cute monochromatic card on Pinterest using a lattice die.  The original is on Linda Higgins' blog. I really liked the simplicity of the monochromatic color scheme, but, of course, that wasn't what I replicated.  Instead I focused on the lattice work.  I used the intersect feature in the Silhouette Design Studio with a lattice background I had downloaded earlier.  It turned out pretty good matted on the printed paper from the Fiddlesticks 6x6 pad from My Mind's Eye.  I added a sentiment from my new Inky Antics stamp set using Brocade Blue ink from Stampin' Up and finished it off with a button and some ribbon from my stash.  Cute.