Showing posts with label Versafine. Show all posts

Monday, September 15, 2014

A Beautiful Wedding

After the memorial on Saturday, the hubby and I attended my boss', although I really consider him a friend, wedding.  This one has been a long time coming and I was delighted to attend (even though I'm really not a fan of social events and get really anxious about them).  It was an Episcopalian ceremony.  I've never attended one and it was quite beautiful (although the incense was a little much for my head).  It was an amazing sight to see him so happy and so in love. 

The reception was nice.  It was a beautiful night outside.  I tried the pear cider (delicious) and chatted with some co-workers.  Kids ran around playing with a basket of balls that David brought out for them.  It was such a beautiful night and the best part was seeing David so very happy.  I can't think of a more deserving person.

I decided to make a card for him (he very specifically said no gifts).  I thought about doing something whimsical, but then changed my mind for something more formal.  I don't have many traditional wedding stamps, but I did find this delightful silhouette in an Inkadinkado wedding set.  I used some Verafine Onyx Black ink and heat embossed it with some clear embossing powder.  I used a dies from my new My Favorite Things Blueprints #13 set for the flag.  I embossed the vellum with a Victorian folder from Cuttlebug and then used the large stitched die from the Blueprints set to cut it down to size.  I stamped the sentiment on the card base using a stamp from the Simply Sentimental set from Newton's Nook.  Then it was a matter of laying it together, added a little Lawn Trimmings in Silver Sparkle to finish it off. 

Wednesday, September 10, 2014

Have You Heard the News?

I'm having so much fun with the Monster Mash set from Lawn Fawn along with some new goodies from Simon Says Stamp and Hero Arts.  For Labor Day, Craft Warehouse was running a 40% off coupon and I hadn't been there in a while.  I wandered around and got some inspiration and decided I needed a new background stamp when I found the Newspaper Background stamp.  I immediately knew it would work as a perfect neutral for cards that need a little something extra and that was the perfect extra for the card that I had in mind today.  I inked that new stamp up with some Versafine Onyx Black ink and heat embossed it with some clear embossing powder.  Now, of course, I had to ink that up using some of my favorite colors of Distress Ink of Worn Lipstick, Broken China and Spiced Marmalade. 

Then I broke out my new Frames Dies from Simon Says Stamp.  I've played with one of them, but I wanted to use the oval frame and thought this card was perfect for that.  I used the frame to cut through my inked layer and the front of the card. 

I added the large and small one-eyed monsters from the set that I colored in copics with pop dots so they came through the top of the card.

I printed the sentiment on some cardstock and cut it out with a die from Mama Elephant then adhered it to the front of the card before stamping the sentiment from Lawn Fawn on the inside.

Saturday, June 21, 2014

Thinking of You - Inspired by Kristina Werner

I spent the first part of the week in DC.  I never really sleep well when I'm away from home, especially if I'm on my own.  So I watched a lot, I do mean a lot, of crafting videos and couldn't wait to get home to get into my craft room.  But, jet lag, work and life just got in the way until today.  It turned out that was okay because I also got to open some new goodies, including the new round blending tools, so I was super excited to play with them.

One of the videos I watched was a fabulous one-layer card made by the equally fabulous Kristina Werner.  You can find her blog post and the video here.  I encourage you to subscribe to her You Tube channel and blog.  They are amazing.

So for today's card, I made my own version into a thinking of you card.  I used a Heidi Swapp heart stencil I picked up at the Creating Keepsakes Convention, some Worn Lipstick Distress Ink and the new round blending tool.  Can I just tell you how much I love, love, LOVE the round tool?  It's so much easier to use.  I can see a lot more blending with Distress Ink in my future.

After I had my hearts down, I shifted the stencil and used a black pen to outline the hearts on the shadow and added Wink of Stella to the hearts.  Then I added a sentiment from the Fiskars All Year Greetings set with some Versafine Ink.  Then I matted it on some black card stock and popped it onto a white top folding card base.  But I didn't like how the sentiment looked.

 So on to version #2.  I did all the same, except I masked off the place for my sentiment and made the panel slightly larger.  I made the mat a little smaller too.  I liked this version a lot better. 

Tuesday, May 27, 2014

Happy Birthday Card with Ferro

I liked working with the Ferro so much for my dotted card that I had to try another pattern.  This time I used the mini peacock feathers stencil from the Crafter's Workshop to make my Ferro background.  Then I decided to try out some other techniques I've been admiring around the web.  I cut out some vellum with my Lawn Fawn Stitched Journaling Die, then heat embossed in white some stamps from the Blissful Botanicals set on the back side of the vellum.  I colored it in with my colored pencils and then stamped the sentiment from my Fiskars' How Many Candles set in Versafine Black Onyx ink then heat embossed that.  I used my Xyron sticker maker on the vellum to attach it to my Ferro piece and then mounted all of it on a standard card base. 


Thursday, May 15, 2014

Thinking of You Clean and Simple Card Inspired by Watercolor for Card Makers

I am obsessed with these Art Impression stamps!  They are so much fun to play with and I love that they were featured in the Onlinecardclasses.com class Watercolor for Card Makers.  For today's card, I stamped out a simple scene using Distress Ink markers and several sets (A, Flower Set, and the Foliage set) that I had purchased previously after watching Bonnie, the owner, demonstrate them at CKC. I then added a simple sentiment from the Crafter's Meow Potted Garden set and some Versafine ink.  Then I just added a simple black mat and mounted it all on my card base.  Simple, but very pretty.

Saturday, May 10, 2014

Thinking of You - Inspired by Watercolor for Card Makers

Today's card is again inspired from the class I'm taking on watercolor for card makers.  I'm a bit behind in putting together cards.  I have a stack of card background done from watching the videos in the class, but I'm just now working through turning those into actual cards.  Good thing too since I have a long list of cards I'm going to need this month and next. 

For this first card, Jennifer McGuire, one of my favorite crafters to watch, showed how to mask a stamp to leave the stamped image uncolored against the watercolored background.  While she demonstrated the true craft product to do that called liquid frisket, she also showed how to use rubber cement.  Do you think I can find rubber cement?  No.  I've been all over town and no one has it.  So this morning when I couldn't sleep, I got up and started playing with my inks.  I thought "I wonder if I can be careful enough to do the technique without a mask?"  Well, you be the judge...

I used one of my favorite background stamps called This is My Favorite.  It's a wood mounted stamp from Hero Arts.  I don't buy wood mount anymore because of the space they take, but for this one, I broke my own rule and it was a great exception.  I use it all the time in Project Life and was happy to break it out for this technique.  I used some Vintage Sepia Versafine ink after learning that it works with watercolors (something I previously didn't know) and then my watercolor set, which is a very inexpensive set I picked up a Michaels long before I ever knew I would be taking this class.  I have a feeling that a better set will find it's way onto my wish list for my birthday or Christmas, but for now, this (less than $5 with a coupon) set is getting the job done.  I finished the card off with a sentiment from Inky Antics' Delivery Benton set also stamped in the Vintage Sepia ink and some Darice sequins that were laying on my craft table.  Then I just couldn't help myself, I had to put Wink of Stella on the butterflies (but you can't really tell that here). 

Thursday, April 17, 2014

Soy Happy for You Card

I needed a card to congratulate a friend on his new job.  I was flipped through my stamps and decided I had to use the Let's Roll set from Lawn Fawn.  I have loved this set since I first saw it in the preview pictures from CHA.  It's so cute and punny.  I broke out my Momento ink and new Copics (thanks again Mom) and colored up a storm.  Then it was just a matter of using the dies and finding some cute paper.  I had some paper left in the 6x6 Print Shop paper pad from Studio Calico that I received as part of a Citrus Twist project life kit.  I thought it would work well for the background and yet leave the card suitably masculine.  I decided that the puffy star stackables from Lawn Fawn would add a nice highlight, especially after I edged them in Wink of Stella, too bad it doesn't really show in the cards.

Saturday, January 25, 2014

Inspired by Lynnette in the Lawnscaping Challenge #74

Last night I was just puttering in my craft room waiting for the hockey game to start, so I pulled up my Pinterest card layout board and quickly found a cute card using the new Lawn Fawn set I picked up called Love You Tons.  I quickly stamped the cute little elephants in VersaFine ink and heat embossed them.  Then I colored them with my Spectrum Noir markers and cut them out using the matching dies.  I found the heart bubble in the Lawn Fawn Into the Woods set and inked it with some ColorBox chalk ink in Warm Red.  I fussy cut the speech bubble (is it really speech if it's an emotion?).

The inspiration pin has what appears to be a hand stamped background with the little heart in the set but I am NOT patient enough to do that.  But I found some cute paper from the 6x6 pad from Pink Paislee called Secret Crush.  After debating far too long about what side of the paper to cut from (left? right? left? right it is), I stamped the sentiment in the VersaFine ink and added my elephants and bubble with some pop dots. But, it needed something.  I swiped some white Wink of Stella on the heart, stared at the card for far too long before deciding to add some clear Wink of Stella to the red in the bubble.  Done.

I picked out a pretty red card base from my rainbow stash, taped down my top panel then added a simple panel inside with a heart form the Lawn Fawn set Bee Mine in my red chalk ink on the inside.  Done and done.

So the only thing I left to do was find who posted my inspiration card so I could give credit where credit is due - to my surprise, when I scanned the cards posted for the Lawnscaping Challenge that I pinned it from, I discovered it was Lynnette of Netter's Notables again.  Inspiring twice in a week? I would say this must mean I really like her style.

Friday, January 24, 2014

Inspired by Laura Williams on Papercrafts & Scrapbooking

I was trolling through the blogs I read (hmm... I wonder how many times I've written that?) when I saw this clean and simple, but oh so wonderful card made by Laura Williams on the Papercrafts & Scrapbooking blog.  I had marked it to pin to my Pinterest Card Layout board for some day when I needed some quick inspiration, but it struck me that it was the perfect card to use a new set I just received from Technique Tuesday called Say It - Hello.

On a side note:  After a disastrous try of a kit club a while back, I shied away from them for a long time.  But then I finally broke down and joined two stamp clubs (Stamps of Life and Studio AE from Technique Tuesday) and the Project Life kit from Citrus Twist.  I must say that each of them is exactly what I expect from a good monthly club and have revived my belief in the concept.  I also love that with both Studio AE and Citrus Twist I can add extras for no extra shipping.  Stamps of Life charges extra shipping, but it's very reasonable and they give you a discount on the stamps that pretty much evens it all out. 

 
Back to our regularly scheduled post:  I couldn't believe how quickly this card came together.  I pulled out a rainbow of Distress Ink:  Fired Brick, Spiced Marmalade, Mowed Lawn, Broken China and Dusty Concord.  Then I stamped them using my Martha Stewart stamp press just to make sure I lined them up well.  Once I had that done, I noticed the "Just Saying" sentiment stamp and light bulb went off.  A little VersaFine Tuxedo Black ink added the right touch. I rummaged through my box of card blanks and narrowed it down to a sunny yellow or this beautiful teal.  Teal won out in the end through.  I used my We R Memory Keepers Corner Chomper to round a few corners then added that last touch with some enamel dots from the Cut & Paste line from My Mind's Eye.

I have to say that I really liked this one (even the hello I heat embossed in VersaMark on the inside, but you don't get to see that here). 

Thursday, January 23, 2014

Inspired by Simon Says Stamp and Freshly Made Sketches #120...

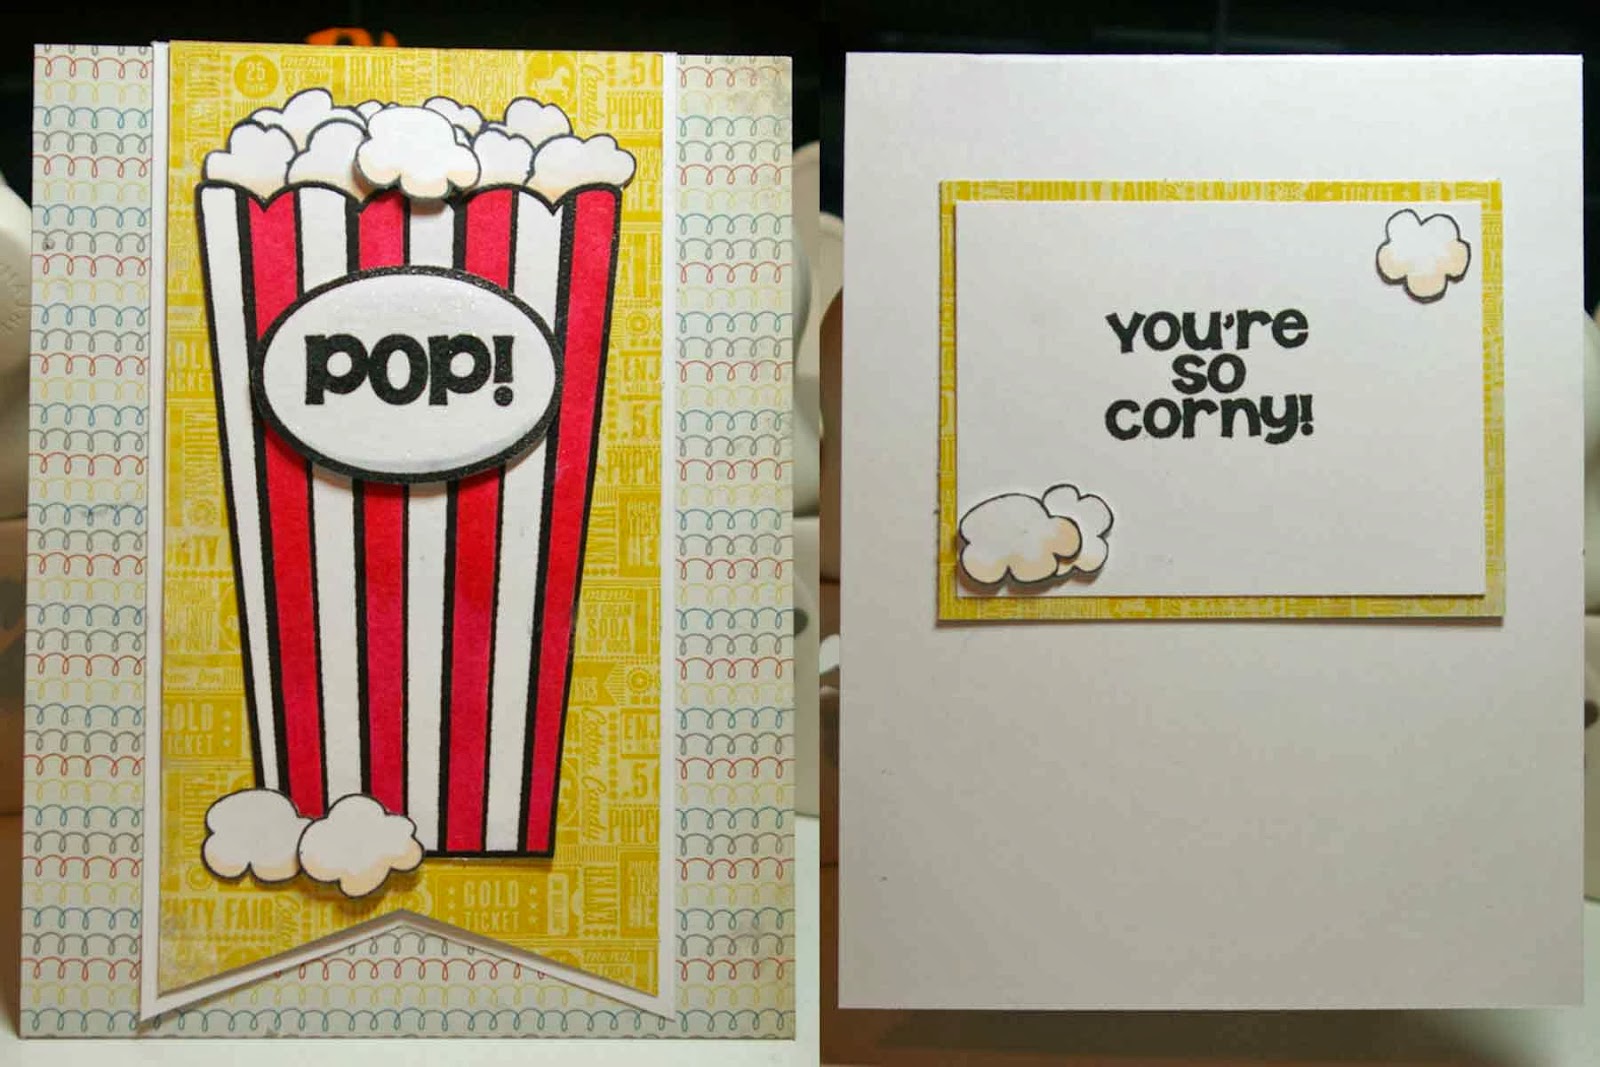
I was trolling through my blogs looking for inspiration that would encourage me to overcome this lingering headache (at times migraine) of the last couple of days and do something in my craft room when I came across the new Simon Says Stamp challenge on their blog to make something funny.  Well, I have a lot of punny stamps including this month's Stamps of Life set, popcorn2stamp, which has been sitting on my craft desk waiting to be stamped on something.

So I set about stamping the popcorn container with Momento ink on some white card stock and colored it with my Spectrum Noir pens.  I masked the container off and stamped some popcorn on the top (after cutting a bunch of popcorn masks too).  Then I wasn't quite sure what to do with it.  I didn't really have any creative mojo so I pulled up the sketch for Freshly Made Sketches to see if it gave me any ideas and decided I could make it work. 

So I flipped through my 6x6 paper pads until I found some paper I liked in the Dilly Dally pad by My Mind's Eye.  Then it was just a matter of trimming my banner, gluing the background paper to my card stock, adding my banner and layering my popcorn box and some individual popcorn.  I used a few pop dots for some dimension and then decided the label needed a bit of sparkle with some Wink of Stella. 

For the inside, I stamped my sentiment in VersaFine Black Onyx and then matted it on a scrap of the paper from the banner and added a few more pops of corn. 


Tuesday, January 21, 2014

Happy Birthday Card as Seen on Papercrafts

I was browsing through the blogs when I stumbled upon this adorable card using my favorite Stampin' Up stamp, Swallowtail, on the Papercrafts and Scrapbooking blog here.  So while I watched the Seattle/49ers game yesterday, I made my own version.  I stamped the butterfly in Versafine ink and heat embossed it with some clear embossing powder.  I then colored in one with my Spectrum Noir markers and left the other black and white for the base.  I then cut the black and white one down to fit a standard A2 card with a black mat and the colored version smaller.  I then matted both of them on plain black card stock and layered them together.  I stamped the sentiment from my Hero Arts All Occasions set in the Versafine on some vellum and heat embossed it with clear embossing powder to match.  I ran the sentiment through my Xyron and adhered it across the bottom of the panel.  Then all I had to was adhere the panel to my card base and I was done.

Looking back on it now, I kind of wish that I had made the colored panel a touch smaller.  Well, maybe next time...

Sunday, January 19, 2014

Good Fortune Card

I needed a quick card of encouragement for a co-worker and, quite frankly, I was a little too tired to work on one.  I started looking at some inspiration on Google Images thinking I might do something with Lawn Fawn's Summertime Charm set.   But the Good Fortune set popped into my mind and I found myself pulling out before I really had even given it any conscious thought.  I knew I had previously cut and colored some extra pieces and they were perfect for my need for a quick card tonight.  I only had to cut the "fortunes" for the cookie because I already had all the other pieces ready.  Then it was just a matter of layering the pieces on some plain white paper and finding the right colored paper to give the card some cheer. I was very drawn to this pattern from the Amy Tangerine 6x6 paper pad for Ready Set Go.  It was the perfect amount of color.  I added some to the inside and put my sentiment as if it's coming from the side of the card for a little visual interest.  This was a super simple card as I had so much pre-made, but I'm quite pleased with how it turned out. 

Sunday, January 5, 2014

I'm Back With a Birthday Card Inspired by Julie Davidson...

Life has been crazy and hectic and really I just haven't been myself lately.  But today I had some time in my craft room and I wasn't busy putting together December Daily or Christmas cards or tags for gifts or one of a million things lately that has taken over my life.  But I do have a couple of people with birthdays coming up that I needed cards for my stash is woefully depleted.  So today I made a new card, well actually two of the same card to get me through this card drought.

For this card, I took my inspiration from this card on Julie Davidson's blog.  I used the Lunar Lights set from Lawn Fawn along with the tag die from Winter Gifts (not just for winter at all) to stamp and cut out the focal tag of the card.  I used Versafine Ink in Onyx Black then set it with some clear embossing powder (I am so grateful to finally have a working heat gun again.  Mine died right before Christmas and with my shopping embargo, I was not allowed to buy a new one.  I got one for Christmas but it died the first day.  I'm beginning to think I wasn't supposed to have a heat gun anymore).  I colored the lanterns with Distress Ink and then sprayed them with some water to wash out the color a bit to more closely match the paper I had selected from the Party Day 6x6 pad from Crate Paper.  I fussy cut the lanterns then layered them on my tag and finished off the tag with some Hemptique baker's twine. 

I finished off the card by putting the patterned paper on a mat of solid blue that I had distressed with a little Black Soot Distress Ink and wrapped in the same Hemptique baker's twine.  I added the tag with some pop dots.

I inserted a panel on the inside with a sentiment from Inkadinkado's All Occasions stamp set, also heat embossed to match the front and set on a blue mat inked with a little Black Soot Distress Ink.  I then finished off the entire card with a bit of Wink of Stella on the lanterns and topped with some Glossy Accents. 

Thursday, October 31, 2013

Happy Halloween!

I'm sharing today the one and only Halloween card I made.  I love the holiday but I rarely do cards for it.  But I wanted to use the cute Lawn Fawn set I picked up called Heebie Jeebies.  One of my favorite crafting on-line stores, Two Peas in Bucket, runs a message board where people can sell the stuff they no longer want.  It's totally random what you'll find there, but I've managed to pick up a couple of things from there that I cannot get in any store anymore.  One of my favorite finds was a bundle of a couple of Lawn Fawn sets.

So I just stamped the spider web, spider and bat in Onyx Black Versafine and heat embossed them. Then I fussy cut them and colored in the spider with some Spectrum Noir pens.  I then dug through some of my stash and found some cute Halloween paper in an old Fall Stack from DCWV.  I cut both the mat and the background paper then layered them together and wrapped them with some Queen & Co. black and white baker's twine.  I then adhered them to a black card base I found in my stash.  Then I just added my stamped pieces with some pop dots to finish it off. 

I decided to dress up the inside of this card too by matting my sentiment panel and adding the spider and bat from the outside to the inside along with the a sentiment stamp from the set.  Too cute!

So here's the really fun part.  I bought the We R Memory Keepers envelope punch board, but I haven't really gotten to play with it yet.  I also picked up a new score board; it's the smaller, more portable version of my big Martha Stewart one.  When I was packing it for our recent failed camping trip, I noticed that it had markings for making envelopes on the back.  So I decided to play with those pieces when I was making this card.  I started out with another sheet from that same DCWV Fall Stack and followed the instructions on the Martha Stewart board to make the envelope.  It turned out pretty good.  I decided it needed a liner so I used some scraps of paper from making the card to cut a liner using the punch board.  It turned out pretty good for my first try.
 

Tuesday, October 29, 2013

An Inky Thank You

I just had to do one more card with the Inky Antic's Delivery Benton set.  I really do love this set and I'm sure I'll be pulling it out again soon even after the use it's seen the last couple of days.  It's the same combination of Versafine ink, embossing powder and Spectrum Noir pens.  I opted for a sentiment from the Inkadinkado Thank You Words stamped in Versafine ink for the sentiment and added a strip of American Crafts ribbon I found in my stash that seemed to be just the perfect blend of colors. 

Monday, October 28, 2013

I just wasn't quite ready to put that Inky Antics' Delivery Benton set away, so I had some fun coloring in and cutting out this cute little guy using my Versafine ink, a little heat embossing and my Spectrum Noir pens.  I then found some cute paper in the 6x6 Jillibean Soup Neopolitan Bean paper pad.  I decided to use a pre-made card base that I've had in my stash for a long time.  I cut it down to 4x4 and used a strip of the extra for a base for the Hemptique baker's twine I decided to use to finish off the card.  Then it was just a matter of taping it all together and adding the little bear with some pop dots.  Too cute!

Sunday, October 27, 2013

A Bear-y Wonderful Birthday

Today I got to play in my craft room a bit courtesy of a failed attempt to go camping this weekend.  I was putting away the supplies I had packed to take with me when I found this adorable Inky Antics set called Delivery Benton.  I just couldn't resist stamping it out and playing with it.  A co-worker's birthday is next weekend so I thought this one would be cute for a birthday card.  I stamped him out with Versafine ink and heat embossed the design.  I colored him with my Spectrum Noir pens and added a little Wink of Stella on the flowers for a pop of sparkle.  I added some shiny ribbon from my stash and then mounted the card on some green card stock from my stash and adhered it all to a DCWV Neutrals card base. 

Monday, October 14, 2013

Have a Roarin' Good Birthday Card

My nephew recently celebrated a birthday so I went on the hunt for a card for inspiration.  I found this adorable one from A Bit of This, A Bit of That I had pinned to my card layout board on Pinterest.  So I went hunting through my Lawn Fawn stamps for the ones for the card and got side tracked when I saw the Critters on the Savanna set and my original plan was abandoned in favor of a new idea.  I had a bit of fun with stamping, sponging and coloring with this one.  I used the lion, two little birds, tree, rock and grass from the Critters on the Savanna set and the hat and presents from Lawn Fawn's Year Two set.  I stamped all but the grass using Versafine ink then clear embossed it.  I stamped the grass with Mowed Lawn Distress Ink and clear embossed that.  I then sponged on the Mowed Lawn and colored in the trees and sky with Spectrum Noir pens.  I cut the banner from the Lawn Fawn Stitched Journaling Card die set and stamped on the sentiment from the Critters on the Savanna set.  Then it was just a matter of gluing it all together and adding some pop dots.  I then backed my scene with a mat of white and adhered that to a yellow card base from the DCWV Brights Box of Cards.

For the inside, I added a mat of white upon which I had stamped the little bird from Critters on the Savanna and the little hat from Year Two in Versafine.  I added some grass in Mowed Lawn Distress Ink and colored in the bird and hat with Spectrum Noir markers.  Too cute for a little boy who is too cute.

Sunday, October 13, 2013

Another 50th Anniversary Card

I guess I am very blessed to have many great role models for marriage as this weekend we attended another 50th wedding anniversary celebration.  I needed a card for the event.  I haven't really felt like being in my craft room this week so I thought I might just pull one from my stash like I have for every event the last week or so, but I sat in my craft room for a bit and found a card on Pinterest that I thought I might lift.  While I was sifting through my Lawn Fawn stamp sets, I saw the Cruisin' Through Life set in my stash and it inspired me to go a wholly different direction.  For this card, I used a mask to add two bouquets of flowers to the basket of the bicycle, all of which I stamped using Versafine Ink that I heat embossed with clear embossing powder. I added selectively stamped a bit of one of the sentiments from the Cruising Through Life set and then put together the word together using letters from Lawn Fawn's Harold's ABCs set.  I then colored the whole thing with Spectrum Noir markers and added a bit of sparkle with Wink of Stella.  I matted the colored piece with a piece of paper from the Southern Chicken Dumpling Soup 6x6 pad from Jillibean Soup.

For the inside of the card, I used a sentiment from Lawn Fawn's Sophie's Sentiments set, but cut apart so I could add the 50th from the Creative Imaginations Wedded Bliss set stamping the 50th in Tsunineko Galaxy Gold and the rest in Versafine ink.  I then just had to add this cute little strip of bicycles from the Blossom Soup 6x6 pad from Jillibean Soup to finish it off. 
Here's a shot of the sparkle from the Wink of Stella:
 
 Here's a shot of the inside:

Saturday, October 12, 2013

Happy Birthday Card - Inspired by A Busy Llittle Craftee Bee

Today's card I gave to my aunt for her recent birthday (I'm a little late in getting it posted). I took the inspiration for this card from one I saw posted on A Busy Little Craftee Bee that you can see here

The picture isn't the greatest because it was dark when I took the picture and every attempt I made to compensate for that made the stamping practically disappear.  I did not have the oh so cute flower used in the inspiration piece from A Busy Little Craftee Bee, so I used one in my stash from the Heidi Grace Designs' Paradise stamp set.  I used Stampin' Up's So Saffron ink.  In person, it looks quite nice combined with the Hemptique baker's twine and the sentiment from Fiskars' How Many Candles set stamped in Versafine Ink.  I finished it up with rounding the bottom corner with my We R Memory Keepers Corner Chomper.