After I finished my card for the Inky Paws Challenge over at Newton's Nook, I just had to start working on an idea that had been percolating while I made my challenge card. I inked up the Newton's Day Dream stamp but then wiped off the flowers. I then stamped it on my card stock and then again twice more on two post-it notes so I could have both sky and land masks. I masked the kitty before I inked up the small pumpkin from Newton's Perfect Pumpkin and stamped it on both sides. I also cut two more masks for the pumpkins. Once the kitty and pumpkins were stamped and masked, I used Lawn Fawn's Starry Backdrops inked in Versamark and then heat embossed in clear embossing powder to make the starry background. I used a variety of Distress Inks to sponge on the background starting with Squeezed Lemonade at the horizon, adding Seedless Preserves and finishing in Chipped Sapphire at the top and then blending back down. I wiped the excess ink off the stars and removed my kitty mask to replace it with the one to let me finish the ground. I sponged on Shabby Shutters and Mowed Lawn Distress Ink for the ground, leaving me with just white pumpkins and kitty.
My sister's cat Gus, a gorgeous house panther, isn't doing well. She's pretty sure he has kidney failure and, since he's 16, it's probably a pretty good guess. She's taken him to the vet for blood work and, when I was working on this, we were waiting for the results. So I decided that Gus would be my inspiration for this kitty. Not much technique involved in coloring an all black kitty, but I still had fun with my new Prismacolor colored pencils and gamsol. The pumpkins were a bit more of a challenge on the coloring scale. I was going to finish them off with one of the pumpkin faces that come in the Newton's Perfect Pumpkin set, but, of course, I can't for the life of me find it. I had pulled it off to size the stamp for the pumpkin and then set it aside to finish the coloring and now I can't find it. That happens to me all the time and the stamps eventually turn up stuck the back of another package or the side of my pencil case or whatever. My bet is that it will turn up just after I finish my last Halloween card of the year....
To finish off my panel, I wanted to do something a little simple. I bought the Simon Says Stamp Frames dies because I love the frame it cuts out. I saw so many ways it would be useful and I thought it would be perfect for this. So first I cut the panel down using the largest stitched die from My Favorite Thing's Blueprints #13 set and then centered up the Simon Says Stamp Frame Die over my panel and die cut it. I then die cut a white piece with the same frame. Then it was just a matter of piecing them all back together on my card base. Once I had it together, I added my sentiment from the Newton's Perfect Pumpkin set and washed the sky in Wink of Stella.
After the card was done, I was left with a starry frame that was perfect to frame Chewie! Of course, she would sit still so I could get an in-focus picture. This was the best I could get...
Showing posts with label Versamark. Show all posts
Sunday, October 12, 2014
Friday, September 5, 2014
The Last Baby Card with Newton's Nook Wild Child
Okay, so the title may be a bit misleading because I'm sure sometime in the future there will be another baby card from this set because it's so adorable. But, for now, here's the last baby card I've made with the Newton's Nook Wild Child set that I colored the weekend we went to Seattle for Sandy Allnock's class.
I used paper from the Day Dreamer 6x6 paper pad from Dear Lizzy/American Crafts but I wanted to change things up a bit. I had bought the Pretty Pink Posh Stitched Border Dies a while back with the idea of cutting some fun edges to my cards, but had yet to break them out. I had an idea of adding the sparkly polka dots on the background of the white paper that colored the image on, but it didn't look right, so I ended up fussy cutting the image out. I just used the patterned paper cut with the border and cut the border again on my card base.
I used that American Crafts Project Life banner to cut out the banner to stamp with the sentiment from the set. I added some Lawn Fawn Sky Lawn Trimmings to the top with a Glue Dot holding the bow in place. A few pop dots gave some dimension to the image and the banner. Then I decided to try my sparkly dots on the inside bottom of the card since it would show through to the outside at the bottom. I used a dot stencil to pounce on some VersaMark and some JudiKins embossing powder in White Diamonds. It worked much better there, but is harder than heck to photograph with a curved front panel...
I used paper from the Day Dreamer 6x6 paper pad from Dear Lizzy/American Crafts but I wanted to change things up a bit. I had bought the Pretty Pink Posh Stitched Border Dies a while back with the idea of cutting some fun edges to my cards, but had yet to break them out. I had an idea of adding the sparkly polka dots on the background of the white paper that colored the image on, but it didn't look right, so I ended up fussy cutting the image out. I just used the patterned paper cut with the border and cut the border again on my card base.
I used that American Crafts Project Life banner to cut out the banner to stamp with the sentiment from the set. I added some Lawn Fawn Sky Lawn Trimmings to the top with a Glue Dot holding the bow in place. A few pop dots gave some dimension to the image and the banner. Then I decided to try my sparkly dots on the inside bottom of the card since it would show through to the outside at the bottom. I used a dot stencil to pounce on some VersaMark and some JudiKins embossing powder in White Diamonds. It worked much better there, but is harder than heck to photograph with a curved front panel...
Saturday, August 16, 2014
Thanks for Things on My Craft Desk
This card was completely born from things sitting on my craft desk as I spent an evening doing odds and ends, like writing in cards, sending email, posting pictures and putting together a list of copic colors I wanted to pick up for an upcoming class. By the time I was done, I pretty much ready to go to bed, but then I saw the Hero Arts Antique Flower Background stamp and some JudiKins White Diamond Embossing Powder sitting on my desk. It was calling my name. So I found a scrap of black paper, stamped it with some Versamark ink and added the embossing powder. It was so pretty. I cut it out with the stitched frame from Mama Elephant's Femme Frames (although you can't really tell) and then cut a white background with the scalloped frame from that set. I wasn't sure about the sentiment, but the Scripty Thanks die from Lawn Fawn was still on my desk, so I pulled out some beautiful blue paper from Pop Tone that I've been hoarding since Paper Zone closed down and I knew I wouldn't have a local supplier anymore. But now that I've seen how pretty the Audrey Blue paper is from Simon Says Stamp, I'm feeling more comfortable about using my stash. I die cute the thanks several times and inlayed then stacked them. I think if I were to do the card again, I'd put the sentiment in the bottom left corner rather than the middle. I finished it off with some clear Wink of Stella and some Glossy Accents.
Wednesday, August 13, 2014
Another Sympathy Card
While making the last card, I made another panel using that same technique demonstrated by Jennifer McGuire in the Onlinecardclasses.com Stretch Your Stamps 2 class using the Ornate Florals Cover-a-Card stamp from Impression Obsession, Versamark and Perfect Pearls. This time I stopped after adding the Perfect Pearls and did not add the clear embossing powder. I think it liked it the effect better without it. I wasn't sure what to do with the panel at first, but I decided to inlay it as is so popular right now. I used the same With Sympathy die from Simon Says Stamp. It was not particularly fun to inlay because there were sooooo many little bits of paper to fill in the spaces. I guess I wasn't thinking about that when I settled on that technique. Once it was done, it still needed something. I had just watched a video where Kristina Werner used Glossy Accents to make her sentiment stand out, so I thought I would do that. Big mistake. This sentiment is so dainty that it was really difficult to add the Glossy Accents without making a big old mess.
Tuesday, August 12, 2014
With Sympathy
I saw this clever technique in a video from Jennifer McGuire in the Onlinecardclasses.com Stretch Your Stamps 2 class using a reverse background stamp, Versamark and Perfect Pearls. I knew I had to give it a try. I had picked up this beautiful background stamp from Impression Obsession that I thought would be perfect for the technique. I inked it up with Versamark, stamped my image, swirled on the Perfect Pearls in Blue Patina and Green Patina, then covered it with clear embossing powder and heat set it. So pretty. I cut it down just smaller than my black card base.
I added some Heirloom Gold Perfect Pearls using Versamark ink on some white card stock. I then die cut it with the flag shape from Lawn Fawn's Large Stitched Journaling Card and cut a plain black one as well. I then layered them with a bit of the gold peeking out. For the sentiment, I used the tiny With Sympathy die from Simon Says Stamp. It cuts the thinnest sentiment. There's no way I could do something so thin anyway else. I decided that I wanted it to be out of the Verdigris embossing powder from Ranger, so I just added some Versamark to some white card stock, covered it with the powder, heat embossed it and then cut it out. I layered it on top of the banner to finish off the card.
Saturday, July 19, 2014
Thinking of You Inspired by Jennifer McGuire
As I posted before, I was completely enthralled watching Jennifer McGuire
use Distress Inks with embossing folders. You can see her beautiful
work and check out her video here. I immediately knew I
had to give it a try by making several panels. For this card, I used the Darice Heart Background with my Distress Inks (Peacock Feathers and Seedless Preserves I think) to make the lovely embossed panel. I wasn't quite sure how I was going to use it on a card, but the idea came to me when I made a mess of a my craft desk. I hate when it's messy but I do have to admit that I'm more creative when things are chaotic on my desk. Somehow the mess of supplies leads me to think of things I might not have thought of if I hadn't seen random things laying together.
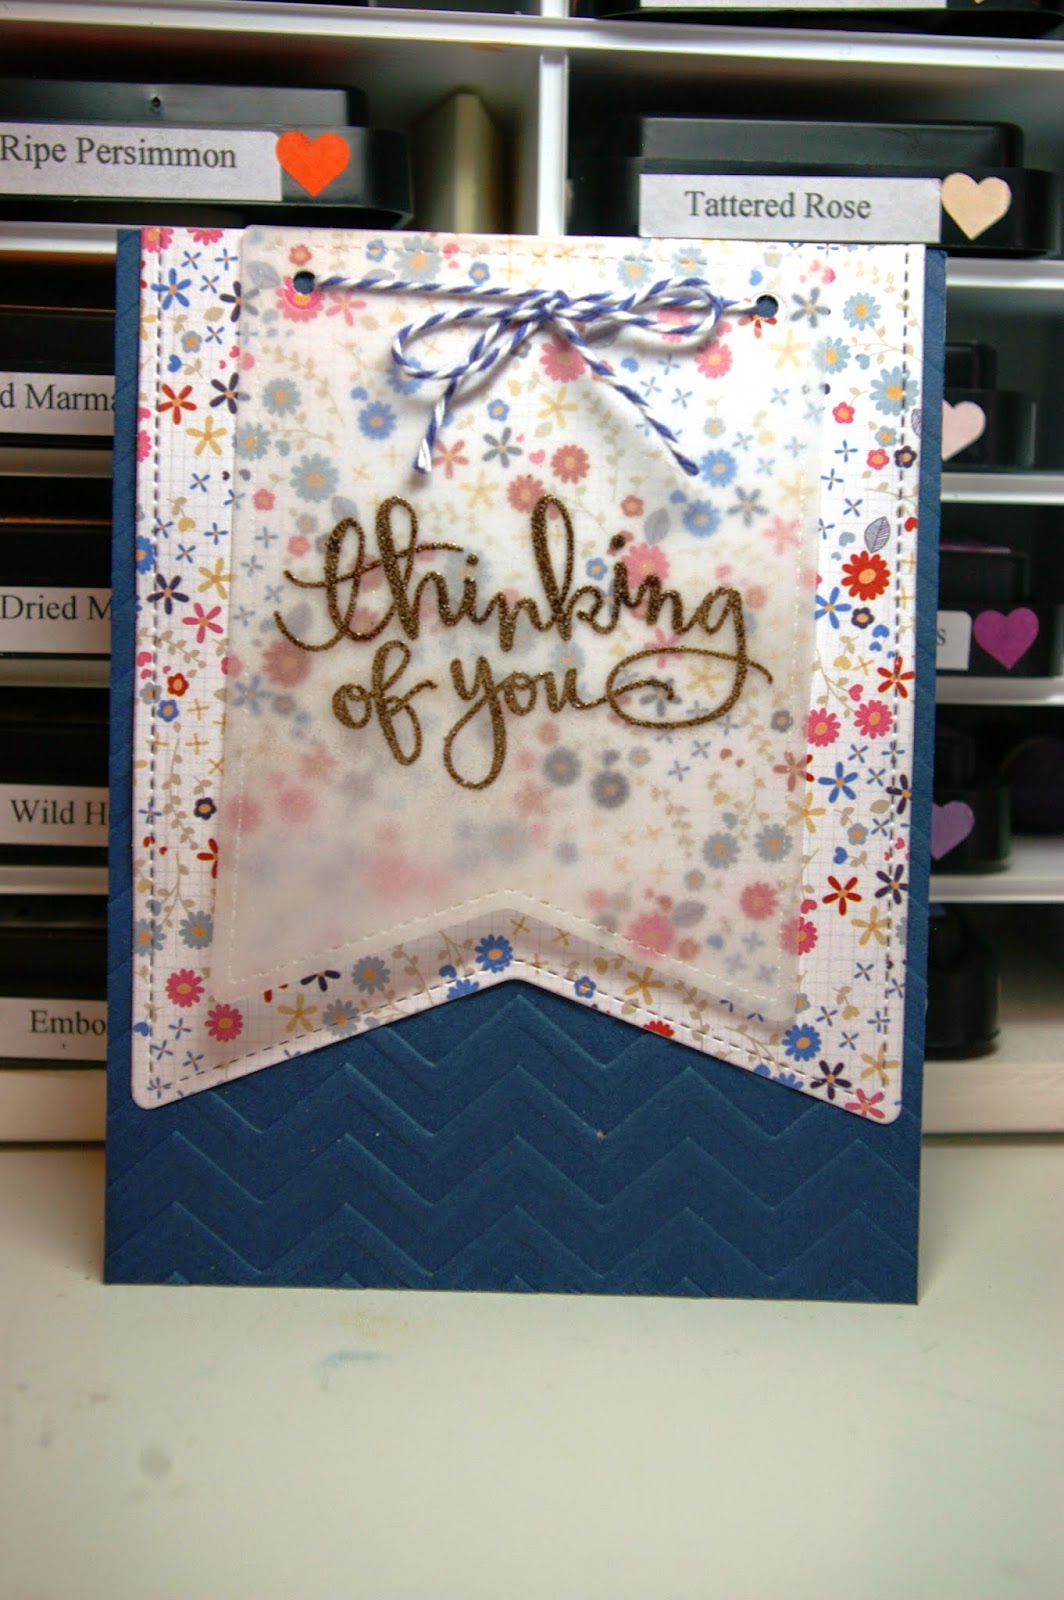
It all started with the Lawn Fawn Stitched Party Banners dies and I thought about using the smallest banner shape for my sentiment. But I didn't want to cover over all the texture and color, so I found some vellum in my stash. Fortunately, I have several weights of vellum because the first piece was way too heavy. It really was too opaque for what I wanted. But then I found the lighter weight pack and realized it was perfect. After cutting out my banner, I used the stamp from the Simon Says Stamp July 2014 Card Kit inked in Versamark and heat embossed with some Ranger Super Fine White Embossing Powder to finish the sentiment. I then marked the holes in the banner on my panel and used my Crop-a-dile to hole punch in the back panel. I used some Sky hemp cord from Lawn Fawn for a bow and then cut my panel just a bit smaller than the width of my card base made from a half of a sheet of Simon Says Stamp Soft Navy card stock. Once I had adhered it to the card base, I decided it really didn't need any further embellishment.
Wednesday, July 16, 2014
Thinking of You Using the Simon Says Stamp July 2014 Card Kit
In my quest to use up my Simon Says Stamp July 2014 Card Kit, I had another piece of floral paper that I had used with the envelope stamp, but still had quite a bit of the sheet left. I decided it would be good time to use my new Lawn Fawn Stitched Party Banners die. I used the largest banner die to cut a banner out of the floral paper. I then used the smaller banner die with vellum. I then stamped the sentiment with some Versamark ink and used Ranger Walnut Stain Embossing Powder to finish off the sentiment. I layered the banners together, hole punched some matching holes in the floral paper then tied the two layers together with some Hemptique baker's twine. I ran a piece of Soft Navy card stock from Simon Says Stamp through the Darice Chevron Background embossing folder for a little added texture. I then layered the embossed card stock on my card base and topped it off with the banner pieces I had previous tied together.
Monday, July 14, 2014
Thinking of You Using the Simon Says Stamp July 2014 Card Kit
I've got a few sheets of paper left from the July 2014 card kit from Simon Says Stamp, some of which I love so I've been hoarding and some I wasn't quite sure how to use. This card uses one of the later. The busy floral print is pretty, but I wasn't sure how to use it until I pulled out my new Avery Elle Pinked Elements. The big rectangle seemed perfect, but I wasn't sure on the card stock. So I decided to go with vellum instead. I stamped the sentiment from stamp set in the kit then heat embossed it in Ranger Super Fine White embossing powder. Then started stamping the flowers in the corners then heat embossing them in colors to match the paper.
Saturday, June 28, 2014
Sending Happy Thoughts Using the Simon Says Stamp July 2014 Card Kit
Last weekend I played with the Simon Says Stamp July 2014 card kit. I made my own copy of each of the samples because I wasn't quite feeling any crafty mojo. Even after all the card samples were made, I had lots (and I do mean lots) left of the kit. Hubby and I have a long weekend together and have been pretty busy, but tonight I slipped into my craft room after our date and just started re-arranging the papers on my desk. I had planned to do a inlayed die cut since I've seen so many cute examples lately, but then something else took root and I'm pretty happy it did.
In addition to the card kit, I used a Paper Smooches die of the notebook paper, the white paper I cut the notebook paper from, a small piece of ribbon, some Versamark ink, some black Archival ink and the clear embossing powder, a little clear Wink of Stella on the Sending and a heart on one of the envelopes then a little Glossy Accents on the heart on the envelope. Sure, it's more than just the card kit, but, other than perhaps the die, it's staples most of us have in our stash. Love this kit and the stamp set with it is amazing. If you want one, head over to Simon Says Stamp before this kit sells out.
Wednesday, June 11, 2014
I Love You to the Stars and Back
I've had this idea percolating in my head since Sunday and I finally had some time to get my fingers inky. I used two Lawn Fawn stamps sets: Happy Trails and Lucky Stars. I inked the sentiment and stars using Versamark and heat embossed them with clear power. Then it was time for some inky fingers. I used Scattered Straw, Seedless Preserves, a little bit of Dusty Concord and a whole lot of Chipped Sapphire Distress Ink to make my night sky. I really need to get those round blending tools, but I made the rectangle ones and some Tsukineko dabbers work. After stamping out my trees, car and trailer in Momento ink, I colored them pretty simply with my copic markers. Then I cut them out with the matching dies. I decided they needed some grass, so I cut out some green card stock with my Lawn Fawn grassy border die and added a little Mowed Lawn Distress Ink to the edges. Then it was just a matter of building the background with some tape and pop dots.
Thursday, June 5, 2014
Withholding Judgment
So I'm not so sure about today's card. I had this idea but it didn't quite translate the way I had it in my mind. So I'm not in love with this card. I keep looking at it thinking that it needs something, but I'm not sure just quite what. So I'm going to sleep on it and take another look at it tomorrow. In the meantime, what got me started tonight was the newest sketch over at Freshly Made Sketches, another challenge block that I stalk read every week, but haven't participated in for a while. I really liked Rita's sketch this week and I've had this Happy Trails set from Lawn Fawn that I picked up at CKC about two months ago, but haven't broken out yet. But now that I've played with the set, I really, really want to go camping, but the RV is in the shop. Boo.
I had stamped the stars from the Lawn Fawn Lucky Stars set, heat embossed the stars with some Versamark and clear embossing powder, stamped the car and trailer from Lawn Fawn's Happy Trails set, inked the starry night background and grass with some colors of Distress Ink, and had the car and trailer pretty much colored with Copics when my husband came in my craft room. He immediately commented on how cute it was (which he rarely does when something is in progress). So I felt like I was on the right track, especially when I added Wink of Stella to the starry night, but it just fell apart after that. I love the starry background embossed with the Darice Stars folder using paper from the Lemon Lush 6x6 pad from Studio Calico. I wasn't sure on the banners because I couldn't find a paper I liked, so I just colored them with a marker to match. Basically I like each of the elements by itself, but they just don't really come together right... So you just may see this card again soon when I figure out what's not quite right. Do you ever have that happen to you?
Monday, May 26, 2014
Thinking of You
The inspiration from this card came from a mash-up of two sources: the card Kristina Werner made with Ferro and some heat embossing on vellum that Nichol Magouirk did in a recent video. But for my card, I didn't use Ferro this time. Instead, I used two products that have been sitting in my stash for a couple of weeks from some recent sale shopping I've done: Claudine Hellmuth Studio Multi-Medium Matte and some Distress Stickles dry glitter. I used the Heidi Swapp dotted stencil, brushed on a layer of medium, lifted my stencil, cleaned it and sprinkled on the glitter. Once it dried, I trimmed the piece to fit my card base with a small mat. Then I stamped the tag from Lawn Fawn's Winter Gifts set with Versamark and heat embossed it with white embossing powder. Then I added the sentiment from Inkadinkado's Expressions and Frames set following the same method. To finish it off, I decided on a red poppy when scrolling through my cut files in my Cameo library. I loved this one and I think it was just the right finishing piece (with a little Wink of Stella in the center of course).
Friday, May 23, 2014
Dream - Still Inspired by Watercolor for Card Makers
Even though the onlinecardclasses.com Watercolor for Card Makers class is officially over today with new content having ended last weekend and the galleries closing tonight, I'm still working through all the fun backgrounds I created and the inspiration just keeps coming. When Lawn Fawn released their new products at Winter CHA back in January, I just had to have most of them. There were a couple of sets where I wasn't sure I would get as much use. One of them was the Dream set. I could see it really being useful for art journaling or perhaps graduation cards, but since I don't do the first and I don't know many people still in school (and I have at least one graduation set already) I thought I would give it a pass. But I've seen a couple of cute cards with it lately so it's been rattling around in the back of my mind. Last week, I took a rare lunch break to walk downtown, oh, not because I really had the time to take a lunch break, but because my legs itched something fierce from this stupid rash that developed after a pedicure and I desperately needed hydro cortisone, so, of course, I had to do a little craft shopping too at Runaway Arts and Crafts since I was already in the area. I found the Dream set and matching dies and decided that was my call to snap them up.
I have this background I made on the first night of class using the Impression Obsession Circle Fusion background stamp, some Versamark Ink, some clear embossing powder and then some watercolor over the stamped image. I played around a lot with what to put over it and realized I really didn't want to cover it too much. I had a Lawn Fawn banner from the Winter Gifts set sitting on desk and I realized it was about the right size for what I wanted. So I stamped it up, then added some Old Paper Distress Ink to give it a little wear. For the feathers, I colored them a little with Copics (B95 mostly) and then cut them out. I added pop dots and some sequins to finish it off.
Thursday, May 22, 2014
Happy Birthday - Inspired by Watercolor for Card Makers
Today's card features a background I made on the first day of class when I was so inspired by what I was learning that I just wanted to play. There was a fabulous class where the instructor mentioned circles. If you follow me on Instagram, Twitter or Facebook, you saw this picture (love the post-it note list of all the cards I need for coming up occasions in the background):
I was just having fun inking up circles in Distress Ink with no idea where the end product would be. There's something very freeing about just playing with ink. Well, today, I'm going to share with you where it ended after lots of circles, some water and some more water. The background was so colorful and really beautiful, it just made me smile so I decided to let it shine. I just stamped a quick sentiment from the Stampin' Up set I bought during their free shipping/retiring product promotion recently called Perfectly Penned. I used Versamark and some white embossing powder, then added a black mat on a white card base and a few clear sequins. I just love the result:
Sunday, May 11, 2014
Happy Mother's Day - Inspired by Watercolor for Card Makers
Happy Mother's Day to all the moms out there. Here's the card I made for my Mom:
Yes, it's another card from things I learned in the onlinecardclasses.com class Watercolor for Card Makers. You are going to see a lot of posts about it because that class rocks. This card was made with a Cover-a-Card background stamp from Impression Obsession called Circle Fusion. I heat embossed it with some VersaMark Dazzle and clear embossing powder. Then I played with my watercolors over the image (and wiped up the excess on top of the image with a baby wipe). I then watercolored some stamps from Lawn Fawn's Our Friendship Grows set and cut them out with the matching dies. I stamped the sentiment using the "happy" from Simon Says Stamp's Happy Sentiments set and the "mother's day" from Technique Tuesday's Swanky Sentiment set. Then I cut a flagged banner and added some Old Paper Distress Ink to tone down the white a bit. A few pop dots and glue and I was done.
Friday, January 24, 2014
Inspired by Laura Williams on Papercrafts & Scrapbooking
I was trolling through the blogs I read (hmm... I wonder how many times I've written that?) when I saw this clean and simple, but oh so wonderful card made by Laura Williams on the Papercrafts & Scrapbooking blog. I had marked it to pin to my Pinterest Card Layout board for some day when I needed some quick inspiration, but it struck me that it was the perfect card to use a new set I just received from Technique Tuesday called Say It - Hello.
On a side note: After a disastrous try of a kit club a while back, I shied away from them for a long time. But then I finally broke down and joined two stamp clubs (Stamps of Life and Studio AE from Technique Tuesday) and the Project Life kit from Citrus Twist. I must say that each of them is exactly what I expect from a good monthly club and have revived my belief in the concept. I also love that with both Studio AE and Citrus Twist I can add extras for no extra shipping. Stamps of Life charges extra shipping, but it's very reasonable and they give you a discount on the stamps that pretty much evens it all out.
Back to our regularly scheduled post: I couldn't believe how quickly this card came together. I pulled out a rainbow of Distress Ink: Fired Brick, Spiced Marmalade, Mowed Lawn, Broken China and Dusty Concord. Then I stamped them using my Martha Stewart stamp press just to make sure I lined them up well. Once I had that done, I noticed the "Just Saying" sentiment stamp and light bulb went off. A little VersaFine Tuxedo Black ink added the right touch. I rummaged through my box of card blanks and narrowed it down to a sunny yellow or this beautiful teal. Teal won out in the end through. I used my We R Memory Keepers Corner Chomper to round a few corners then added that last touch with some enamel dots from the Cut & Paste line from My Mind's Eye.
I have to say that I really liked this one (even the hello I heat embossed in VersaMark on the inside, but you don't get to see that here).
On a side note: After a disastrous try of a kit club a while back, I shied away from them for a long time. But then I finally broke down and joined two stamp clubs (Stamps of Life and Studio AE from Technique Tuesday) and the Project Life kit from Citrus Twist. I must say that each of them is exactly what I expect from a good monthly club and have revived my belief in the concept. I also love that with both Studio AE and Citrus Twist I can add extras for no extra shipping. Stamps of Life charges extra shipping, but it's very reasonable and they give you a discount on the stamps that pretty much evens it all out.
I have to say that I really liked this one (even the hello I heat embossed in VersaMark on the inside, but you don't get to see that here).
Friday, October 11, 2013
Happy Birthday!
For today's card, I really didn't have to look anywhere for inspiration; it just sort of made itself. I recently bought this Crafty Secrets' set called Dahlia while shopping at yet another local scrapbooking store that is going out of business. My sister was over to watch some TV and I just wanted to play with the new stamp. Without any real idea of where I was going with it, I stamped it in Versamark ink on some kraft card stock from my stash then heat embossed it with some Zing white embossing powder. I colored the flower in with some colored pencils to add a pop of color. Then I stamped on the sentiment from the Simon Says Stamp Happy Sentiments set using Versafine ink. I decided it needed a bit of a mat, so I cut the finished piece down to 3.75 by 5 inches and then cut a white mat at 4 by 5.25. Then it was just a matter of gluing it all down to a kraft card stock card base.
Thursday, September 12, 2013
So Thankful for You - Inspired by Lawn Fawn
A dear friend of mine is starting a new adventure. She's not really leaving but she won't be around as much. So I wanted to the opportunity to let her know how much I appreciate here. Today's card is inspired by an adorable card posted on the Lawn Fawn blog (love, love, love their products) that you can see here. For my case of the card, I stamped the cute pumpkins from the So Thankful set in Versafine and then heat embossed them with clear embossing powder. I then colored them with my Spectrum Noir pens and fussy cut them (since I don't have the dies yet - but they are on my wish list). I then stamped the sentiment in Versamark and heat embossed it in white embossing powder use some Jillibean Soup paper. I matted it on some more Jillibean Soup paper and added that to a card base from some Pop Tone paper I've been hoarding. I love how it turned out even if I don't like my own photography of the card.
Friday, May 10, 2013
Another Butterfly Card
I loved the butterfly card using the Stampin' Up Swallowtail stamp on Stampin' Lab's blog. It's just gorgeous and I thought I could quickly create my own version, but I'm still so exhausted that my brain just wasn't helping me tonight. I didn't have the same stamp for the border, but I found a nice swirly one in my stash that I thought would work. I embossed both and then colored in the butterfly. I didn't have the right baker's twine, so I ran some white embroidery thread over some Distress Ink in old paper to give it a little age. I then added distress ink to the paper and put it all together with a vintage button from my stash. It should have a been a quick card, but I just needed a bit more time tonight.
Monday, January 7, 2013
Happy Birthday Love of My Life
Today is my hubby's birthday so I made him this card with stars on it to celebrate that he is the star of my life. I found the original design on Julie Davidson's blog Julie's Stamping Spot. I just loved that the design worked for something a little bit masculine since making cards for men is the hardest of all. I used some scrap orange paper for the background and some lovely cream card stock for the base of the card and the elements. The rest of the paper comes from the Simple Stories Awesome 6x6 paper pad. I just love the masculine nature of the paper. For the background, I used Versamark to stamp the stars from the Autumn Leaves set Scribbles Hearts and Stars. Then I finished it off with the sentiment from Fiskar's Happy Birthday set stamped in Chocolate Chip from Stampin' Up. I just love how the card turned out, but I love my dear hubby more. Happy birthday!
Subscribe to:
Posts (Atom)