Showing posts with label Hemptique. Show all posts

Thursday, September 18, 2014

Happy Birthday Spring Chicken!

Ahh... It's Thursday.  Just one more day before opening night of hockey and I just can't wait.  This time tomorrow I'll be yelling and cheering and celebrating one of my favorite things about Fall:  the return of hockey!

In the meantime, I continue to make birthday cards using that Simon Says Stamp Birthday Farm Animals set.  Today's card features the chicken (which is so stinking cute).  Once I had it colored, I was back to that same place:  what do I do with it now?  This time I pulled out the tag die from Lawn Fawn from the Winter Gifts set.  It was the perfect frame for the chicken.  I cute a second one from patterned paper from the Pebbles Sunny Side 6x6 pad, which was still sitting on my desk.  Then I cut down another piece using the stitched frame die from Mama Elephants Basic Set and some vellum from the scalloped die from the same set.  Then it was just a matter of layering the papers together, added some Hemptique baker's twine and finishing it off with some Pretty Pink Posh sequins and Glossy Accents on the eyes.  Super cute!


Sunday, August 31, 2014

Inspired by Mojo Monday and Featuring Newton's Nook

Okay, so I'm not really a fan of a skinny card, but I liked the sketch and I thought it was the perfect way to combine one of my newest dies from Simon Says Stamp with a Newton's Nook image I colored a week ago.

I gave away my last baby card the other day, so this seemed like the perfect way to start to replenish my supply.  I used the Echo Park 6x6 paper pad from the Everyday Eclectic line, which has some adorable prints that were perfect for a paper card.  I colored the cute little penguins from the Newton's Nook Wild Child set then cut them out with a die from the Frames set from Simon Says Stamp.  I added the sentiment from the stamp set to a banner cut with the die from American Crafts/Crate Paper Maggie Holmes Styleboard dies.  I found a button in my stash and added some baker's twine from Hemptique to finish it off. 


Wednesday, July 16, 2014

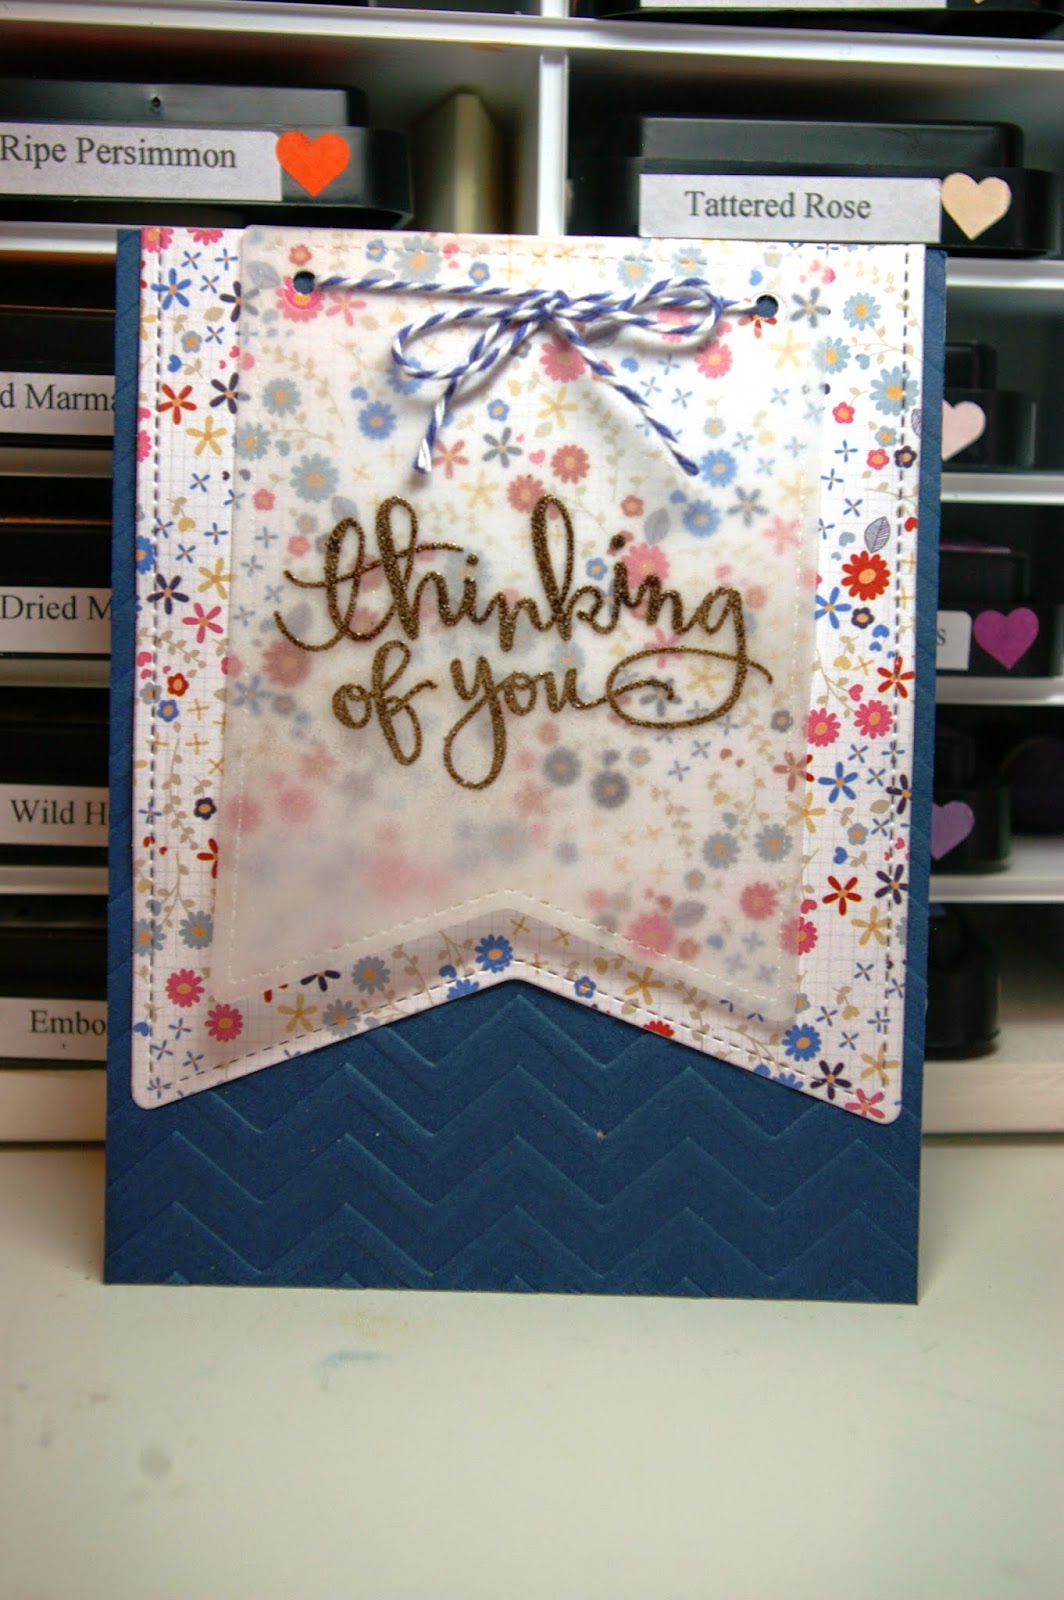
Thinking of You Using the Simon Says Stamp July 2014 Card Kit

In my quest to use up my Simon Says Stamp July 2014 Card Kit, I had another piece of floral paper that I had used with the envelope stamp, but still had quite a bit of the sheet left.  I decided it would be good time to use my new Lawn Fawn Stitched Party Banners die.  I used the largest banner die to cut a banner out of the floral paper.  I then used the smaller banner die with vellum.  I then stamped the sentiment with some Versamark ink and used Ranger Walnut Stain Embossing Powder to finish off the sentiment.  I layered the banners together, hole punched some matching holes in the floral paper then tied the two layers together with some Hemptique baker's twine.  I ran a piece of Soft Navy card stock from Simon Says Stamp through the Darice Chevron Background embossing folder for a little added texture.  I then layered the embossed card stock on my card base and topped it off with the banner pieces I had previous tied together.

Friday, June 6, 2014

Take Two

Remember this card that I wasn't quite sure about?
Well, I pulled it apart and played with it some more.  I used the dashed line stamp from Lawn Fawn's Winter Gifts to add a little something to the banners.  I used the tag stamp to stamp the tag background to give it more definition.  I pulled apart the baker's twine and substituted one length of Silver Sparkle hemp cord from Lawn Fawn in with the Hemptique baker's twine.  Then I added a few Studio Calico wood veneer stars that I brushed with Wink of Stella and topped with Glossy Accents to give them a bit more flash.  I like it a lot better.  It's certainly not my favorite card I've ever made, but I like it lot better now.

Thursday, June 5, 2014

Withholding Judgment

So I'm not so sure about today's card.  I had this idea but it didn't quite translate the way I had it in my mind.  So I'm not in love with this card.  I keep looking at it thinking that it needs something, but I'm not sure just quite what.  So I'm going to sleep on it and take another look at it tomorrow.  In the meantime, what got me started tonight was the newest sketch over at Freshly Made Sketches, another challenge block that I stalk read every week, but haven't participated in for a while.  I really liked Rita's sketch this week and I've had this Happy Trails set from Lawn Fawn that I picked up at CKC about two months ago, but haven't broken out yet.  But now that I've played with the set, I really, really want to go camping, but the RV is in the shop.  Boo.

I had stamped the stars from the Lawn Fawn Lucky Stars set, heat embossed the stars with some Versamark and clear embossing powder, stamped the car and trailer from Lawn Fawn's Happy Trails set, inked the starry night background and grass with some colors of Distress Ink, and had the car and trailer pretty much colored with Copics when my husband came in my craft room.  He immediately commented on how cute it was (which he rarely does when something is in progress).  So I felt like I was on the right track, especially when I added Wink of Stella to the starry night, but it just fell apart after that. I love the starry background embossed with the Darice Stars folder using paper from the Lemon Lush 6x6 pad from Studio Calico.  I wasn't sure on the banners because I couldn't find a paper I liked, so I just colored them with a marker to match.  Basically I like each of the elements by itself, but they just don't really come together right...  So you just may see this card again soon when I figure out what's not quite right.  Do you ever have that happen to you? 

Friday, April 18, 2014

Get Well Soon Inspired by the Lawn Fawn Blog

I had a headache (darn weather change) and yet I needed a card for a co-worker who just had surgery.  So, I scoped out the Lawn Fawn blog where I fell in love with this cute turtle card.  It was the perfect opportunity to break out my On the Mend set (with a few extra stamps from Critters in the 'Burbs, Sunny Skies and Bon Voyage) plus my new Grassy Border die.  After stamping out my selections with the Momento Tuxedo Black ink and coloring with my Copics (love them), I cut out my grass with some green paper and the sky from some blue paper in my stash.  I added some clouds with Hero Arts Unicorn white ink and the cloud from the Bon Voyage set.  I added some Hemptique baker's twine and a button from my stash, but it still seemed to need something.  So I cut out a black mat to bring it all together and adhered it to my card base.  Simple, easy and quick to let me crawl off to bed and see if I can sleep off this headache.

Sunday, January 5, 2014

I'm Back With a Birthday Card Inspired by Julie Davidson...

Life has been crazy and hectic and really I just haven't been myself lately.  But today I had some time in my craft room and I wasn't busy putting together December Daily or Christmas cards or tags for gifts or one of a million things lately that has taken over my life.  But I do have a couple of people with birthdays coming up that I needed cards for my stash is woefully depleted.  So today I made a new card, well actually two of the same card to get me through this card drought.

For this card, I took my inspiration from this card on Julie Davidson's blog.  I used the Lunar Lights set from Lawn Fawn along with the tag die from Winter Gifts (not just for winter at all) to stamp and cut out the focal tag of the card.  I used Versafine Ink in Onyx Black then set it with some clear embossing powder (I am so grateful to finally have a working heat gun again.  Mine died right before Christmas and with my shopping embargo, I was not allowed to buy a new one.  I got one for Christmas but it died the first day.  I'm beginning to think I wasn't supposed to have a heat gun anymore).  I colored the lanterns with Distress Ink and then sprayed them with some water to wash out the color a bit to more closely match the paper I had selected from the Party Day 6x6 pad from Crate Paper.  I fussy cut the lanterns then layered them on my tag and finished off the tag with some Hemptique baker's twine. 

I finished off the card by putting the patterned paper on a mat of solid blue that I had distressed with a little Black Soot Distress Ink and wrapped in the same Hemptique baker's twine.  I added the tag with some pop dots.

I inserted a panel on the inside with a sentiment from Inkadinkado's All Occasions stamp set, also heat embossed to match the front and set on a blue mat inked with a little Black Soot Distress Ink.  I then finished off the entire card with a bit of Wink of Stella on the lanterns and topped with some Glossy Accents. 

Monday, October 28, 2013

I just wasn't quite ready to put that Inky Antics' Delivery Benton set away, so I had some fun coloring in and cutting out this cute little guy using my Versafine ink, a little heat embossing and my Spectrum Noir pens.  I then found some cute paper in the 6x6 Jillibean Soup Neopolitan Bean paper pad.  I decided to use a pre-made card base that I've had in my stash for a long time.  I cut it down to 4x4 and used a strip of the extra for a base for the Hemptique baker's twine I decided to use to finish off the card.  Then it was just a matter of taping it all together and adding the little bear with some pop dots.  Too cute!

Saturday, October 12, 2013

Happy Birthday Card - Inspired by A Busy Llittle Craftee Bee

Today's card I gave to my aunt for her recent birthday (I'm a little late in getting it posted). I took the inspiration for this card from one I saw posted on A Busy Little Craftee Bee that you can see here

The picture isn't the greatest because it was dark when I took the picture and every attempt I made to compensate for that made the stamping practically disappear.  I did not have the oh so cute flower used in the inspiration piece from A Busy Little Craftee Bee, so I used one in my stash from the Heidi Grace Designs' Paradise stamp set.  I used Stampin' Up's So Saffron ink.  In person, it looks quite nice combined with the Hemptique baker's twine and the sentiment from Fiskars' How Many Candles set stamped in Versafine Ink.  I finished it up with rounding the bottom corner with my We R Memory Keepers Corner Chomper. 

Friday, September 13, 2013

Happy Birthday Card - Inspired by I Create and Freshly Made Sketches

A friend at work is celebrated acknowledged her birthday this week so I needed a card to celebrate acknowledge it.  I turned to my lovely card layout board on Pinterest where I pin all the cards that I find in the blogs I read that I think I'll want to try my hand out or will inspire me.   This wonderful card from Jen of I Create for the Freshly Made Sketches sketch #89 caught my attention.  You can see the card here

For my version, I changed it up from a square card to a A2 size.  I stamped my rectangle of white linen card stock with some stamps from the Chocolate Chalet set from Cloud 9 Designs using Stampin' Up So Saffron ink.  I then topped that with a sentiment from the Fiskars Happy Birthday set using Versafine Onyx Black ink.  I cut little banners from some Jillibean Soup paper (yellow stripe) from the Southern Dumpling 6x6 pad and some Echo Park (yellow chevron) from the A Perfect Summer 6x6 pad. 

I then layered the stamped paper on some black card stock, added the banners and then adhered it all to the kraft paper. I added the Hemptique baker's twine and cute white button from my stash.  Then I was ready to at it to my A2 card base and call it cute!

Friday, July 5, 2013

Thanks Watercolor Card

Yesterday I shared a card I made using watercolor.  It was my first time playing with that technique.  I decided to take my "practice" piece and turn it into a card even though I thought it was pretty basic looking.  Although I didn't originally plan to use it, I think there's something magic in our first efforts at something.  They usually are never the best we ever do (unless it's our last attempt), but firsts are special.  So I thought I would turn it into a card for someone special.  I'm sure she'll appreciate what it's like to make a first attempt.  I added just a touch of glitter with the Zig brush I talked about yesterday and some Hemptique twine.  Once it was all put together, I realized I actually liked it.

Monday, June 24, 2013

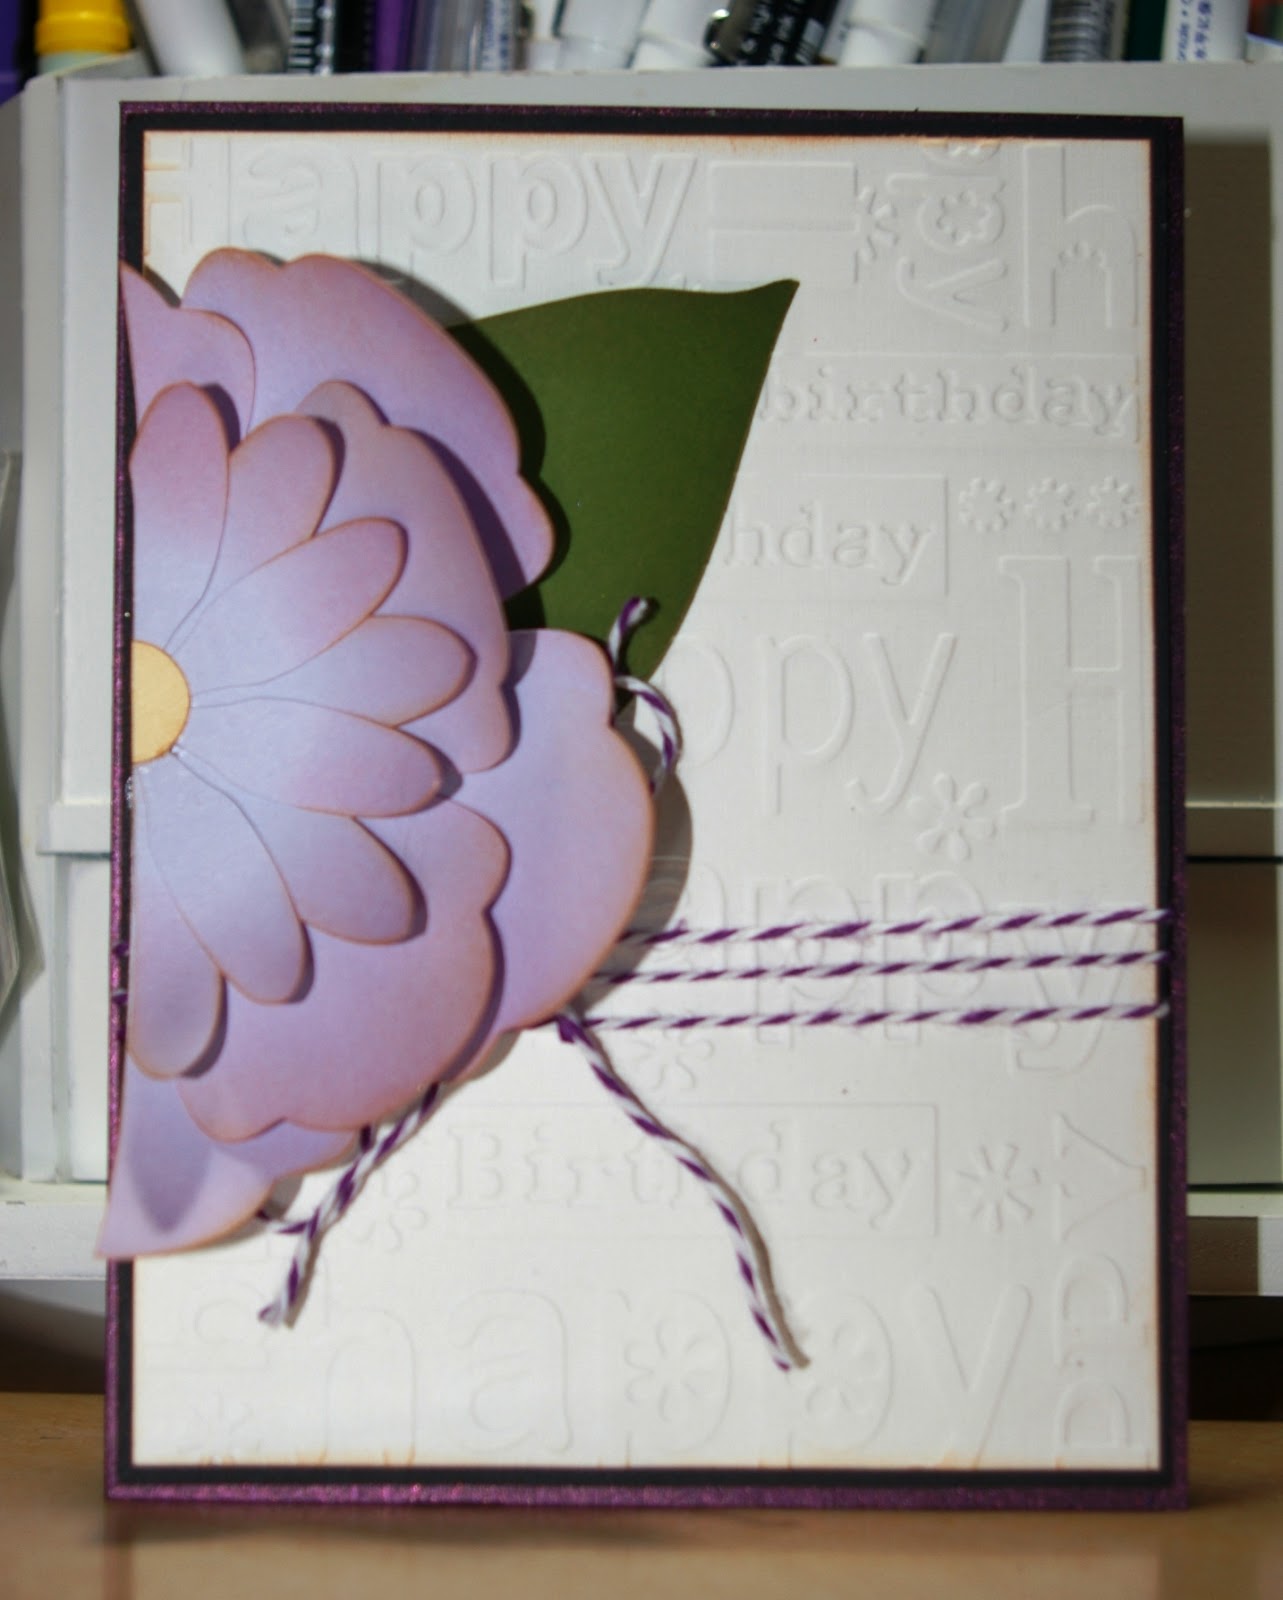
Happy Birthday Card

Last week was my mother-in-law's birthday so I went trolling on Pinterest for some inspiration and found a lovely birthday card pinned from Jaydekay on Splitcoaststampers.com.  I just loved the look of this card.  Of course, I don't have the lovely retired Sizzix die, but I do have a Cameo and lots of 3rd flowers.  I finally selected this 3rd layered flower, which is Design ID #38042, from Patty Young/MODKID.  I cut it out of a random piece of card stock from my stashed then inked the flower with Spun Sugar Distress Ink.  I finished inking all the edges of the flower, center and leaf in Tea Dye Distress Ink.  Then it was just a matter of running the white card stock through the Happy Birthday Cuttlebug embossing folder and tied it all together with some Hemptique baker's twine.  I decided it all needed matting with black before I adhered it all to my purple card stock card base. 

Wednesday, June 19, 2013

I'm Wild About You Card

I just loved the Critters on the Savannah set from Lawn Fawn.  It's just too cute!  So after seeing all the amazing cards that others had made with it, I picked it up.  So here's the first of the cute cards that I scraplifted from the Lawn Fawn blog.  This one they found on Flickr by SweetMaeBell

So I spent some time playing with my new Spectrum Noir pens to color the stamps. This was my first time that I've really had the chance to use them and it was so much fun!  To finish it off, I played with my Mustard Seed and Wild Honey Distress Inks to make the background color.  I also added some Black Soot Distress Ink to the background I embossed with the Animal Print Sizzix embossing folder.  Then it was just a matter to put it all together and finish it off with some Hemptique twine.  Super cute and fun!

The hubby will find this card today as I'm off to DC for a quick meeting and he'll be holding down the fort at home with the fur babies. 

Tuesday, June 4, 2013

Happy Birthday Card Inspired by the Paper Players Challenge

I was really inspired by Nance Leedy's card from the Paper Players Challenge #147.  I loved how she stamped the large sunflower over the card and through I would give it a try with the Swallowtail stamp from Stampin' Up.  I simply adore that stamp.  I used four colors of card stock from DCWV's Pastel stack:  white, yellow, blue and green.  Then I stamped the image using Momento's Toffee Crunch ink and colored it in with some colored pencils.  I resized a card from the 3x4 Life Cards by Lori Whitlock in the Silhouette store (Design ID #25178) to make it super tiny and stamped the sentiment from a set of stamps I bought from Boxer before they closed.  I then tied the tag using some Hemptique twine onto some sheer yellow ribbon. 

 
Isn't it funny how sometimes you finish a card and you know exactly what you would do differently?  The minute I saw this card sitting on the shelf across the craft room, I thought I should have swapped the blue and yellow.  They would be more impact if they were in the opposition positions. 

Monday, June 3, 2013

The Rest of Week 21

I still had a lot of pictures and things I wanted to use for Week 21 in my Project Life album, so, in addition, to the two full page layouts I added in, I decided to include an additional insert with three horizontal stacked photos and an edging for a little more fun.  To do that, I simply cut off the two vertical photo pockets off a We R Memory Keepers pocket page.  I then added my pictures and sealed it with some Washi tape from Recollections.  It was super simple to do and gave me just the extra space I needed for party pictures.


I still had the invitation for the party so I used a normal 8.5 x 11 page protector that I cut down to hold the invitation (Didn't my brother-in-law do a nice job designing the invitation?  I'm impressed).


For the back of it, I had an extra shot that I decided to throw back in since I had the space and I loved the little chocolate dipped strawberries that they served at the party. 

So this is how it all looks in the book:


Sunday, June 2, 2013

Congrats Grad Layout

During Week 21 of Project Life, we celebrated my sister-in-law graduating from college.  While at her party, I took a great picture of her and my mother-in-law hugging.  I knew it needed to have it's own layout in the week.  I started my scrolling through my Pinterest board of scrapbook layout ideas where I pin pages and sketches that I think will inspire me.  That's were I found a page created by Rhonda of Scrappity Dappity Doo based upon a sketch posted by Quick Quotes.  I thought it was the perfect place to start.

I again used the Basic Grey Fact line I've been using for my Project Life pages for Week 21. For this layout, I used some of the paper to cut a tag and created a hidden envelope for it.  A bit of baker's twine makes it easy to slide it out of the hidden pocket.  I took a heart from the 11 Hearts by Lori Whitlock set in Silhouette (Design ID #24813) and opened the nodes.  I moved a few of the nodes around to get a more stylized heart.  I then duplicated it and move a bit of the nodes on the second one so they would be similar, but not exactly the same.  Then it was just cutting my scraps, layering them together until I had a layout I liked.  I added my favorite brown Thickers called Marquis and then finished it off with some Darice studs in a brown color.  This was my finished page:

Saturday, June 1, 2013

Craft Room Upgrade Layout

For Week 21 of Project Life I knew I wanted to do a layout commemorating the work we've done on my craft room lately.  I had some video footage of our cat Chewie climbing the ladder we had in the room to replace the light fixture and a picture of another of our cats, Smoke, climbing the ladder that I wanted to include.  I saw this really great idea of using a QR code to access videos stored on YouTube that I thought I would give a try.  I simply uploaded my video to YouTube then fed the web address into a QR code generator program.  I then printed the QR Code it gave me onto paper (I used photo paper) and added it to my layout. Now all I have to do is open up my code reader app on my phone or iPad to watch Chewie climbing the ladder any time I want.  It was super easy to do so I'm pretty sure you are going to see a lot more QR Codes showing up in my layouts and in Project Life in the future.

For the layout, I was inspired by a sketch from the Sketch Savvy blog from April.  I used paper from the Basic Grey Fact line to match my Project Life layouts for the week since this page would be inserted into that part of my book.  I used the Eric Thickers for my title (I just got these at Michaels earlier this week and I was excited to use them).  The little tab above the middle picture and the chevrons on either side of the title were cut from files I bought for my cameo and I finished it off with some hand stitching across the bottom using some Hemptique baker's twine.  It was super easy to do because I was able to easily poke evenly spaced holes using my new Tim Holtz Ideology rule (that I also picked up at Michaels this week with a coupon so I could replace my beloved E K Success ruler that I've used so much that the markings are starting to disappear).  I wasn't completely happy with it but then I added a few Darice gems and it all just seemed to look right.

 
So here's what it looks like now that it's in the book:

Monday, May 6, 2013

With Sympathy, a Design Principles Card

Today, I'm sharing the second card from the first lesson in the Design Principals class I'm taking.  I really deviated quite a bit from the card she showed, but at the same time tried to stay true to the concepts she showed.  This one was fun because I got to use a lot of supplies I haven't used in a long time or even ever.  The background is an old Rubber Stampede stamp (probably the first background stamp I ever bought) and I stamped it on the card with Old Paper Distress Ink.  I then cut the "shield" out with my Cameo.  The sentiment is one I picked up when Boxer Scrapbooks was going out of business and the butterfly is from the Teresa Collins Spring Fling Stamps.  It's the first time I've used either of those sets.  I used Timber Brown StazOn ink then colored the butterfly with my colored pencils.  I added a little more Old Paper ink to the edge of the shield and then used pop dots so I could run some Hemptique twine behind it.  It was a fun card to make and I really like how it turned out.   


Saturday, May 4, 2013

Butterfly Card

There is one thing about Pinterest that really frustrates me:  when people pin things such that I cannot find the original source.  Sometimes this is because the person making the pin doesn't understand how Pinterest works.  The person is reading a blog and sees something she likes.  She pins it not realizing that you have to pin from the specific entry, otherwise Pinterest will simply take me back to the most recent post of the blog.  Then I have to sort through all the entries to find the one that is really for the item that caught my attention.  Sometimes, however, I cannot access the original source because I simply don't have access.  The Stampin' Connection is a good example.  I cannot log in to see the sources, but I can see the pictures on Pinterest.  Sometimes the artist is smart and leaves me a breadcrumb in the form of a watermark that at least lets me know who I can give credit to for the inspiration.  That's the case here.  I loved this butterfly card I saw on Pinterest.  Of course, it was a Stampin' Connection link so I could see where it had been pinned from.  But the watermark is from Carrie Gaskin, the Artistic Avenger.  She stopped blogging in October last year and some of the pictures on her blog simply would not load for me, so I couldn't find if she had posted on her blog about it.  It was really kind of a shame too because from the few pictures I did get to load, I can tell I would have found even more inspiration.

The only paper on here that wasn't from my scraps bin is the green pattern paper peeking in the background.  It's from the 6x6 pad called For the Record 2 by Echo Park and designed by Lori Whitlock.  The butterflies were cut on my Cameo using the Echo Park butterfly design.  I cut out only the base and then inked them with various shades of Distress Ink.  I used a french curve to draw the butterfly path and then poked the holes with my stylus and my Stampin' Up paper piercer template to make sure the path remained reasonably evenly spaced.  I finished it off with Hemptique baker's twine instead of ribbon and some glossy accents down the middle of each butterfly. 

I've left off the sentiment on this one because I'm not quite sure what I want to use it for.  I think it could do well as a birthday card, a sympathy card or even just a thinking of you card.  So for now, I'll leave those possibilities open.   
 

Friday, May 3, 2013

Fly High

Today I'm sharing another card I made from inspiration found while browsing through older posts on Rita's Creations. She made this delightful kite card that I just loved.  I don't have the stamp set she used, but I did have a kite shape to cut on my Cameo.  I used my french curves to draw the hills out of a piece of paper from the Sunny Side 6 by 6 pad by Pebbles.  I couldn't draw a straight or curved line to save my life without a straight edge or a french curve.  I used a Darice embossing folder called Cloudy Sky for the background.  The blue and white papers are from my scraps stash.  The brown cardstock has a linen texture and is from the Paper Company. The green background paper is from the 6 by 6 paper pad called Vanity Fair by My Mind's Eye.  I used some baker's twine from Hemptique to finish it off.  I haven't added a sentiment yet.  I think I'll probably save that for the inside only on this card.