I still had a lot of pictures and things I wanted to use for Week 21 in my Project Life album, so, in addition, to the two full page layouts I added in, I decided to include an additional insert with three horizontal stacked photos and an edging for a little more fun. To do that, I simply cut off the two vertical photo pockets off a We R Memory Keepers pocket page. I then added my pictures and sealed it with some Washi tape from Recollections. It was super simple to do and gave me just the extra space I needed for party pictures.
I still had the invitation for the party so I used a normal 8.5 x 11 page protector that I cut down to hold the invitation (Didn't my brother-in-law do a nice job designing the invitation? I'm impressed).
For the back of it, I had an extra shot that I decided to throw back in since I had the space and I loved the little chocolate dipped strawberries that they served at the party.
So this is how it all looks in the book:
Showing posts with label Recollections. Show all posts
Monday, June 3, 2013
Sunday, May 5, 2013
Hello Card - Design Principals with Britta Swiderski
I'm sharing today a card I made as part of an online class called Design Principals with Britta Swiderski. I've just started this class and so far it's pretty interesting. In addition to a lecture video, there are three project videos: a tag of class information and two cards. I thought I would share with you one of the cards I made after watching her video. I used some paper from the mat stack for Mango Frost by DCWV and my Sizzix Top Note die for the shape and a EK Success punch called Bumpy Road for the strips. The sentiment is stamped in Chocolate Chip ink from Stampin' Up using a stamp from the Portfolio set by Pink Paislee. I inked the edges of all the paper except the sentiment with Aged Mahogany Distress Ink and finished it off with some Pearls by Recollections. It was pretty quick to make once I saw her video. I'm sure I'll share more finished projects as I work through the class.
Thursday, April 25, 2013
So Wild ... About You
I had some time to play in my craft room this week as I listened to hockey playoffs. I usually hate fussy cutting things because, well, I'm impatient. Since I had lots of time on my hands in my room this week, I did spend some time fussy cutting for this card inspired by one I saw on the Lawn Fawn blog a few weeks ago. I love their Critters on the Savannah set, but it's one I don't own (yet) so I had to settle for using the Quinn's ABCs set for the inside sentiment on my card. Thankfully I have a Recollections set I bought on clearance at Michael's a while back that I thought would make a decent substitute for the animals. I used some cute Love Me paper from My Mind's Eye for the background. I pulled some polka dot paper from my scraps bin that I'm pretty sure is DCWV from an old (really old, but still very useful) Spring Stack. I finally had a really good reason to use my animal print embossing folder from Sizzix that I bought several years ago on a trip to St. Louis where I went way out of my way to visit an Archiver's. Despite my loathing of fussy cutting, I'm really surprised t how quickly it all came together.
Friday, April 12, 2013
Happy Birthday Rayna
My youngest niece turns 11 today, so I made her a sweet card to celebrate. I took my inspiration from one of my favorite blog, Karen Thomas' Luv to Stamp. Karen took a bit of a break from blogging and I'm so happy to see that she's back. I love her style so much.
For this card, I used some paper I picked up from Paper Zone just before they went out of business (oh how I miss that store). I cannot for the life of me remember the manufacturer, but I love it's flecked tones. The pick paper is a Pop Tone that Paper Zone used to sell too. The burgandy-ish (is that even a word?) color is from DCWV. The ribbon I picked up on sale at Michaels quite some time ago. The washi tape I bought there much more recently. I'm pretty sure the heart tape is from Recollections and the pink tape is either from Queen and Co or Recollections. The butterflies were cut on the Cameo using the Echo Park design and the shape is one that I bought from Silhouette and altered on the Cameo. I embossed the smallest butterfly with an embossing folder from the "Phrases" set by Darice. I think it's so wonderful that you would never know that the embossing on there is the beginning of the word "Thank." The sentiment is from a Hero Arts set I bought at Michaels. I finished it off with a few Liquid Pearls and called it good.
Friday, April 5, 2013
Working on my card stash
I realized that my card stash is woefully depleted in several areas, so it's time to spend a little time stocking up. Until the blue elephant yesterday, I had absolutely no baby cards of any kind so I decided to make the "girlie" version of yesterday's to add to the stash. It was pretty simple, but I thought I would make this a little more girlie by adding back the bow and button from the inspiration card.
Thursday, April 4, 2013
Inspired by Pinterest and Recollections
It's so unusual that I find something through Pinterest that actually uses a stamp set I have. Usually I have to rethink it, so when I came across this cute little baby card, I did a double take. I thought to myself, "I think I have that set." Sure enough, I did! I bought the Recollections stamp set at Michaels a few weeks back when they had it on clearance for a super buy.
I made my own version of this cute baby card from Stamping Up North with Laurie. I made a boy version using some DCWV paper from my stash. I played with a button and bow on it, but it seemed a little too girlie for this boy card, so I left them off. Pretty clean and simple, just the way I like them.
Monday, March 18, 2013
A Card a Day...
Yesterday after I broke my elliptical machine (Well, really I just wore out the tension strap on it. Fortunately, a replacement will be here by the end of the week), I finished another inset layout for Week 9, the week I went to San Antonio. If you follow my blog, you know that I leave a card a day for the hubby while I'm gone. He saves them up and gives them back to me at the end of the week. I thought it would be perfect to save them in their own inset layout for the week. I wasn't feeling too creative and I didn't think that they needed a whole lot to go with them, so I kept it pretty clean and simple, which is pretty much my trademark anyway. I inked and painted the edges of the pages to keep them consistent with the other pages for this set. I cut my title and inked it up as well, give the words "blues" a little extra color. I then just added a little bit of the washi tape I've used on the other pages and added just a little of the new heart washi tape from Recollections I picked up recently at half-price (love that!). With that, I called it complete and closed the book on it. I think I have maybe one more double page layout from that trip before I'm done with it.
Thursday, February 14, 2013
So Much Love
No, not a Valentine's Day card. I posted that one a while back without stating that it was the card for my dear hubby. No, this is a congratulations card for my boss who got married back in December, but we are finally getting around to celebrating it now. I found this wonderful monochromatic card on SplitcoastStampers. I started to make this card following that scheme but it just didn't have the pop that her card had. So I swapped out the white for some soft yellow and green and realized I finally liked how the card looked. I never really get to use my Sizzix dies enough and I so love this swirly one a lot, particular how it compliments the flower cut from the Silhouette Design Studio topped with a pearl from Recollections. I back it all with an embossed background using the Sizzix Musical Flourish embossing folder. I then finished off with a sentiment stamped from an old Studio G mini stamp set I've had for several years.
Sunday, January 6, 2013
Sigh...
Here I have all day to play in my room, but do you think I am feeling it? No. I'm spending more time watching Project Runway on the DVR than creating anything. But I did manage to make this card inspired by the Green Christmas card by AnnetteMac I found on Pinterest. I started by making it in red with a poppy on it, but it just didn't sing to me. So instead I switched to colors that remind me of my sister. Then it really took shape with the Sizzix textured paper, a little EK Success border punch and a 3D flower pattern out of the Silhouette store. I also got to use a stamp out of my new set from Recollections called Journal It. A lot of time went into this card (far more than should have).
Tuesday, September 18, 2012
Inspired by Studio Calico and Kelly Marie Alvarez
I received a little sad news at work today. One of the people that I work with on regular basis and really like is leaving her company. So I knew immediately I needed to make a little card to thank you her for all the good times working together these last few years.
I'm also trying to break out of my usual style and do something a little different too. That's hard for me because I'm pretty set in my plain style and stepping out of my comfort zone is really hard. But when I saw this card made by Kelly Marie Alvarez on Studio Calico's blog today, I knew it was just the card for me to make tonight.
I picked about three different papers but finally settled with the chevron print (so hot right now) from the Vanity Fair 6x6 pad from My Mind's Eye. That's it. One sheet of double-sided paper. Everything else is plain old white cardstock, which is where I really pushed myself. The tag, butterflies and bird are all cut on the Cameo, with the butterfly and bird from a lovely Echo Park design. Rather than all the layers on the butterfly, I just used the base layer. Then I started playing with my distress inks. Once I had color the way I liked it, I ran the butterflies through my Big Kick with the Cuttlebug Script Texture embossing folder and the background using the Sizzix Dots and Flowers set. I didn't emboss the bird, but I did add some Glossy Accents to give it some shine.
The sentiment is stamped from the Inkadinkado set "All Occasions" and I finished it all with some grosgrain ribbon and some Recollections adhesive faux pearls. So there's still bits of my usual style, but I pushed it a little more and it was kind of fun.
I'm also trying to break out of my usual style and do something a little different too. That's hard for me because I'm pretty set in my plain style and stepping out of my comfort zone is really hard. But when I saw this card made by Kelly Marie Alvarez on Studio Calico's blog today, I knew it was just the card for me to make tonight.
I picked about three different papers but finally settled with the chevron print (so hot right now) from the Vanity Fair 6x6 pad from My Mind's Eye. That's it. One sheet of double-sided paper. Everything else is plain old white cardstock, which is where I really pushed myself. The tag, butterflies and bird are all cut on the Cameo, with the butterfly and bird from a lovely Echo Park design. Rather than all the layers on the butterfly, I just used the base layer. Then I started playing with my distress inks. Once I had color the way I liked it, I ran the butterflies through my Big Kick with the Cuttlebug Script Texture embossing folder and the background using the Sizzix Dots and Flowers set. I didn't emboss the bird, but I did add some Glossy Accents to give it some shine.
The sentiment is stamped from the Inkadinkado set "All Occasions" and I finished it all with some grosgrain ribbon and some Recollections adhesive faux pearls. So there's still bits of my usual style, but I pushed it a little more and it was kind of fun.
Monday, April 2, 2012
I Feel the Love - April
It's time for another I Feel the Love Project card. I've missed a couple months and did last month's at the last minute, so I thought I would get this month's done right away. Emily is a girl after my own heart with her love of cats so I decided to use my Chewie stamp. I had a completed, colored one pinned on my inspiration board in my craft room for months and decided this was the perfect project for it. Since Emily's favorite colors are pink and purple, I stuck with those colors. I found this pink leopard ribbon in my drawer and decided it was perfect. I used sketch # 55 from Sketch and Stash for a template. The ribbon slide and paw print inside it are both out of the Silhouette Design Studio store. I needed something for the background though. It's been a while since I used an embossing folder so I drug out my stash. I narrowed it down to two: the cheetah print and a swirly one that I like a lot. I actually did both backgrounds so I could see if cheetah ribbon on cheetah background would be too much. Seeing it in person convinced it was fine. After that, the card went together in a snap.

So break out your supplies and join us in sending cards to put a smile on Emily's face.
Monday, December 19, 2011
My second cut...
Also did not go so well due to human error, but boy was I excited with what I learned. I knew I was not going to be happy with just cutting out what Silhouette has available in their library. Sure they have a lot of fun looking designs and I know I'll enjoy using those, but since I have had Sure Cuts a Lot with my Cricut for a long time now, I've gotten used to being able to cut out whatever I can dream of (as long as it wasn't a perfect circle - Cricut just could not cut that). Lately, that's mostly been cutting out around stamps of the stamp sets I have so I don't have to fussy cut anymore. I have almost all of them scanned into my computer, which is nice for organization and knowing what I have, but also meant that they were handy to play with. I opened up my favorite stamp set (Meow Meow from Recollections) and found my favorite stamp: the one that looks like Chewie. I erased all the other stamps, traced the outline of Chewie, then printed it and cut it with the Cameo. Only problem: I somehow ended up with a stray cut line that decapitated the paper Chewie. Oops... You can see the extra cut just above the collar where I taped it together:
On my second try, it came out much better. I colored it a little with my colored pencils and added a little rhinestone and now it's perfect for...
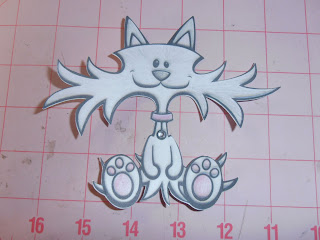
well for something. I'll figure out what later, but boy am I loving this new machine. 
Wednesday, September 7, 2011
You're Purrfect card
My absolute favorite stamp right now is from a Recollections set called Meow, Meow and it looks like our cat Chewie. So of course I had to make a cut file to go with the stamp. My test cut worked perfectly, but my stamping isn't very good. After coloring in Chewie, I trolled my bookmarks looking for a card that it would work with. I don't have a card in mind because Chewie doesn't go with the whole list of birthday cards I need to make, but I was going to make this card anyway. Then I found this sketch I had bookmarked on Scrappity Dappity Doo!, which is really from the Doodlebug Design blog post here. I decided it was perfect. So I cut a scalloped circle on my Cricut using a scallop from the BeaOriginal blog here. Then a little grosgrain ribbon and an heat embossed saying from a We R Memory Keepers stamp set called "You're Purrfect" and a piece of paper from my scraps and I was done.
Subscribe to:
Posts (Atom)
