Showing posts with label Newton's Nook. Show all posts

Sunday, October 12, 2014

Happy Meow-oween, Take Two

After I finished my card for the Inky Paws Challenge over at Newton's Nook, I just had to start working on an idea that had been percolating while I made my challenge card.  I inked up the Newton's Day Dream stamp but then wiped off the flowers.   I then stamped it on my card stock and then again twice more on two post-it notes so I could have both sky and land masks.  I masked the kitty before I inked up the small pumpkin from Newton's Perfect Pumpkin and stamped it on both sides. I also cut two more masks for the pumpkins.  Once the kitty and pumpkins were stamped and masked, I used Lawn Fawn's Starry Backdrops inked in Versamark and then heat embossed in clear embossing powder to make the starry background.  I used a variety of Distress Inks to sponge on the background starting with Squeezed Lemonade at the horizon, adding Seedless Preserves and finishing in Chipped Sapphire at the top and then blending back down.  I wiped the excess ink off the stars and removed my kitty mask to replace it with the one to let me finish the ground.  I sponged on Shabby Shutters and Mowed Lawn Distress Ink for the ground, leaving me with just white pumpkins and kitty.

My sister's cat Gus, a gorgeous house panther, isn't doing well.  She's pretty sure he has kidney failure and, since he's 16, it's probably a pretty good guess.  She's taken him to the vet for blood work and, when I was working on this, we were waiting for the results.  So I decided that Gus would be my inspiration for this kitty.  Not much technique involved in coloring an all black kitty, but I still had fun with my new Prismacolor colored pencils and gamsol.  The pumpkins were a bit more of a challenge on the coloring scale.  I was going to finish them off with one of the pumpkin faces that come in the Newton's Perfect Pumpkin set, but, of course, I can't for the life of me find it. I had pulled it off to size the stamp for the pumpkin and then set it aside to finish the coloring and now I can't find it.  That happens to me all the time and the stamps eventually turn up stuck the back of another package or the side of my pencil case or whatever.  My bet is that it will turn up just after I finish my last Halloween card of the year....

To finish off my panel, I wanted to do something a little simple.  I bought the Simon Says Stamp Frames dies because I love the frame it cuts out.  I saw so many ways it would be useful and I thought it would be perfect for this. So first I cut the panel down using the largest stitched die from My Favorite Thing's Blueprints #13 set and then centered up the Simon Says Stamp Frame Die over my panel and die cut it.  I then die cut a white piece with the same frame.  Then it was just a matter of piecing them all back together on my card base.  Once I had it together, I added my sentiment from the Newton's Perfect Pumpkin set and washed the sky in Wink of Stella. 
After the card was done, I was left with a starry frame that was perfect to frame Chewie!  Of course, she would sit still so I could get an in-focus picture.  This was the best I could get...

Friday, October 10, 2014

Happy Meow-oween! Inspired by Newton's Nook's Inky Paws Challenge #14 and Mojo Monday #366

We're back from vacation and, sadly, hubby is sick.  I don't feel so great either, but I think my issues are just the upcoming weather change playing havoc with my sinuses.  So I didn't have much creative mojo today but I so desperately wanted to play in the Inky Paws Challenge #14 over at Newton's Nook.  I just love their stamps (maybe it's the whole kitty thing?) and I love a good challenge.  Fortunately my most recent stamp acquisitions from them were waiting in the mail (along with yet another vehicle registration bill - why is it that every single vehicle we own has tabs that renew in the same year?  It's a crafty budget killer.) just begging to be inked up.

I spent a time today stamping and cutting out masks and coloring, of course, in between loads of laundry and doses of cold medicine for the hubster and catching up on Project Runway, Survivor and Resurrection.  I used the Newton's Perfect Pumpkin set to stamp out the kitty and pumpkins, but I needed some trees and leaves, so I had to look to some other sets to finish out my scene.  I used Avery Elle's Let it Snow set for the trees, and the leaf from the Lawn Fawn Winter Sparrows set to finish it out. 

I wasn't sure what to do with my image, but loved the sketch over at Mojo Monday (Sketch #366) so I decided to use it for my layout.  For the paper, I pulled out the Simple Stories Take a Hike 6x6 pad just to extend our camping vacation just a bit and the Dark Chocolate Simon Says Stamp card stock.  I used a bit of vellum to add my sentiment.  I picked a heavy weight vellum and, in retrospect, I wish I had used a lighter weight.

Monday, September 15, 2014

A Beautiful Wedding

After the memorial on Saturday, the hubby and I attended my boss', although I really consider him a friend, wedding.  This one has been a long time coming and I was delighted to attend (even though I'm really not a fan of social events and get really anxious about them).  It was an Episcopalian ceremony.  I've never attended one and it was quite beautiful (although the incense was a little much for my head).  It was an amazing sight to see him so happy and so in love. 

The reception was nice.  It was a beautiful night outside.  I tried the pear cider (delicious) and chatted with some co-workers.  Kids ran around playing with a basket of balls that David brought out for them.  It was such a beautiful night and the best part was seeing David so very happy.  I can't think of a more deserving person.

I decided to make a card for him (he very specifically said no gifts).  I thought about doing something whimsical, but then changed my mind for something more formal.  I don't have many traditional wedding stamps, but I did find this delightful silhouette in an Inkadinkado wedding set.  I used some Verafine Onyx Black ink and heat embossed it with some clear embossing powder.  I used a dies from my new My Favorite Things Blueprints #13 set for the flag.  I embossed the vellum with a Victorian folder from Cuttlebug and then used the large stitched die from the Blueprints set to cut it down to size.  I stamped the sentiment on the card base using a stamp from the Simply Sentimental set from Newton's Nook.  Then it was a matter of laying it together, added a little Lawn Trimmings in Silver Sparkle to finish it off. 

Sunday, September 14, 2014

Heartfelt Sympathy and a Celebration of a Gifted Photographer

Yesterday was an interesting day.  I attended both a memorial celebration and wedding on the same day (and, thankfully, in that order).  I was just going to pull a sympathy card from my stash, but yesterday  morning I woke up early and because I had an idea about the cornucopia stamp from Lawn Fawn's Harvest Season that was percolating. So I had to wander down to my craft room to develop the idea. I stamped in Memento Onyx Black ink and used my colored pencils for it.  I don't have many and they are just a cheap set I picked up from Michaels a while ago, but they have been good enough to some simple coloring and blend okay with gamsol.  I know I could do better if I had better quality pencils so the other day I did order a huge set of colored pencils that should be here later this week.  Yes, I know, it's crazy that I ordered colored pencils when I'm taking the copic class at onlinecardclasses.com later this month and I'm sure I will be order markers I need to fill in the gaps of what I have.  But I've wanted this set of pencils for over year now and haven't ordered them.  After a bit of a rough couple of days, I thought some retail therapy might help.  So I expect you'll see a lot of coloring in my future both in pencil and in copics.  Good thing I find coloring therapeutic too!

Anyhow, back to this card, after I finished coloring the cornucopia, I added a sentiment from the new Simply Sentimental set from Newton's Nook Designs (love the script on this one) and added random leaves using the leaves from the Harvest Season set and three colors of Simon Says Stamp ink (Leaf Green, Burnt Orange and the new Goldenlocks).  I finished off the card by cutting the panel out with the Simon Says Stamp Frame Die, cutting a second one in black and then cutting the whole background using the stitched frame from my new dies from My Favorite Things, Blueprints #13. 


The memorial was for my intern who passed away suddenly a couple weeks ago at only age 44!  Way too young, especially when I saw his teenage sons at the service and intensely realized what a huge gap it would be leaving in their lives.  It was actually quite a beautiful memorial service and they showcased many of his pictures, as he was a gifted photographer.  During his interview, his photography hobby came up and he shared with me this picture he took for a designer.  I found it on Google and am sharing it here (at the service, his friend encouraged us to share his pictures):

It's such an amazing shot.  I assumed he used a lot of Photoshop on it, but his friend explained that Jeff came to him asking how to use Photoshop and the friend was amazed that the photos hadn't already been through Photoshop (that's how gifted Jeff was at capturing the shot). 

I remember one day shortly before the state fair, Jeff showed me four photos on his phone asking me which one he should enter.  There were four amazing shots and it was so hard to choose between them (the fourth was one similar to the first picture below, but there was a man and his dog in the shot - I looked all over for it because it was one of my favorites, but I couldn't find it):


This next one is the one I actually choose, maybe because I love tulips so much.  He entered it and won (the same weekend he died):

 
At the memorial service, they showed many other shots that were equally stunning.  I encourage you to go check them out.  You can find them here:  http://500px.com/Masterlender.  But I'll leave you today with some that were a few of my favorite examples of the beauty that is this great world of ours that Jeff eye's was able to capture to share with the world:


Friday, September 5, 2014

The Last Baby Card with Newton's Nook Wild Child

Okay, so the title may be a bit misleading because I'm sure sometime in the future there will be another baby card from this set because it's so adorable.  But, for now, here's the last baby card I've made with the Newton's Nook Wild Child set that I colored the weekend we went to Seattle for Sandy Allnock's class.

I used paper from the Day Dreamer 6x6 paper pad from Dear Lizzy/American Crafts but I wanted to change things up a bit.  I had bought the Pretty Pink Posh Stitched Border Dies a while back with the idea of cutting some fun edges to my cards, but had yet to break them out.  I had an idea of adding the sparkly polka dots on the background of the white paper that colored the image on, but it didn't look right, so I ended up fussy cutting the image out.  I just used the patterned paper cut with the border and cut the border again on my card base. 

I used that American Crafts Project Life banner to cut out the banner to stamp with the sentiment from the set.  I added some Lawn Fawn Sky Lawn Trimmings to the top with a Glue Dot holding the bow in place. A few pop dots gave some dimension to the image and the banner.  Then I decided to try my sparkly dots on the inside bottom of the card since it would show through to the outside at the bottom.  I used a dot stencil to pounce on some VersaMark and some JudiKins embossing powder in White Diamonds.  It worked much better there, but is harder than heck to photograph with a curved front panel...
 

Thursday, September 4, 2014

On a Baby Card Roll Using Wild Child from Newton's Nook

I'm on a roll replenishing my baby card stash thanks to the Wild Child set from Newton's Nook. 
The stamps are just so cute.  For today's card, I played along with the sketch challenge over at Newton's Nook for their Inky Paws Challenge #13.  If you haven't checked out their stamps or played along in their challenge, you are missing out.  Don't wait any longer and go check it out.  They have such cute designs.

For today's card, I used the super cute kitty image colored with copic markers.  I looked at several paper pads for the card, but finally settled on the Echo Park For the Record 2 6x6 paper pad selecting some gender neutral green and yellow for the card.  I followed the sketch and added a button with some baker's twine (sorry I don't know the brand, it was used to tie up a Citrus Twist kit from last December) from my stash.

Wednesday, September 3, 2014

Another Baby Card Featuring Wild Child from Newton's Nook

I'm still working on using the images from the Wild Child set from Newton's Nook that I inked up and colored while on our quick trip to Seattle for Sandy Allnock's class at Impress.  For today's card, I was inspired by a past sketch up at Freshly Made Sketches. I was looking for something to use as the layout.  I didn't exactly follow the sketch, but it gave me an idea of what to do. 

I cut the colored Wild Child image out using my Lawn Fawn Stitched Journaling Card (I love that die!).  I cut a panel of paper from the Day Dreamer 6x6 pad from Dear Lizzy/American Crafts and cut a few banners from other paper from the pad.  Then it was just a matter of layering them together and using some pop dots for focal image.  I finished it off with some sequins from Doodlebug topped with some Stickles. 

Sunday, August 31, 2014

Inspired by Mojo Monday and Featuring Newton's Nook

Okay, so I'm not really a fan of a skinny card, but I liked the sketch and I thought it was the perfect way to combine one of my newest dies from Simon Says Stamp with a Newton's Nook image I colored a week ago.

I gave away my last baby card the other day, so this seemed like the perfect way to start to replenish my supply.  I used the Echo Park 6x6 paper pad from the Everyday Eclectic line, which has some adorable prints that were perfect for a paper card.  I colored the cute little penguins from the Newton's Nook Wild Child set then cut them out with a die from the Frames set from Simon Says Stamp.  I added the sentiment from the stamp set to a banner cut with the die from American Crafts/Crate Paper Maggie Holmes Styleboard dies.  I found a button in my stash and added some baker's twine from Hemptique to finish it off. 


Monday, August 4, 2014

Wishing You Were Here Card Three Featuring Newton's Nook

Today is the last card with the images I stamped from the Newton's Summer Vacation set from Newton's Nook.  Because this card has a beach theme, it fits the current challenge over at Newton's Nook to make a beached themed card.  If you haven't played along yet, go check it out on their blog here.  There's still time to play along and, if you've already played along, why not do another?

I kept this card pretty simple because I absolutely loved the sunburst pattern paper from the A Perfect Summer 6x6 pad from Echo Park. After cutting that slightly smaller than my card base, I adhered it to the card.  After coloring my image, I die cut it with the Lawn Fawn Stitched Journaling Card die and added it with some pop dots to the card base.  I added some Doodlebug sequins to the corners.  I brushed the umbrella and towel with Wink of Stella and topped the sun glasses with some Glossy Accents to finish of the card. 

Sunday, August 3, 2014

Wish You Were Here Card Two Featuring Newton's Nook

I really had a great time with this stamp set and since it's a beach themed card, it fits the Newton's Nook challenge to make a beach themed card.  There's still time to play so head over to their blog and check it out.  You can find it here.    The cards just seemed to make themselves and I loved coloring all the kitties.  I've colored them to look like the furballs, Tigger, Cha-Ching and for today's card, I decided to try my hand an orinch one (yes I know that's not the correct spelling).  After coloring my panel, I ran it through my Sizzix with the Lawn Fawn Stitched Journaling Card.  I cut some sand paper from the Summer Stack from DCWV to a slightly larger size and chomped the corners with my We R Memory Keepers Corner Chomper.  I messed up my sentiment (missed that I had a piece of lint on it), so I stamped it again on a scrap of the sand paper.  I then used the banner from the Lawn Fawn dies to cut out the banner and then ran it through again with the stitched journaling die to get the stitched look on the end.  For the background, I used a couple sheets of paper from that Echo Park 6x6 paper pad A Perfect Summer.  I added some Peppermint Lawn Trimmings at the join of the two papers.  I added my panel with pop dots and then finished it off with some Doodlebug sequins. 

Saturday, August 2, 2014

Enjoy Your Day Card Two Featuring Newton's Nook

Today's card is another image from the delightful Newton's Summer Vacation set from Newton's Nook.  I actually fussy cut this image after coloring it with my copics.  I hate fussy cutting, but it was the perfect thing for this card.  I used two sheets of paper from the Echo Park 6x6 pad A Perfect Summer.  I love that paper pad and it seemed the perfect one to go with this stamp set.  I die cut the wave paper using the largest die from the Avery Elle Pinked die set.  I then stamped my sentiment on a scrap piece of white paper and cut it out with the banner die from the Avery Elle set.  I then ran it through again with the large die to pink the other end to match the background.  I cut the polka dot/pie chart paper to cover the entire card base.  I adhered my wave paper and then tied it with some Martha Stewart baker's twine, adhered it my card base and then added a few Doodlebug sequins to finish it off.  It was cute, but still needed something.  So I covered the floatie with some Glossy Accents and called it good.


Thursday, July 31, 2014

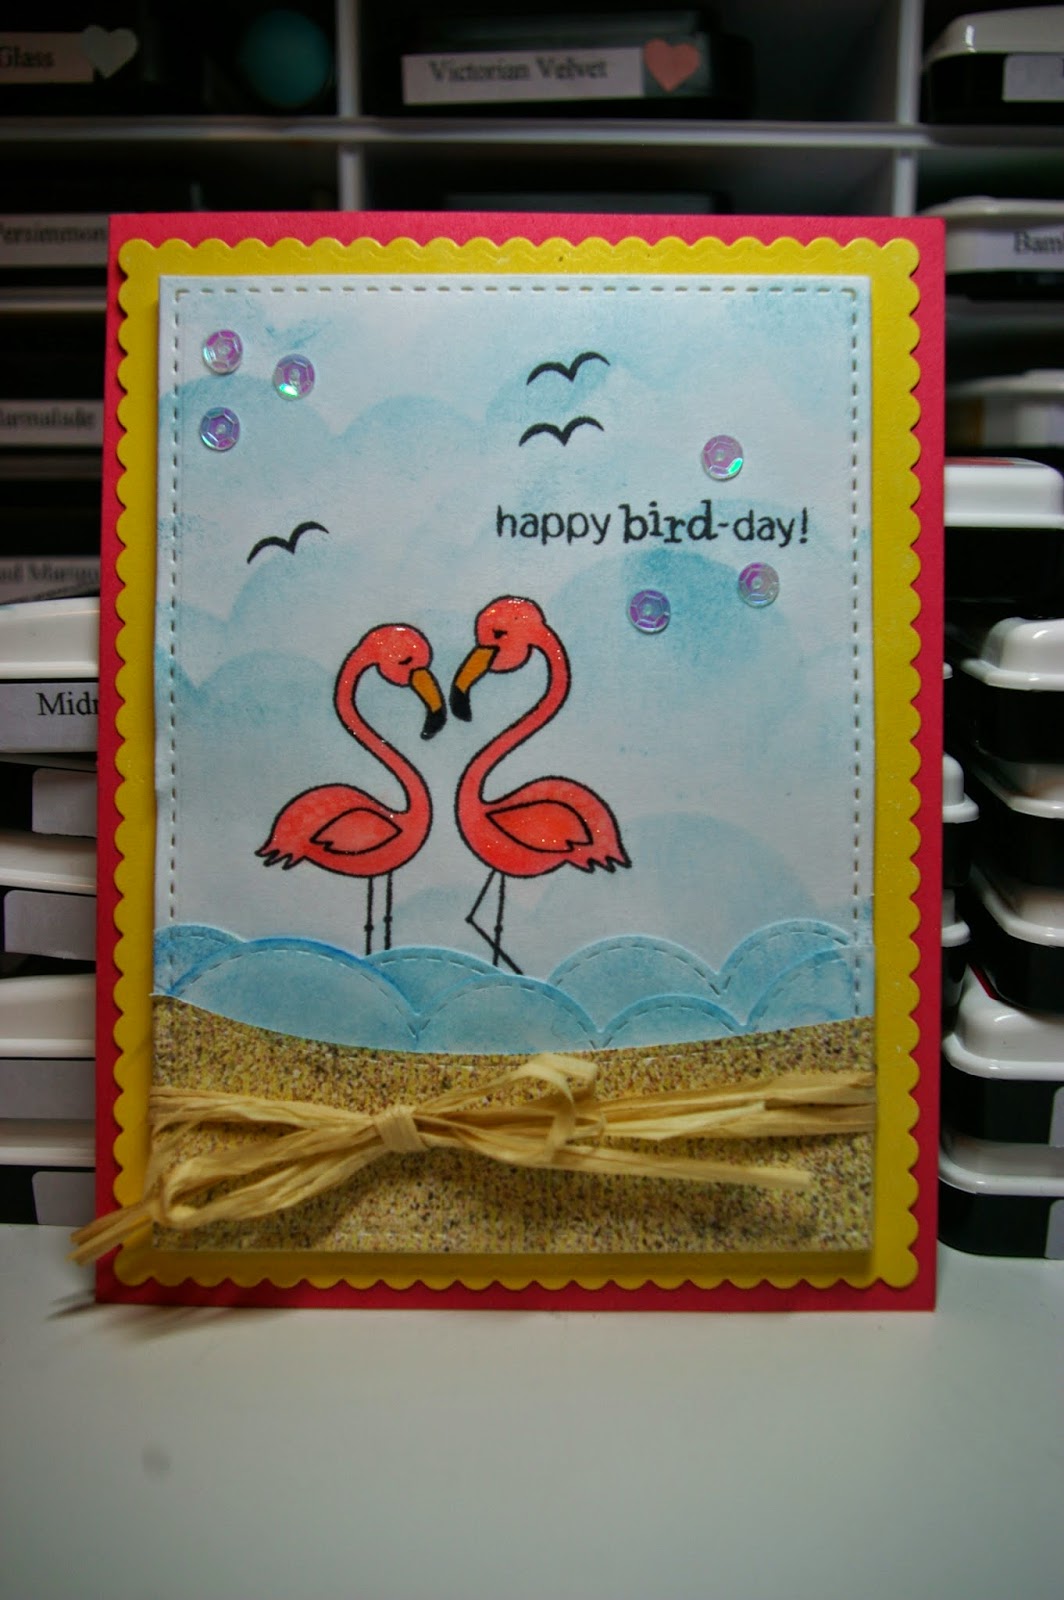
Happy Bird-day Featuring Newton's Nook

I had so much fun playing with my Newton's Nook stamps, that I thought I would keep going.  For today's card, I wanted to play with the Landscape Trio dies from Mama Elephant.  It took me forever to get these dies.  They were always sold out; I mean everywhere!  I've always thought that the scalloped one would work well for surf too so I cut it out a couple of times, inked it up with some Distress Inks and used one of the sloped dies to cut out some more of the DCWV paper for the beach.  On the background panel, I stamped the double bird stamp and colored with copics.  I covered it with a mask and used the negative from the die cuts for the surf to sponge in some background clouds in the sky.  I added a few birds to the background.  I had to cheat for these. I had pulled the bird stamp off the Flirty Flamingos set, but when it came time to stamp I could not find them anywhere!  I'm sure they will turn up when I clean off my craft desk (it's embarrassing to admit this, but this happens all the time).  So I used the birds from Lawn Fawn's Life Is Good set.  I layered everything together and then ran it through my die cut machine using the stitched frame from Mama Elephant's Femme Frames, which I also finally find this week after stalking the various websites for a long time to try to find a place where it, too, wasn't sold out (Ellen Hudson had it in the Basics set).  I then used some cute yellow paper from the Echo Park 6x6 paper pad A Perfect Summer to cut out the larger frame.  I tied some raffia around the beach and then used pop dots to place the panel on the yellow paper and adhered that to the card base.  I added Wink of Stella and Glossy Accents to the flamingos.  I added white Wink of Stella to the "surf" and some clear sequins to finish it off.  Because it's a beach themed card, it fits the challenge over at Newton's Nook to create a beach themed card.  You can find lots of inspiration on their post here.  The challenge is open until August 8th, so go check it out and play along!

Wednesday, July 30, 2014

Wish You Were Here Featuring Newton's Nook

This week and next week are going to be crazy busy at work. I'm basically covering the work of three people for two weeks and one of those weeks I won't even be in this state. So, although, we're really short handed, I decided to take last Friday off.  I had been scheduled off since the beginning of the month to use some use-it-or-lose-it time before I lose it at the end of this month and I had worked long hours all week so I really needed a break, plus hubby had the day off.  We spent some time together doing a lot of nothing, which was nice.  He worked on Saturday, so I had thought about going into the office, but I also realized that I had things around the house I wanted to get done since I knew I was going to be working long hours and wouldn't to have any time this week or next.  So I stayed home and cleaned the house, snuggled a furball or two (at the same time!) and watched a few crafty videos in between loads of laundry.  It was the perfect break to feel like I was human again and not just a working machine.  Then I it was time to spend some time in my craft room to exercise a different part of my brain with some new goodies I've picked up recently.

Specifically, Newton's Nook recently released some new (adorable) stamp sets.  I'm such a sucker for Newton so I had to pick up Newton's Summer Vacation and my sister loves flamingos so, of course, I had to get Flirty Flamingos.  When I was catching up on my blog reading, I noticed Newton's Nook had a new challenge to create a beach themed card and thought it was the perfect opportunity to play with my new stamps.  You can find out all about the challenge over on the Newton's Nook blog here.  It's open until August 8th so go check it out and play along.

For my card, I started with the Flirty Flamingos set.  I inked up the solo flamingo in Memento Tuxedo Black ink and colored it with copics.  I then created mask for my flamingo so I could sponge in some waves with Distress Ink and sponge daubers and then colored in some sand and sky with my copics.  I used the Amy Tangerine dies to cut a polaroid shape.  I stamped the sentiment from the Newton's Summer Vacation and colored in the little heart with the same copics used for the flamingos.  I remembered having some "sand' paper and found in an old DCWV Summer Stack.  I used the Dotted Die from Avery Elle to cut out that paper and mounted my "polaroid" on it.  To finish it off, I added a few Doodlebug sequins, some Glossy Accents on the floaty ring and a some Wink of Stella on the waves. 


Wednesday, June 4, 2014

Loads of Thanks

I wasn't sure I would make it into my craft room tonight.  I'm fighting a bit of a sinus headache and I really just thought about crawling in bed, but it's Game 1 of the Stanley Cup Playoffs!  How could I sleep through that?  In fact, I have to thank those guys because in between periods (and overtime!) I played around in my craft room because I needed a thank you card.  I pulled out a Newton's Nook stamp set called Wagon of Wishes that I think is just adorable and stamped out the wagon with the apples.  I played with my copics trying to color the apples to match the apples that grow on the tree in our backyard.  It was kind of hard to get that green, yellow with a little red combo, but I'm pretty happy with how it turned out.  I was a little stumped for a layout for the card, but then I remembered that I loved the Mojo Monday layout and I haven't participated in that for a while so it seemed like the perfect time to try my hand at it.  I've also been playing around with trying the current Inky Paws challenge which was to use wood, metal or cork on a card.  So I started by breaking out the Hardwood stamp I bought during the Stampin' Up free shipping promotion a while back.  I used Vintage Photo Distress Ink on some watercolor paper then used a damp brush to spread the color a little.  To be honest, I wasn't sure I liked it and I really wasn't sure I liked it with the image I had colored, but I kept plugging along.  I broke out my Lawn Fawn Circle Stackables and Scalloped Circle Stackables to set off the cute sentiment from the Newton's Nook set and then remembered how much I liked the tag stamp and die from the Lawn Fawn Winter Gifts that I used on a card a week or so ago.  So the last piece I wasn't sure about was the strip on the right.  I knew that a red strip would help tie it all together, but plain red wasn't working for me.  I pulled out a couple of embossing folders.  Wood grain didn't look quite right and I ended up debating between a dotted texture and this Quick Kutz Zig Zag folder.  Fortunately, I have a great resource when I can't decide:  my husband!  So then it was just some glue, a couple of chomps of the corners of some pieces and a few wood veneer hearts to balance what seemed to be a bit of a plain spot in the corner and it was done.  I actually walked back out to the family room and commented to my husband that I wasn't really sure about the pieces going together but I loved how it turned out in the end.   I'll be linking this up to both challenges, but come play with me because it's always more fun if everyone plays.  You have until Friday, June 6th for the Inky Paws challenge and until Sunday, June 8th for the Mojo Monday challenge.


Tuesday, June 3, 2014

Welcome Baby

It's been a rough couple of weeks at work so I have been too drained in the evenings to play in my craft room. Last week, I literally came home, crawled in bed, went to sleep, got up, went to work, repeat until the weekend.... Last weekend, I was busy finishing up April's Project Life layouts and prepping photos for May, so I didn't even make a single card.  Today was another rough day at work where I feel so brain-dead that I just wasn't sure I could come up with anything creative, but I figured I could clean the craft room even as a zombie.  But a funny thing happened... there was this first blip in an otherwise flat line of brain activity as I started putting away the remnants of a 6x6 Studio Calico Lemon Lush paper pad from my April Citrus Twist Project Life kit, I was drawn to a piece of the green paper that I had die cut with the grass border die from Lawn Fawn.    I set it aside thinking it would work well on a card with some critters or something.  Then a second blip when I saw the cute Polaroid-like die from Amy Tangerine's Plus One collection for American Crafts as I was putting away the dies on my desk.  Then ... blip ... these cloud cut-outs would work as a mask for the background ... blip... these Distress Inks are the right color for a sky ... blip ... this red glitter paper would be cute inlayed in the heart cut out ... blip... oh yeah, I need a baby card for my co-worker (oh, and Mom do you have any sweaters made up?) ...blip... I have that new set from Newton's Nook called Wild Child that would work for a cute baby card ... blip ... blip ... blip... and ta-da!  It's all made from scraps on my desk and the Newton's Nook set I got the other day but told myself I couldn't use until I finish up Project Life for April.
So don't look to closely at the coloring.  It's a little blotchy because I got caught up watching tonight's episode of True Tori while I was cleaning (okay so I was talking back to the screen telling her that she's chickening out by not asking Dean if this is the only affair he's had, plus I really want to know and I'm bummed that she's going to handle it in "private" - you signed up to have the cameras follow you, now I want the dirt and you're denying me that) and my ink dried before I got to finish blending it and, honestly, in person, it doesn't look nearly as blotchy as it does with all that light on it so I'm leaving it alone. 

Wednesday, March 26, 2014

Another Newton's Nook Image

Today I have yet another card made with the Newton's Nook set called Newton's Birthday Bash. I used a design very similar to the one in yesterday's card.  The images were stamped onto Neenah white cardstock using Tuxedo Black Momento Ink so I could color with my markers.  For the card on the left, I used some markers from Stampin' Up (I wasn't really very happy with the outcome).  For the card on the right, I used my new Copic markers.  I liked the Copic markers much better for this process.  I cut the finished images out using that same Lawn Fawn Stitched Journaling Card die.  For the paper, I used two more sheets from the Crate Paper 6x6 Party Day pad cut down to an A2 side and wrapped with baker's twine.  For the banners, I again couldn't find the right paper.  This time I used a couple of Distress Ink ink pads and my blending tool to color them to go with the rest of the card.  Then, I used that Lawn Fawn Bannerific stamp and die combined with the sentiment from Sophie's Sentiments. 

Tuesday, March 25, 2014

More Fun with Newton's Nook

 While I had my new Newton's Nook sets out, I could help but ink up Newton's Birthday Bash too.  It has such cute images.  This time, I used my watercolor paper, some Jet Black Archival ink and my Distress Ink Markers.  The one on the right was my first try and I was able to learn a few things that made the left image a bit easier to do.  For the cards, I used some paper from the 6x6 pad from Crate Paper called Party Day as the background and some baker's twine.  I cropped the corners with my We R Memory Keeper's Corner Rounder.  I ran the images through my Stitched Journaling Card die from Lawn Fawn for a little more interest.  I wasn't really sure about how to put on my sentiment and finally decided on a banner, but I couldn't find the right paper.  So I finally decided to add some color to watercolor paper using my Distress Ink pens, stamp the sentiment from Sophie's Sentiments from Lawn Fawn using my Archival ink.  Then it was just a few snips of the scissors to make a banner and some pop dots to finish it off.   

Monday, March 24, 2014

Playing with Newton's Nook

I recently received my order for stamps from Newton's Nook.  They have some of the cutest stamps and how could I not support a company named after a cat?  When I unpacked them, Smoke, of course, had to come in to inspect them.

After they received the "Smoke Seal of Approval," I broke open the package for Wagon of Wishes and got inky since I had been waiting for these to make a very special thank you card.  The stamps inked up and stamped just beautifully and I used my brand new Copic markers (thanks Mom!) to color this cutie.  Then I stamped the sentiment using a combination of stamps from the set and from a Lawn Fawn "thanks!" stamp I had on my craft desk on a banner stamped and cut from the Bannerific set and dies from Lawn Fawn.  I used some left over paper from the Basic Grey Carte Postale 6x6 pad that came with a past Citrus Twist Project Life monthly kit.  Even the twine is some that I saved from the packaging of a monthly kit.