Showing posts with label Spectrum Noir. Show all posts

Tuesday, June 3, 2014

Welcome Baby

It's been a rough couple of weeks at work so I have been too drained in the evenings to play in my craft room. Last week, I literally came home, crawled in bed, went to sleep, got up, went to work, repeat until the weekend.... Last weekend, I was busy finishing up April's Project Life layouts and prepping photos for May, so I didn't even make a single card.  Today was another rough day at work where I feel so brain-dead that I just wasn't sure I could come up with anything creative, but I figured I could clean the craft room even as a zombie.  But a funny thing happened... there was this first blip in an otherwise flat line of brain activity as I started putting away the remnants of a 6x6 Studio Calico Lemon Lush paper pad from my April Citrus Twist Project Life kit, I was drawn to a piece of the green paper that I had die cut with the grass border die from Lawn Fawn.    I set it aside thinking it would work well on a card with some critters or something.  Then a second blip when I saw the cute Polaroid-like die from Amy Tangerine's Plus One collection for American Crafts as I was putting away the dies on my desk.  Then ... blip ... these cloud cut-outs would work as a mask for the background ... blip... these Distress Inks are the right color for a sky ... blip ... this red glitter paper would be cute inlayed in the heart cut out ... blip... oh yeah, I need a baby card for my co-worker (oh, and Mom do you have any sweaters made up?) ...blip... I have that new set from Newton's Nook called Wild Child that would work for a cute baby card ... blip ... blip ... blip... and ta-da!  It's all made from scraps on my desk and the Newton's Nook set I got the other day but told myself I couldn't use until I finish up Project Life for April.
So don't look to closely at the coloring.  It's a little blotchy because I got caught up watching tonight's episode of True Tori while I was cleaning (okay so I was talking back to the screen telling her that she's chickening out by not asking Dean if this is the only affair he's had, plus I really want to know and I'm bummed that she's going to handle it in "private" - you signed up to have the cameras follow you, now I want the dirt and you're denying me that) and my ink dried before I got to finish blending it and, honestly, in person, it doesn't look nearly as blotchy as it does with all that light on it so I'm leaving it alone. 

Wednesday, May 28, 2014

I "Seally" Like You...

A dear friend of mine at work is fighting breast cancer. She was just diagnosed this month and she has to be aggressive because she has other complicating factors.  There's not much I can do for her.  Her family is taking care of the usual things, like keeping her refrigerator stocked.  So I feel like the best I can do is remind her that I'm here for her and I adore her.

We have this little joke that I adopted her when my boss was promoted and she's joked about getting a seal for the papers.  So I've always had this idea of doing something with a seal, rather than  seal in a little punny twist.  Fortunately, Lawn Fawn has an adorable seal in their Critters in the Snow set.  I colored it along with some fish and a crab from the Critters in the Sea set.  I created a beachy scene by tearing some DCWV white core card stock and die cutting the Lawn Fawn Stitched Scallop Borders (and using the other side) several times from three colors of blue card stock.  I used several colors of Distress Ink (Peacock Feathers, Broken China and Tumbled Glass) to make the sky, then layered by "sea" and finally my sand.  I used several colors of Distress Ink markers and a Spectrum Noir marker to stipple the "sand" and then placed my critters in their places.  It still needed one thing so I cut a sun with the dies from Hello Sunshine to finish it off.

All the sentiment on this card is on the inside where it says:

I "seally" like you!  You have my seal of approval.

 I hope this card lifts her spirits and reminds her that we're all pulling for her. 

Sunday, January 26, 2014

Inspired by Heather Campbell and PaperCrafts & Scrapbooking

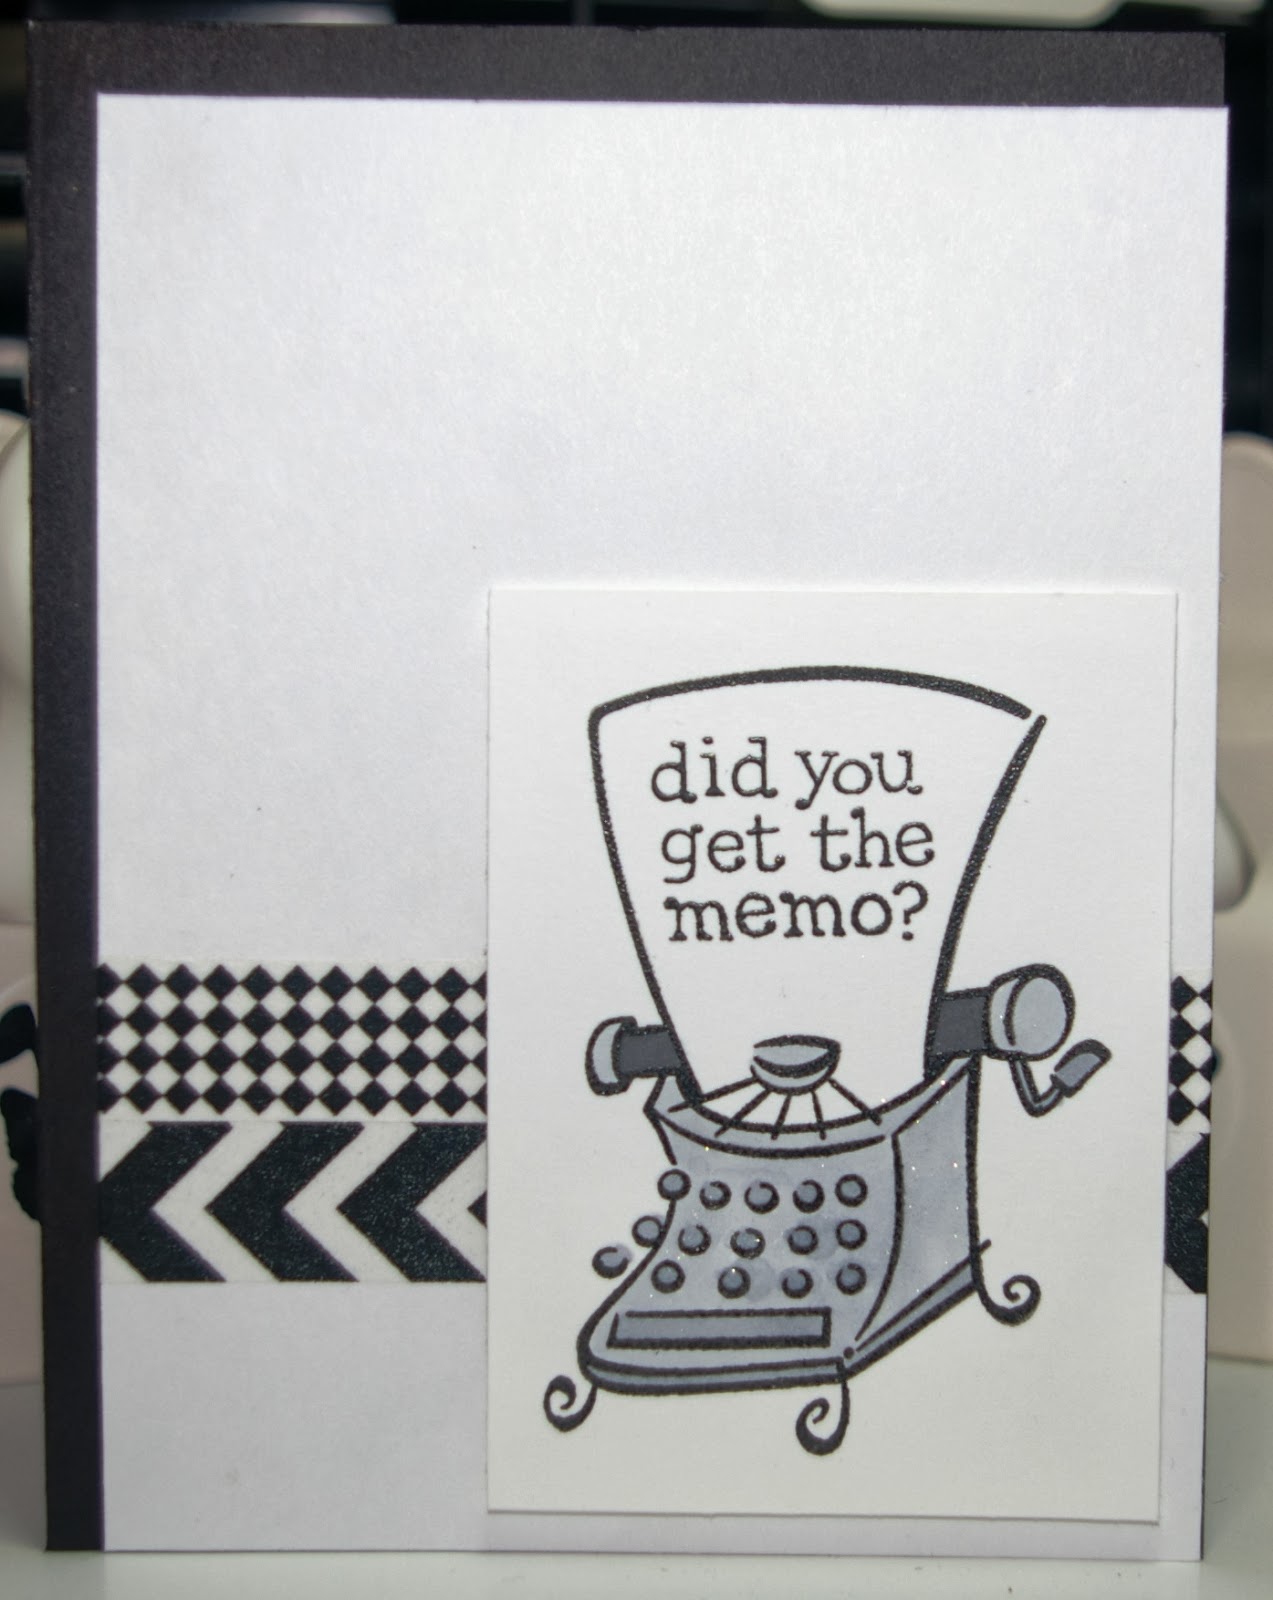
For today's card, I was inspired to use two more recent Lawn Fawn stamp set acquisitions, Just My Type and Just My Type Too, when I saw this super cute card by Heather Campbell featured on the PaperCrafts & Scrapbooking blog.  I didn't mask off the card like she did; instead I used some washi tape from my collection as the backing.  Since there are no matching dies for this set and I couldn't imagine trying to fussy cut that cute typewriter, I just stamped it on a rectangle in VersaFine and then heat embossed it.  I added a little color with my Spectrum Noir markers and some shine with my Wink of Stella in clear.  For the inside, I added the scissor to highlight my sentiment and colored it to match the typewriter.  Quick and easy.

Saturday, January 25, 2014

Inspired by Lynnette in the Lawnscaping Challenge #74

Last night I was just puttering in my craft room waiting for the hockey game to start, so I pulled up my Pinterest card layout board and quickly found a cute card using the new Lawn Fawn set I picked up called Love You Tons.  I quickly stamped the cute little elephants in VersaFine ink and heat embossed them.  Then I colored them with my Spectrum Noir markers and cut them out using the matching dies.  I found the heart bubble in the Lawn Fawn Into the Woods set and inked it with some ColorBox chalk ink in Warm Red.  I fussy cut the speech bubble (is it really speech if it's an emotion?).

The inspiration pin has what appears to be a hand stamped background with the little heart in the set but I am NOT patient enough to do that.  But I found some cute paper from the 6x6 pad from Pink Paislee called Secret Crush.  After debating far too long about what side of the paper to cut from (left? right? left? right it is), I stamped the sentiment in the VersaFine ink and added my elephants and bubble with some pop dots. But, it needed something.  I swiped some white Wink of Stella on the heart, stared at the card for far too long before deciding to add some clear Wink of Stella to the red in the bubble.  Done.

I picked out a pretty red card base from my rainbow stash, taped down my top panel then added a simple panel inside with a heart form the Lawn Fawn set Bee Mine in my red chalk ink on the inside.  Done and done.

So the only thing I left to do was find who posted my inspiration card so I could give credit where credit is due - to my surprise, when I scanned the cards posted for the Lawnscaping Challenge that I pinned it from, I discovered it was Lynnette of Netter's Notables again.  Inspiring twice in a week? I would say this must mean I really like her style.

Thursday, January 23, 2014

Inspired by Simon Says Stamp and Freshly Made Sketches #120...

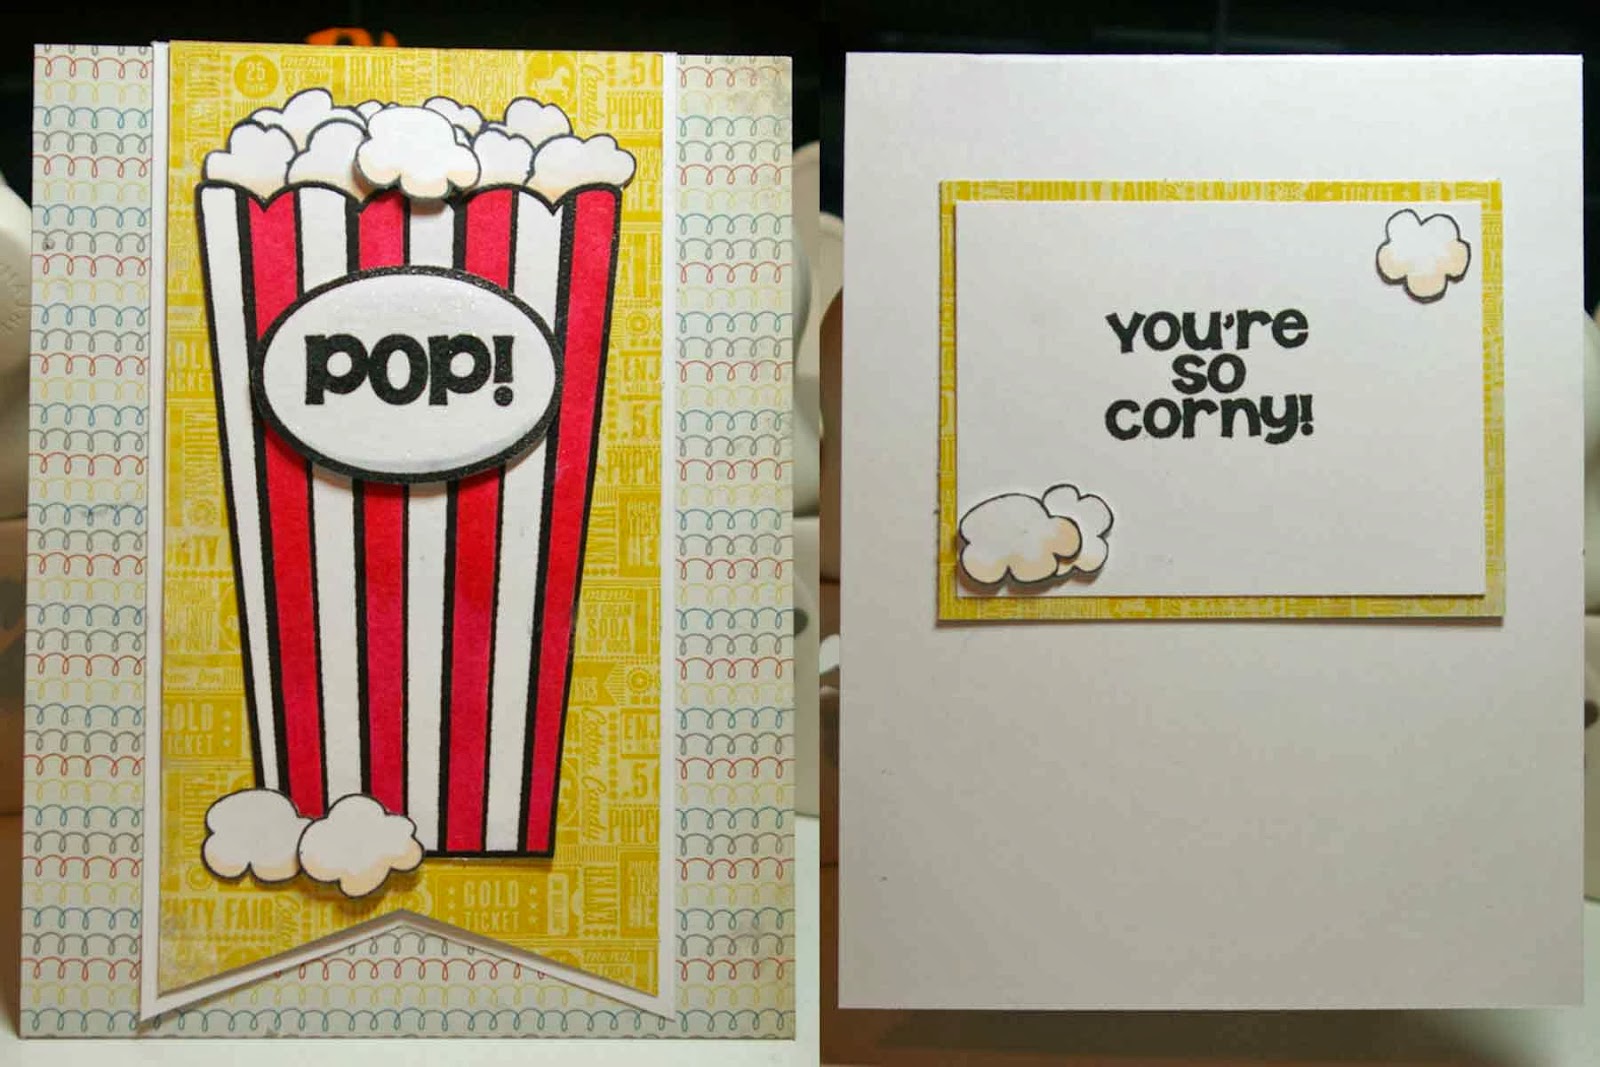
I was trolling through my blogs looking for inspiration that would encourage me to overcome this lingering headache (at times migraine) of the last couple of days and do something in my craft room when I came across the new Simon Says Stamp challenge on their blog to make something funny.  Well, I have a lot of punny stamps including this month's Stamps of Life set, popcorn2stamp, which has been sitting on my craft desk waiting to be stamped on something.

So I set about stamping the popcorn container with Momento ink on some white card stock and colored it with my Spectrum Noir pens.  I masked the container off and stamped some popcorn on the top (after cutting a bunch of popcorn masks too).  Then I wasn't quite sure what to do with it.  I didn't really have any creative mojo so I pulled up the sketch for Freshly Made Sketches to see if it gave me any ideas and decided I could make it work. 

So I flipped through my 6x6 paper pads until I found some paper I liked in the Dilly Dally pad by My Mind's Eye.  Then it was just a matter of trimming my banner, gluing the background paper to my card stock, adding my banner and layering my popcorn box and some individual popcorn.  I used a few pop dots for some dimension and then decided the label needed a bit of sparkle with some Wink of Stella. 

For the inside, I stamped my sentiment in VersaFine Black Onyx and then matted it on a scrap of the paper from the banner and added a few more pops of corn. 


Wednesday, January 22, 2014

Lawnscaping Challenge #74: Inspired By...

For today's card, I'm playing along (for the first time ever) with the Lawnscaping Challenge, this one #74.  I love, love, love Lawn Fawn stamps.  They are by far my favorite and I've amassed quite a collection of them.  But today, I'm putting them to use.

For this challenge, we're supposed to pick a Lawn Fawn Design Team Member and make a card inspired by their work.  I knew that I wanted to do something similar this card published a while back on Netter's Notables, Design Team Member Lynette's blog.

I really liked how sweet this card was when I pinned it awhile ago.  So while I used it as my base, I also challenged myself to use only stamp sets I've bought but not used yet.  I was stunned: a) by how many stamp sets I was able to use on one card and b) how many new stamp sets I have.  So I ended up with the Yeti, snowflake and sentiment from Yeti, Set, Go, the banner from Bannerific, the sweet little heart from Bee Mine, and the wood grain from Woodgrain Backdrops. I even used dies from my newest purchases:  Circle Stackables and Scalloped Circle Stackables. 

I colored the yeti ever so slightly with my Spectrum Noir markers then fussy cut him out.  I cut out the circle, stamped and heat embossed some random snowflakes.  I then used Broken China and Weathered Wood Distress Ink to color my circle and finished it off with some hearts stamped in Barn Door.  I cut a frame with my scalloped circle dies.  I stamped the wood grain background on some kraft card stock cut and folded into an A2 card using some Tea Dye Distress Ink.  Then it was  just a matter of stamping my banner and sentiment, a little fussy cutting and adhering it all together with some glue and pop dots.  Then I finished the card off with some sequins form the Peace Joy Love line, a little Glossy Accents on the hearts, some Wink of Stella on the Yeti, and a corner rounder for the bottom edges. 

Tuesday, January 21, 2014

Happy Birthday Card as Seen on Papercrafts

I was browsing through the blogs when I stumbled upon this adorable card using my favorite Stampin' Up stamp, Swallowtail, on the Papercrafts and Scrapbooking blog here.  So while I watched the Seattle/49ers game yesterday, I made my own version.  I stamped the butterfly in Versafine ink and heat embossed it with some clear embossing powder.  I then colored in one with my Spectrum Noir markers and left the other black and white for the base.  I then cut the black and white one down to fit a standard A2 card with a black mat and the colored version smaller.  I then matted both of them on plain black card stock and layered them together.  I stamped the sentiment from my Hero Arts All Occasions set in the Versafine on some vellum and heat embossed it with clear embossing powder to match.  I ran the sentiment through my Xyron and adhered it across the bottom of the panel.  Then all I had to was adhere the panel to my card base and I was done.

Looking back on it now, I kind of wish that I had made the colored panel a touch smaller.  Well, maybe next time...

Sunday, January 19, 2014

Good Fortune Card

I needed a quick card of encouragement for a co-worker and, quite frankly, I was a little too tired to work on one.  I started looking at some inspiration on Google Images thinking I might do something with Lawn Fawn's Summertime Charm set.   But the Good Fortune set popped into my mind and I found myself pulling out before I really had even given it any conscious thought.  I knew I had previously cut and colored some extra pieces and they were perfect for my need for a quick card tonight.  I only had to cut the "fortunes" for the cookie because I already had all the other pieces ready.  Then it was just a matter of layering the pieces on some plain white paper and finding the right colored paper to give the card some cheer. I was very drawn to this pattern from the Amy Tangerine 6x6 paper pad for Ready Set Go.  It was the perfect amount of color.  I added some to the inside and put my sentiment as if it's coming from the side of the card for a little visual interest.  This was a super simple card as I had so much pre-made, but I'm quite pleased with how it turned out. 

Saturday, January 18, 2014

Birthday Good Fortune

My husband recently celebrated his birthday so, of course, I made him a special card.  I love this stamp set from Lawn Fawn called Good Fortune.  Maybe it's because I love Chinese food so much and it naturally reminds me of that.  But for this card, I simply stamped the food carton and embellished the carton by stamping some hearts, brushing them with Wink of Stella and topping them off with Glossy Accents.  I then stamped and colored both my chopsticks and three fortune cookies.  The cookies were super easy to cut out with the matching die and I fussy cut the chopsticks (still pretty easy because it's just straight cuts).  I stamped three different "fortunes" for the inside of my cookies and cut them out with the matching dies too.  Then it was just a matter of putting it all together using some super cute paper from the Pink Paislee Secret Crush 6x6 paper set.


Tuesday, January 14, 2014

Variation on birthday card...

I find it interesting how much color and style can change up a card.  Here I made another variation of the birthday card I previously posted.  This card, however, features clear colors of Spectrum Noir markers to match the background paper from the Echo Park A Perfect Summer 6x6 paper pad rather than the muddier, more distressed colors of the previous card.  I actually like this variation better because the crisp, clean colors look happier to me and more fit the sentiment of the card.   

Tuesday, October 29, 2013

An Inky Thank You

I just had to do one more card with the Inky Antic's Delivery Benton set.  I really do love this set and I'm sure I'll be pulling it out again soon even after the use it's seen the last couple of days.  It's the same combination of Versafine ink, embossing powder and Spectrum Noir pens.  I opted for a sentiment from the Inkadinkado Thank You Words stamped in Versafine ink for the sentiment and added a strip of American Crafts ribbon I found in my stash that seemed to be just the perfect blend of colors. 

Sunday, October 27, 2013

A Bear-y Wonderful Birthday

Today I got to play in my craft room a bit courtesy of a failed attempt to go camping this weekend.  I was putting away the supplies I had packed to take with me when I found this adorable Inky Antics set called Delivery Benton.  I just couldn't resist stamping it out and playing with it.  A co-worker's birthday is next weekend so I thought this one would be cute for a birthday card.  I stamped him out with Versafine ink and heat embossed the design.  I colored him with my Spectrum Noir pens and added a little Wink of Stella on the flowers for a pop of sparkle.  I added some shiny ribbon from my stash and then mounted the card on some green card stock from my stash and adhered it all to a DCWV Neutrals card base. 

Monday, October 14, 2013

Have a Roarin' Good Birthday Card

My nephew recently celebrated a birthday so I went on the hunt for a card for inspiration.  I found this adorable one from A Bit of This, A Bit of That I had pinned to my card layout board on Pinterest.  So I went hunting through my Lawn Fawn stamps for the ones for the card and got side tracked when I saw the Critters on the Savanna set and my original plan was abandoned in favor of a new idea.  I had a bit of fun with stamping, sponging and coloring with this one.  I used the lion, two little birds, tree, rock and grass from the Critters on the Savanna set and the hat and presents from Lawn Fawn's Year Two set.  I stamped all but the grass using Versafine ink then clear embossed it.  I stamped the grass with Mowed Lawn Distress Ink and clear embossed that.  I then sponged on the Mowed Lawn and colored in the trees and sky with Spectrum Noir pens.  I cut the banner from the Lawn Fawn Stitched Journaling Card die set and stamped on the sentiment from the Critters on the Savanna set.  Then it was just a matter of gluing it all together and adding some pop dots.  I then backed my scene with a mat of white and adhered that to a yellow card base from the DCWV Brights Box of Cards.

For the inside, I added a mat of white upon which I had stamped the little bird from Critters on the Savanna and the little hat from Year Two in Versafine.  I added some grass in Mowed Lawn Distress Ink and colored in the bird and hat with Spectrum Noir markers.  Too cute for a little boy who is too cute.

Thursday, September 12, 2013

So Thankful for You - Inspired by Lawn Fawn

A dear friend of mine is starting a new adventure.  She's not really leaving but she won't be around as much.  So I wanted to the opportunity to let her know how much I appreciate here.  Today's card is inspired by an adorable card posted on the Lawn Fawn blog (love, love, love their products) that you can see here.  For my case of the card, I stamped the cute pumpkins from the So Thankful set in Versafine and then heat embossed them with clear embossing powder.  I then colored them with my Spectrum Noir pens and fussy cut them (since I don't have the dies yet - but they are on my wish list).  I then stamped the sentiment in Versamark and heat embossed it in white embossing powder use some Jillibean Soup paper.  I matted it on some more Jillibean Soup paper and added that to a card base from some Pop Tone paper I've been hoarding.  I love how it turned out even if I don't like my own photography of the card. 

Wednesday, September 11, 2013

Many Thanks Card

My dear cousin sent me the cutest pillow cases so I, naturally, needed to send her a thank you card.  After cleaning my craft room, which was a horrible mess, I pulled out my new Simon Says Stamp die called All Seasons Tree and my favorite Lawn Fawn sets, Critters in the 'Burbs and Home Sweet Home to make this sweet thank you card.  I used some scrap DCWV paper for the grass and inked the sky with Distress Ink, then cut and colored the cute kitty with my Spectrum Noir markers.  I stamped and die cut the sentiment banner.  Then it was just the simple matter of building the card on a DCWV card base. 

Tuesday, September 10, 2013

Shine Brightly Card

A co-worker has been tempted away from the fold and I wanted to give her a card to wish her well in her new job.  I didn't have any idea what I wanted to do, but I pulled out my Lawn Fawn stamps since they are in fact my current favorite.  I saw the Lunar Lights set and realized I hadn't used it yet.  So I did a Google Image search and found an adorable card on the My Paper Journey blog that used both the Lunar Lights and the Good Fortune set (a two-fer).  I knew it immediately it was the perfect choice for this situation.  It was a pretty simple card to make even though it was a bit time consuming.  I stamped and colored the little lanterns, the bird from Home Sweet Home that I decided to for a little something more and then fortune cookies using a mask to stack the stamping.  I had a little bleeding even though I used paper specially designed for alcohol markers and Momento ink.  I'm thinking that maybe I didn't let the ink dry quite enough.  Then I hand cut them all out.  I had stamped a fourth cookie as a stand alone one, colored it with my Spectrum Noir markers and was able to run that one through the die to cut it out super fast and easy. I also die cut the fortune papers and stamped them with Versafine ink.  Then I stamped the sentiment with Versamark and heat-embossed it with white Zing embossing powder.   Then it was just a matter of putting it all together.  I cut this cute starry red paper from the Homemade 6 Bean Soup 6x6 paper pad from Jillibean Soup down to fit on a card base from the Neutrals set from DCWV.  I then stamped my string for the lanterns and stamped the outline of the lanterns and the bird on the string.  Then I glued my cut out colored ones on top.  I added a touch of glitter with my Wink of Stella pen.  I then adhered my sentiment and the cookies.

For the inside, I added a small strip of the printed paper from the front and then layered my cookie with the full fortune.  It was so fun to make.

Friday, August 9, 2013

Denver - Coming Home

Yeah!  Today I come home from Denver and the hubster will get his last card for this trip.  This one is really outside of my comfort zone - it's messy!  I'm not a fan of splatter, but when I saw this card on Rita's Creations, I knew I just had to lift it so I could use the new stamp set I got from Fiskars called Latte Love. 

There's a fabulous stamp from Hero Arts that does the messy coffee stain circle, but I don't have that one, so I had to improvise with some Vintage Photo Distress Ink mixed with water.  I mixed the two on my craft sheet and used the stem of a candle holder as my "stamp" to simulate the coffee cup ring.  I sprayed the card with Coffee Shop Glimmer Mist (how appropriate is that name for this card?) and added a few extra larger drops.  I then stamped the sentiment in Versafine Onyx Black and cut out the banner.  After coloring the stamped coffee cup image with some Spectrum Noir markers, I fussy cut it out (the steam was not fun to cut) and added it to the card with some pop dots. 

Warning:  Those who are purists about their stamp sets should skip this paragraph.  I added a coffee bean border along the top and bottom of the card on this inside.  I wanted a sentiment that said "love you a latte" but the stamp set only comes with "thanks a latte" so I cut the thanks off (oh, the horror!) so I could team it with the "love you" sentiment from my Fiskars All Year Greetings set.   Too bad I also managed to get the feet of my Martha Stewart stamp press in the ink and ended up with some stray marks.  But hubby won't care. 


Friday, July 19, 2013

Farewell Sweet Mythbusters Kittens

Tonight was the last night of the Mythbusters Kittens on Foster Dad John's Livestream feed. Tomorrow they are all (hopefully including Mom Kari) off to their new furr-ever homes. While I was watching, I was inspired to do a little playing with my new Lawn Fawn set, Critters in the Burbs.  So I fussy cut four of the cat stamps and colored each of them with Spectrum Noir markers to resemble one of the kittens (too bad I didn't have a bigger cat for Kari).  For the card base, I stamped the tree and tire swing, fussy cut a mask for each piece and then free hand cut masks for the skyline.  After masking off the areas I didn't want color, I sponged the sky with Distress Ink and then covered the sky to sponge the grass.  I colored the tree and tire with the Spectrum Noir markers and then added the sweet little kittens.  For the sentiment, I used the one that came with that set, but added the banner background from the Home Sweet Home set, also from Lawn Fawn.  I knew I wanted some hearts, but I didn't have a punch that small, so I found a cut file in my Silhouette library.  I cut bunches of the little hearts that I attached with Glossy Accents for just that right finishing touch.

I simply can't believe how cute the card turned out and it was the perfect way to spend the last night watching these cute little rascals.  I wish them all the best in their new homes.  As a foster failure (tried to foster just once but could not let the kittens go, except one to my sister), I'm constantly in awe of his ability to love each litter with all his heart then let them go off to their furr-ever homes.  He gives them such a great start in life and for that, he truly is the cat's meow.
 

Friday, June 21, 2013

Yet Another I"m Wild About You Card

I just couldn't resist lifting this beautiful card I found on the Lawn Fawn blog for the release of the Critters on the Savannah stamp set.  I just had to try my hand at it and it gave me another chance to use my Spectrum Noir pens.  I am really starting to love those pens.  I forgot how much fun  it is to color.

For this card, I used the giraffe that I had colored when I cut the whole set, but then I got to have fun stamping and the coloring the background using a mask to stamp the multiple trees.  The only thing I regret is that I put the grass background just a little too high.  But other than that, I love the card, particularly the little Darice studs in the bottom corner.

Friday, June 7, 2013

A Graduation Card Inspired by Doodlebug Design

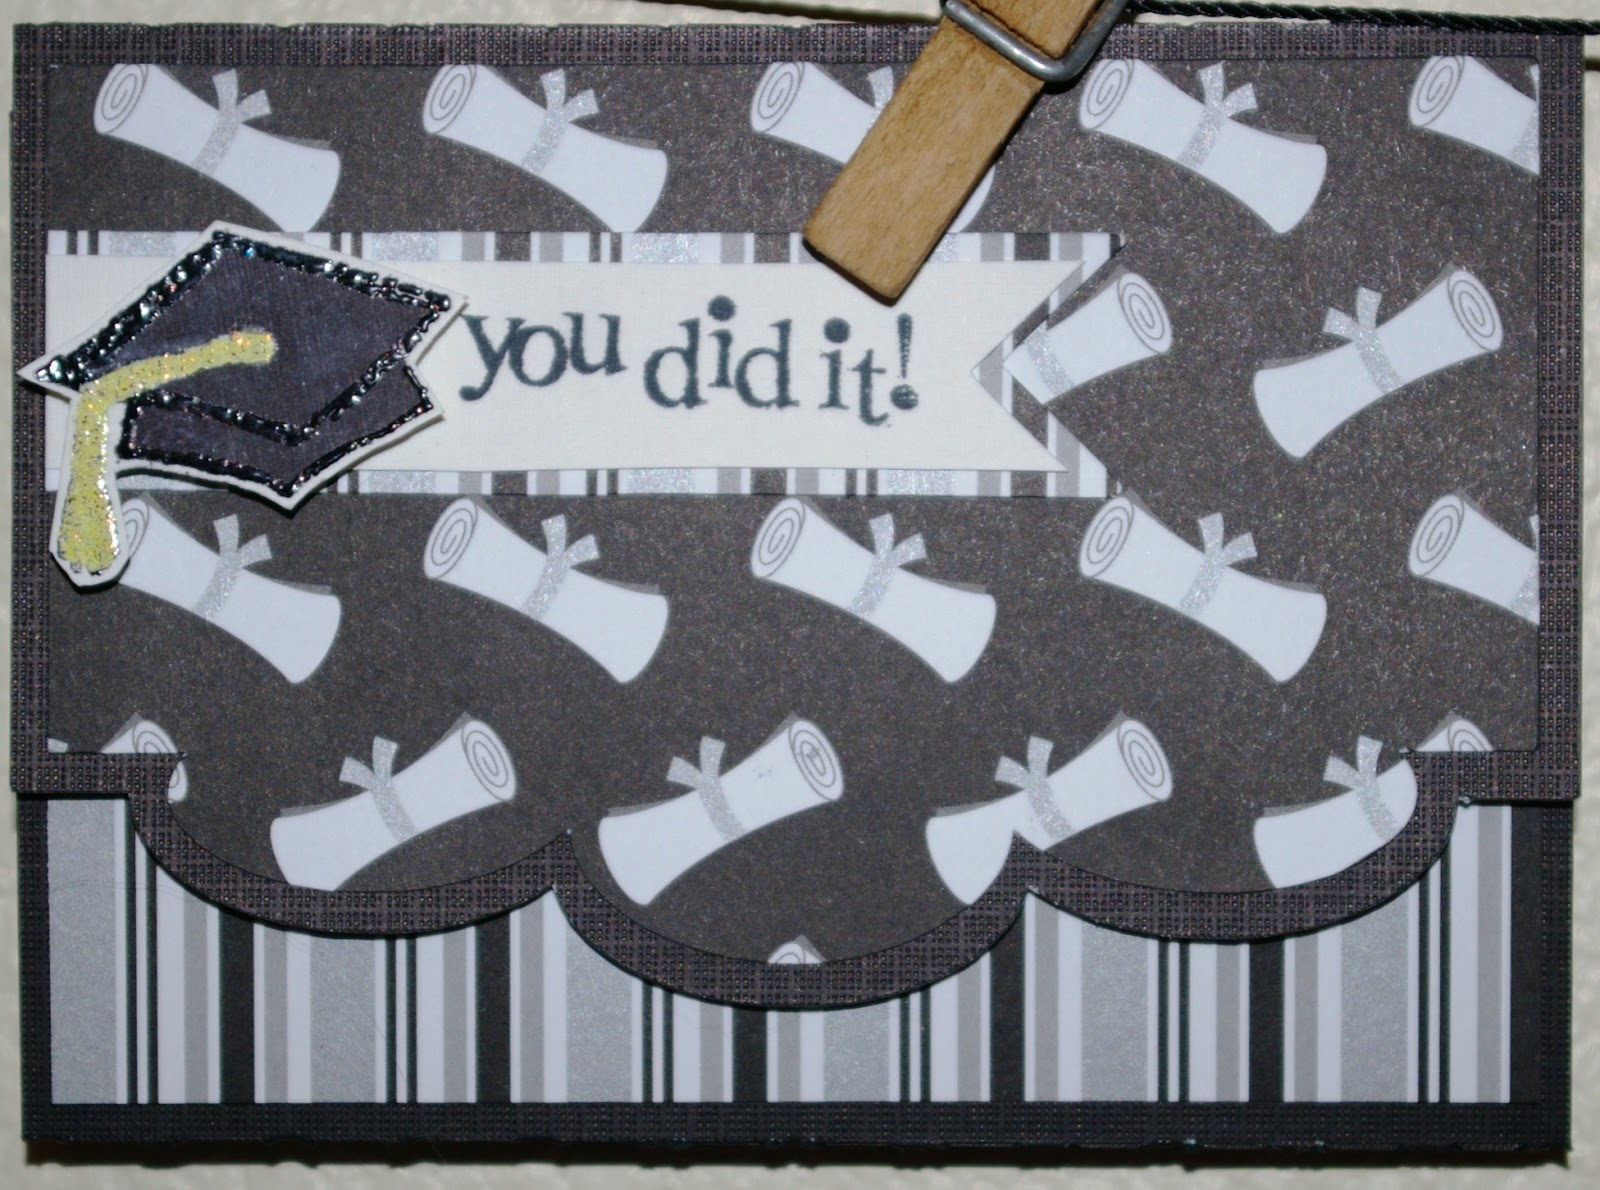
I was trolling Craft Warehouse for supplies and found this great graduation paper from Doodlebug Design.  Knowing that I was going to need a few graduation cards this year, I bought a sheet of the paper called Cap and Gown.  I then started surfing my Pinterest board with card inspiration ideas and found that I had actually pinned some ideas from Doodlebug Design's blog.  Once I saw this cute money holder card, I knew what I was going to be trying my hand at.  I found a card I had in my Silhouette designs (3 scallops edge card - although I could not find in the store today when I was looking for the design number).  I thought it was the perfect base.  I then cut out the card base out of black card stock and cut the Doodlebug paper for the top of the card.  I stamped the cap out of my TPC Studio Graduation set and embossed it in black and then the tassel in yellow.  I colored the cap in with some Spectrum Noir pens to finish it off.  The sentiment was stamp with my new Momento Brilliance ink on a sentiment from the All Occasions set from the Inkadinkado and finished it off perfectly.