My nephew recently celebrated a birthday so I went on the hunt for a card for inspiration. I found this adorable one from A Bit of This, A Bit of That I had pinned to my card layout board on Pinterest. So I went hunting through my Lawn Fawn stamps for the ones for the card and got side tracked when I saw the Critters on the Savanna set and my original plan was abandoned in favor of a new idea. I had a bit of fun with stamping, sponging and coloring with this one. I used the lion, two little birds, tree, rock and grass from the Critters on the Savanna set and the hat and presents from Lawn Fawn's Year Two set. I stamped all but the grass using Versafine ink then clear embossed it. I stamped the grass with Mowed Lawn Distress Ink and clear embossed that. I then sponged on the Mowed Lawn and colored in the trees and sky with Spectrum Noir pens. I cut the banner from the Lawn Fawn Stitched Journaling Card die set and stamped on the sentiment from the Critters on the Savanna set. Then it was just a matter of gluing it all together and adding some pop dots. I then backed my scene with a mat of white and adhered that to a yellow card base from the DCWV Brights Box of Cards.
For the inside, I added a mat of white upon which I had stamped the little bird from Critters on the Savanna and the little hat from Year Two in Versafine. I added some grass in Mowed Lawn Distress Ink and colored in the bird and hat with Spectrum Noir markers. Too cute for a little boy who is too cute.
Showing posts with label Brights Box of Cards. Show all posts
Showing posts with label Brights Box of Cards. Show all posts
Monday, October 14, 2013
Thursday, June 6, 2013
Another Birthday Card Inspired by the Technique Tuesday Blog
Since I my last try at the card inspired by Teri Anderson's card from the Technique Tuesday blog didn't turn out quite like what I originally had in mind, I thought I would give it another try. This time, I really focused on the banner and the card came together very quickly. I used some washi tape from my ever growing pile to create little pennants for the banner. I strung them on some Martha Stewart baker's twine. I hung the banner over some kraft card stock, backed it with white paper and used another DCWV card base from the Brights set. Then, I stamped a sentiment from a set from Fiskars using Momento Espresso Truffle ink. I still thought the card needed a little something so I added some Studio Calico veneer stars. The Glossy Accents I used to glue them down were a little messy so I'm definitely going to have to work on my skills of attaching small embellishments. But I do have to say that overall I really liked this card and I can't believe how one card can inspire so many looks.
Wednesday, June 5, 2013
Happy Birthday Card Inspired by the Technique Tuesday Blog
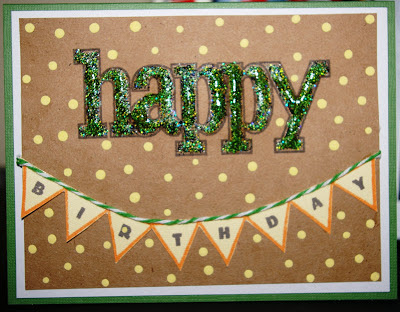
I loved a beautiful card I saw by Teri Anderson on the Technique Tuesday blog. I loved the banners and the simplicity of the card. I had this idea of making it my own using a clear stamp set I've had forever and can longer remember who the manufacturer is, but it has this very large "happy" stamp and smaller word stamps to coordinate. I thought I would use the happy to coordinate with the banners. As I played around with different ideas, I finally decided to try the Stampin' Up Designer Typeset stamp set I bought a while back when they had the free shipping. I stamped the banner with some Momento Tangelo ink on some yellow card stock from the DCWV Pastel mat stack. I then filled in the letters and stamped the happy with Moment Espresso Truffle ink. I mounted the kraft card stock on white and then a base card from the DCWV Brights box of cards.
It definitely still needed something. I used a spare bit of baker's twine I had on my desk that was left over from something I was sent. I glued it to the top of the banner. I then took my sister's suggestion to add some polka dots. I didn't have the right color of paint, so I mixed a little yellow and antique white Apple Barrel acrylic paints together until I had a good shade of yellow to coordinate with the banner. I then filled in the happy with some green glitter glue from Studio G and realized I actually was starting to really like the card.
It definitely still needed something. I used a spare bit of baker's twine I had on my desk that was left over from something I was sent. I glued it to the top of the banner. I then took my sister's suggestion to add some polka dots. I didn't have the right color of paint, so I mixed a little yellow and antique white Apple Barrel acrylic paints together until I had a good shade of yellow to coordinate with the banner. I then filled in the happy with some green glitter glue from Studio G and realized I actually was starting to really like the card.
Subscribe to:
Posts (Atom)


