

Thursday, July 31, 2014
Happy Bird-day Featuring Newton's Nook
I had so much fun playing with my Newton's Nook stamps, that I thought I would keep going. For today's card, I wanted to play with the Landscape Trio dies from Mama Elephant. It took me forever to get these dies. They were always sold out; I mean everywhere! I've always thought that the scalloped one would work well for surf too so I cut it out a couple of times, inked it up with some Distress Inks and used one of the sloped dies to cut out some more of the DCWV paper for the beach. On the background panel, I stamped the double bird stamp and colored with copics. I covered it with a mask and used the negative from the die cuts for the surf to sponge in some background clouds in the sky. I added a few birds to the background. I had to cheat for these. I had pulled the bird stamp off the Flirty Flamingos set, but when it came time to stamp I could not find them anywhere! I'm sure they will turn up when I clean off my craft desk (it's embarrassing to admit this, but this happens all the time). So I used the birds from Lawn Fawn's Life Is Good set. I layered everything together and then ran it through my die cut machine using the stitched frame from Mama Elephant's Femme Frames, which I also finally find this week after stalking the various websites for a long time to try to find a place where it, too, wasn't sold out (Ellen Hudson had it in the Basics set). I then used some cute yellow paper from the Echo Park 6x6 paper pad A Perfect Summer to cut out the larger frame. I tied some raffia around the beach and then used pop dots to place the panel on the yellow paper and adhered that to the card base. I added Wink of Stella and Glossy Accents to the flamingos. I added white Wink of Stella to the "surf" and some clear sequins to finish it off. Because it's a beach themed card, it fits the challenge over at Newton's Nook to create a beach themed card. You can find lots of inspiration on their post here. The challenge is open until August 8th, so go check it out and play along!
Wednesday, July 30, 2014
Wish You Were Here Featuring Newton's Nook
This week and next week are going to be crazy busy at work. I'm basically covering the work of three people for two weeks and one of those weeks I won't even be in this state. So, although, we're really short handed, I decided to take last Friday off. I had been scheduled off since the beginning of the month to use some use-it-or-lose-it time before I lose it at the end of this month and I had worked long hours all week so I really needed a break, plus hubby had the day off. We spent some time together doing a lot of nothing, which was nice. He worked on Saturday, so I had thought about going into the office, but I also realized that I had things around the house I wanted to get done since I knew I was going to be working long hours and wouldn't to have any time this week or next. So I stayed home and cleaned the house, snuggled a furball or two (at the same time!) and watched a few crafty videos in between loads of laundry. It was the perfect break to feel like I was human again and not just a working machine. Then I it was time to spend some time in my craft room to exercise a different part of my brain with some new goodies I've picked up recently.
Specifically, Newton's Nook recently released some new (adorable) stamp sets. I'm such a sucker for Newton so I had to pick up Newton's Summer Vacation and my sister loves flamingos so, of course, I had to get Flirty Flamingos. When I was catching up on my blog reading, I noticed Newton's Nook had a new challenge to create a beach themed card and thought it was the perfect opportunity to play with my new stamps. You can find out all about the challenge over on the Newton's Nook blog here. It's open until August 8th so go check it out and play along.
For my card, I started with the Flirty Flamingos set. I inked up the solo flamingo in Memento Tuxedo Black ink and colored it with copics. I then created mask for my flamingo so I could sponge in some waves with Distress Ink and sponge daubers and then colored in some sand and sky with my copics. I used the Amy Tangerine dies to cut a polaroid shape. I stamped the sentiment from the Newton's Summer Vacation and colored in the little heart with the same copics used for the flamingos. I remembered having some "sand' paper and found in an old DCWV Summer Stack. I used the Dotted Die from Avery Elle to cut out that paper and mounted my "polaroid" on it. To finish it off, I added a few Doodlebug sequins, some Glossy Accents on the floaty ring and a some Wink of Stella on the waves.
Tuesday, July 29, 2014
First Art Jounal page
After seeing so many wonderful art journals out there and having a lot of inspiration for doing something on my own, I finally took the plunge when I realized I really wanted someplace to remember an Amy Poehler quotation I read on Elise Cripe's blog here. What have I learned? Clearly there is a learning curve for this and I'm really in the beginning of that. I saw a lot of things I would do differently next time and even some things I liked in this first run at it. I started with this picture I posted a bit back on Instagram and Facebook:

Once dry, the page ended up looking like this:

I'm not really happy how the quotation is on the page. I used vellum and it kind of wrinkled. It's still readable but not what I had in mind, but here's the fabulous quotation on the page:
“Great people do things before they’re ready. They do things before they know they can do it. Doing what you’re afraid of, getting out of your comfort zone, taking risks like that – that is what life is. You might be really good. You might find out something about yourself that’s really special and if you’re not good, who cares? You tried something. Now you know something about yourself.” - Amy Poehler
Once dry, the page ended up looking like this:
I'm not really happy how the quotation is on the page. I used vellum and it kind of wrinkled. It's still readable but not what I had in mind, but here's the fabulous quotation on the page:
“Great people do things before they’re ready. They do things before they know they can do it. Doing what you’re afraid of, getting out of your comfort zone, taking risks like that – that is what life is. You might be really good. You might find out something about yourself that’s really special and if you’re not good, who cares? You tried something. Now you know something about yourself.” - Amy Poehler
Monday, July 28, 2014
The Last Card With the July 2014 Simon Says Stamp Card Kit
This is it! It's the very last card I made with the 2014 July Card Kit from Simon Says stamp. I only have small bits of paper left that really aren't enough to do a full card from and I long ago ran out of card stock from the kit. I really made this kit stretch and I know I'm still going to get lots of use from the stamp set because it's such a fabulous design (Kristina Werner designs the most amazing stamp sets) and I have loads of washi tape left too. But all I had left was the full sheet of this blue triangle paper. I had a few of the stamped envelopes left over too. I decided to use the Technique Tuesday Notebook Card die as a base for my sentiment. I added the Sending stamped in Soft Navy ink to the thanks cut several times from the Lawn Fawn Scripty Thanks die and then layered for a little dimension. I added a few of the last envelopes from prep for a prior card to finish it off.
 And that's it. I went back to count them up and I made (by my count) 19 cards using supplies from the kit by adding in some extra plain card stock from my own stash. I did use a bunch of dies and ink and a few extra supplies from my own stash, but I'm pretty impressed by how far this kit went. I'll definitely be buying others in the future. In fact, I'm debating about the August kit right now, but I'm not sure if I can trust myself to make so many cards featuring ice cream without eating a bunch of it myself!
Sunday, July 27, 2014
Sending My Love Using the July 2014 Simon Says Stamp Card Kit
I don't have much left of the July 2014 Simon Says Stamp Card Kit, but I had some leftover envelopes from a previous card that were the inspiration for this card. I thought this full sheet of text paper was subtle enough that I could stamp directly on it. I chose to use black so it would have the best chance of standing out. I used Lawn Fawn's Jessie's ABCs to spell out the "my" and then used the heart from the set inked in the Lipstick Red ink that came with the kit. I added a little Wink of Stella and some Glossy Accents to make the heart pop. When I started putting the card together, I decided the patterned paper needed a bit of a frame, so I pulled out some random blue paper from my stash that seemed to match the pattern paper pretty well. I then just layered up the envelopes to finish it off.

Saturday, July 26, 2014
Sending My Love Card Using Simon Says Stamp's July 2014 Card Kit
I've almost used everything from the kit but I had this leftover piece of the envelope paper and this red chevron paper and I thought they would work well together and decided to go with a simple card since the patterns seemed busy enough on their own. I cut a hello using some Simon Says Stamp Soft Navy card stock using the Lawn Fawn Scripty Hello die, layered the papers on a card base made from Soft Navy card stock and then added one of the stickers from the kit to finish it off.

Friday, July 25, 2014
Happy Hello Card
I think this is probably one of my favorite cards of the recent batch. I am still trying to use up the last of the Simon Says Stamp July 2014 card kit and I saved this cute hello paper (I really loved it and would have hoarded it if I wasn't so bound and determined to use up the kit). For this card, I pulled out my Lawn Fawn Scripty Hello die and the heart die from the Large Stitched Journaling Card dies. I die cut the hello and heart from card stock in rainbow colors plus black. I then layered them together so that from the side, there's this cute little rainbow effect. I cut the paper down to just a bit under the standard A2 card size and adhered it to a card base from Soft Navy card stock (love that Simon Says Stamp card stock). I then added the heart and the hello, covered them with Wink of Stella and then coated the top in Glossy Accents. I love, love, love this card in person.


Thursday, July 24, 2014
Sending Happy Thoughts Card
After a bit of a break to do some other card marking and such, I returned to my quest to finish using the July 2014 Simon Says Stamp Card. I only have a few full sheets of paper and some scraps (plus a ton of washi tape) so I spent a little time stamping the various envelop stamps on some of the scraps. I used one of the full sheets for the background, then pulled out some white card stock from my stash to counteract this buys paper. I stamped the sentiment using the Lipstick Red ink that came in the set along with some Soft Navy I had purchased separately. I then layered on some of the envelopes to finish it out. It was a super quick card once I had the envelopes ready, but I like how it turned out.

Wednesday, July 23, 2014
Hippo Birdie Two Ewe Revisited...
Since I already had the stamps out on my desk, I decided to make a second card with the Year Four, Critters on the Farm, Hello Sunshine, Technique Tuesday Grid and Jessie's ABC's stamps and dies along with the Mama Elephant Landscape Trio dies. This time I also pulled out the Stitched Journaling die from Lawn Fawn as well. I used the same green polka dot paper from DCWV but this time I used a sheet from the 6x6 paper pad from the Maggie Holmes collection for Crate Paper for the sky background and some DCWV polka dot paper left over from a prior project to cover my card. It turned out so different even though it mostly the same products:


Tuesday, July 22, 2014
Hippo Birdie Two Ewe!
Last week was rough. I got some bad news about a co-worker and it just sort of threw me for a loop because there's nothing I can do to "fix" the situation (I don't like not being in control). I also realized that the next few weeks are going to a be a bit rough at work so that means I need to really relax during my down time to keep my sanity. But Saturday I had a headache that didn't seem to want to go away so I curled up in a chair with a kitty and watch crafty videos most of the day. I know I don't feel well when I don't want to run into my craft room after a few videos. Fortunately, Sunday I felt a whole lot better (the weather change had completed) and all I wanted to do was play in my craft room. That means I managed to get a few cards made.
I've been playing with some Lawn Fawn stamps I recently got my hands on, including the oh so cute Year Four set. I've had this idea for a card using the phrase hippo birdie two ewe, which I often use for birthday greetings when I'm just dropping a quick line to the birthday boy or girl. I colored the die cut the hippo and bird from the Year Four set and two sheep from the Critters on the Farm set (for which I just finally got the dies - yay! no more fussy cutting).
I also broke out my Mama Elephant Landscape Trio dies. I've seen so many crafters using these and I love the cute little stitched elements. I drug some DCWV polka dotted paper from my scraps bin and sheet of blue graph paper from the Snap Life 6x6 paper pad from Simple Stories for the background. I found a scrap of yellow paper, stamped it in Simon Says Stamp Lemon Chiffon ink using the Technique Tuesday Grid stamp for a little added interest then cut it out with the die from the Hello Sunshine set from Lawn Fawn. I used the Jessie's ABCs set from Lawn Fawn to spell out my sentiment.
Monday, July 21, 2014
Thanks Card Using a Watercolor Technique
The other day when I posted the card that I made trying the reverse stamping technique I saw on Catherine Pooler's blog I mentioned that I wasn't really in love with how the panel turned out originally. So I immediately tried something a little different. I simply painted on Distress Inks using a watercolor brush and then used my heat tool to move them around while they dried. I loved how it turned out. I cut it down to fit on my card with a mat. I used a piece of black card stock to mat it before taping it to my white card base. I used my Lawn Fawn Scripty Thanks die to cut several thanks from some extra black card stock, then glued the layers together. I adhered that to my card front. I used black Wink of Stella to add some shimmer to the sentiment and some clear sequins to finish off the card.
 Here's a close up of the layered and shimmery sentiment:

Sunday, July 20, 2014
Hello Card Inspired by Jennifer McGuire
As I posted before, I was completely enthralled watching Jennifer McGuire
use Distress Inks with embossing folders. You can see her beautiful
work and check out her video here. I immediately knew I
had to give it a try by making several panels. For this card, I used a Darice Basketweave embossing folder with my Distress Inks (this time I think Seedless Preserves, Picked Raspberry and Peacock Feathers). Once my panel was finished, I wasn't sure what to do with it. After all, it was the last of four panels I made using the same technique. So it sat on my desk for while, but in the hurricane of craft products on my desk I got an idea (if you remember this picture from my social media feed):
 In fact, you can see the card in progress on my craft mat. It started with the Lawn Fawn Large Stitched Journaling Card. It's meant to cut a 4 by 6 panel for Project Life, but I've seen it used on cards on videos and blogs (although I can't remember where I specifically saw it), so I pulled it off the card and used it to cut the panel for my card. I then used that piece of Soft Navy card stock from Simon Says Stamp that you can see on the right side of my picture to make a card base. I used the We R Memory Keepers Corner Chomper to round the corners of the panel to match. For the sentiment, I cut out the word hello several times with the Lawn Fawn Scripty Hello die (see the paper on the right) then stacked them. I brushed the finished product with white Wink of Stella for a little glitter, then adhered it to my embossed panel. I added that on top of my card base, then finished it off with some Doodlebug sequins (although I'm not sure I like the color on the finished the card and I may switch them out for clear ones) and some Glossy Accents on the hello.
 Here's a close up of the sentiment:

Saturday, July 19, 2014
Thinking of You Inspired by Jennifer McGuire
As I posted before, I was completely enthralled watching Jennifer McGuire
use Distress Inks with embossing folders. You can see her beautiful
work and check out her video here. I immediately knew I
had to give it a try by making several panels. For this card, I used the Darice Heart Background with my Distress Inks (Peacock Feathers and Seedless Preserves I think) to make the lovely embossed panel. I wasn't quite sure how I was going to use it on a card, but the idea came to me when I made a mess of a my craft desk. I hate when it's messy but I do have to admit that I'm more creative when things are chaotic on my desk. Somehow the mess of supplies leads me to think of things I might not have thought of if I hadn't seen random things laying together.
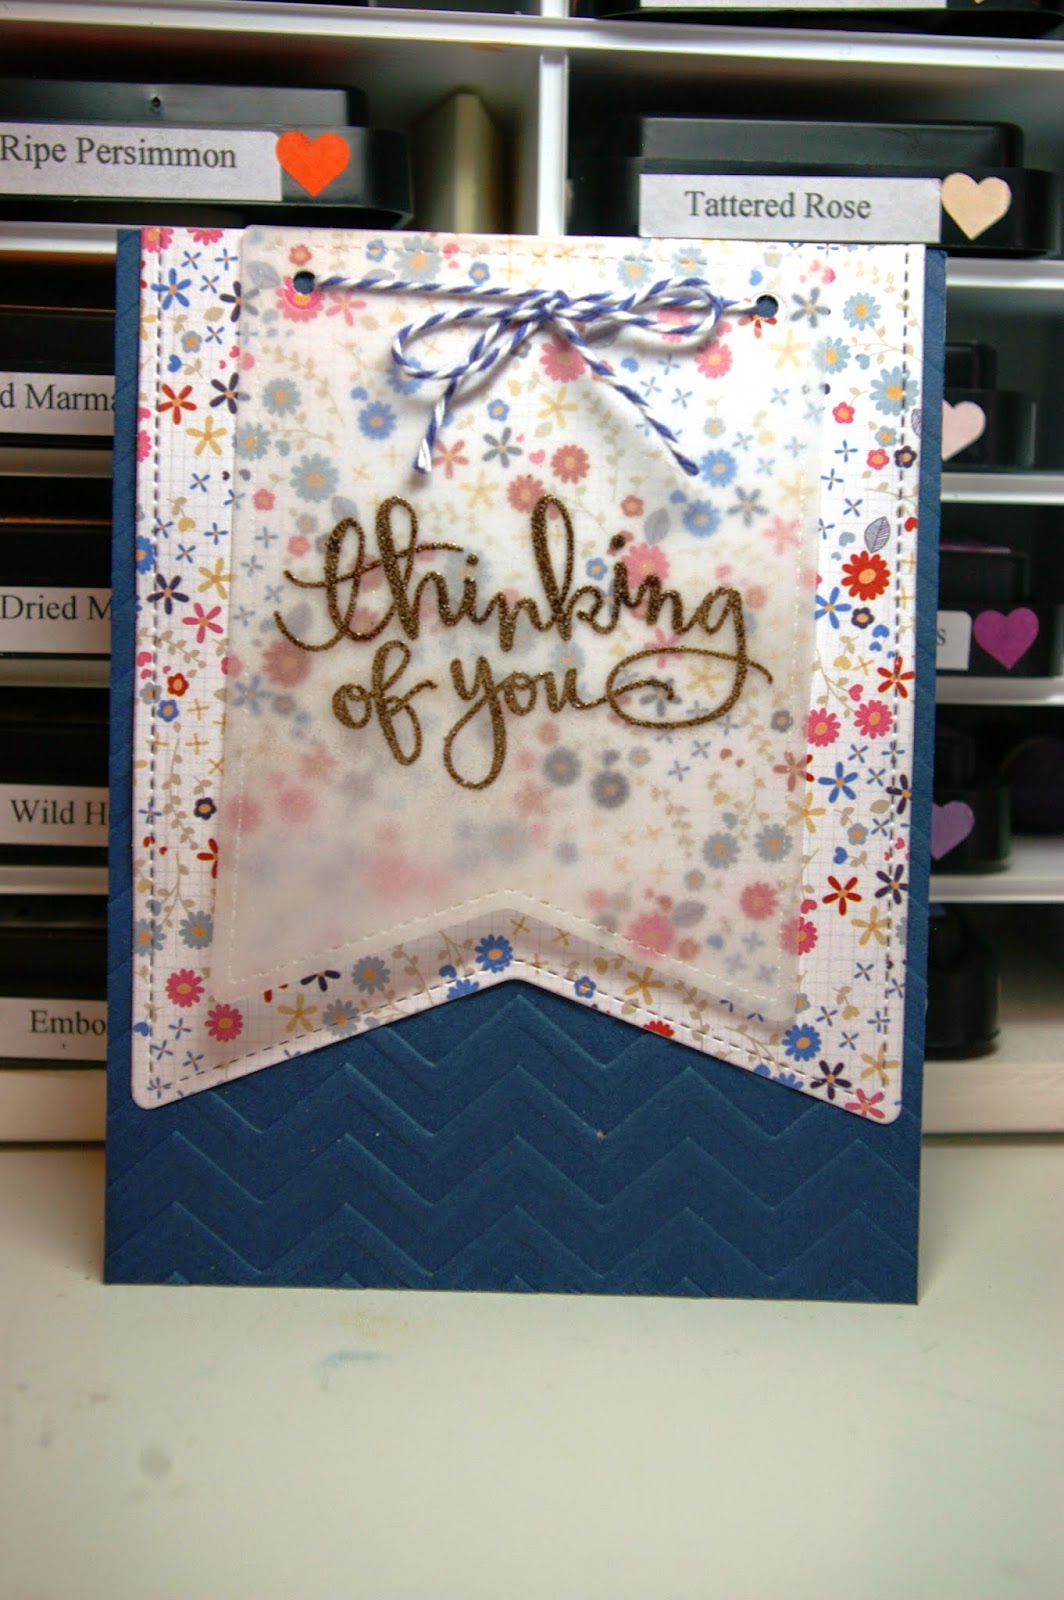
It all started with the Lawn Fawn Stitched Party Banners dies and I thought about using the smallest banner shape for my sentiment. But I didn't want to cover over all the texture and color, so I found some vellum in my stash. Fortunately, I have several weights of vellum because the first piece was way too heavy. It really was too opaque for what I wanted. But then I found the lighter weight pack and realized it was perfect. After cutting out my banner, I used the stamp from the Simon Says Stamp July 2014 Card Kit inked in Versamark and heat embossed with some Ranger Super Fine White Embossing Powder to finish the sentiment. I then marked the holes in the banner on my panel and used my Crop-a-dile to hole punch in the back panel. I used some Sky hemp cord from Lawn Fawn for a bow and then cut my panel just a bit smaller than the width of my card base made from a half of a sheet of Simon Says Stamp Soft Navy card stock. Once I had adhered it to the card base, I decided it really didn't need any further embellishment.

It all started with the Lawn Fawn Stitched Party Banners dies and I thought about using the smallest banner shape for my sentiment. But I didn't want to cover over all the texture and color, so I found some vellum in my stash. Fortunately, I have several weights of vellum because the first piece was way too heavy. It really was too opaque for what I wanted. But then I found the lighter weight pack and realized it was perfect. After cutting out my banner, I used the stamp from the Simon Says Stamp July 2014 Card Kit inked in Versamark and heat embossed with some Ranger Super Fine White Embossing Powder to finish the sentiment. I then marked the holes in the banner on my panel and used my Crop-a-dile to hole punch in the back panel. I used some Sky hemp cord from Lawn Fawn for a bow and then cut my panel just a bit smaller than the width of my card base made from a half of a sheet of Simon Says Stamp Soft Navy card stock. Once I had adhered it to the card base, I decided it really didn't need any further embellishment.
Friday, July 18, 2014
Hello Card Inspired by Jennifer McGuire
As I posted before, I was completely enthralled watching Jennifer McGuire use Distress Inks with embossing folders. You can see her beautiful work and check out her video here. I immediately knew I had to give it a try by making several panels. For this card, I used the Cuttlebug Script Texture with several colors of Distress Ink (Tea Dye, Gathered Twigs and Walnut Stain I believe). I cut the finished piece down and matted it on some cream card stock. I used a piece of brown linen card stock for the base of the card and then cut the hello several times using the die from the That Arrow Card die set from Technique Tuesday with some left over paper. I stacked the hello cuts to give it a bit of thickness. I also die the banner from the same cream card stock as the mat using Avery Elle's Pinked Elle-ments that I just picked up around the holiday. I decided to the leave the card as it was without any extra embellishment.

Thursday, July 17, 2014
Thanks Card Inspired by Catherine Pooler
While reading blogs on my iPad, I came across a fun card made by Catherine Pooler using the reverse side of a stamp. You can find the post and video here. I thought I would give it a shot. Since I didn't have the stamp she has, I used the backside of the Dahlia stamp from Crafty Secrets along with the Peacock Feathers, Mustard Seed and Picked Raspberry Distress Inks. I wasn't sure I really liked how it turned out, so I set it aside and worked on something else, but once it dried, I actually thought it wasn't too bad. Sometimes things just have to grow on me. So I cut the panel down to 4 x 5 1/4. Then I used the Lawn Fawn thanks die to cut my sentiment into the panel. I then taped the panel down to a card base made from Simon Says Stamp Soft Navy card stock, which is quickly becoming a favorite. I used some extra of that card stock to cut out another thanks using the die. I then inlayed the sentiment, which is a very popular technique right now. I added a few clear sequins to finish it off.


Wednesday, July 16, 2014
Thinking of You Using the Simon Says Stamp July 2014 Card Kit
In my quest to use up my Simon Says Stamp July 2014 Card Kit, I had another piece of floral paper that I had used with the envelope stamp, but still had quite a bit of the sheet left. I decided it would be good time to use my new Lawn Fawn Stitched Party Banners die. I used the largest banner die to cut a banner out of the floral paper. I then used the smaller banner die with vellum. I then stamped the sentiment with some Versamark ink and used Ranger Walnut Stain Embossing Powder to finish off the sentiment. I layered the banners together, hole punched some matching holes in the floral paper then tied the two layers together with some Hemptique baker's twine. I ran a piece of Soft Navy card stock from Simon Says Stamp through the Darice Chevron Background embossing folder for a little added texture. I then layered the embossed card stock on my card base and topped it off with the banner pieces I had previous tied together.
Tuesday, July 15, 2014
Sending Lots of Love Using the Simon Says Stamp July 2014 Card Kit
A while back I posted a picture of my craft desk with what's left of my July 2014 Card Kit from Simon Says Stamp:
 Well, actually, there's some extra there too in that some of the card stock is from own stash, but the 6x6 papers there are all that is left of the paper except for one sheet of Neenah Desert Storm card stock. The Lawn Fawn packaging in the back was from the You've Got Mail set that I had pulled out for an idea I had for today's card. I colored the mailbox from that stamp set and fussy cut it out. I knew the background needed something so I used the little dotted border stamp from the stamp set in the kit and some Simon Says Stamp Fog ink (the lightest of their grey colors) to add a little grounding in the background. I then stamped the sentiment using Lipstick Red ink that came in the kit and added the Lots of Love using some Soft Navy ink I had bought myself. I stamped the smallest envelope stamp onto some patterned paper from the kit then fussy cut it out. I added a little heart stamp from the kit, topped with Wink of Stella and some Glossy Accents. Then I drew a dashed line for the envelope. The mailbox was taped flat to the card, but I used pop dots for the mail. I used some striped paper from the card kit for a mat and some Soft Navy card stock for the card base.

Monday, July 14, 2014
Thinking of You Using the Simon Says Stamp July 2014 Card Kit
I've got a few sheets of paper left from the July 2014 card kit from Simon Says Stamp, some of which I love so I've been hoarding and some I wasn't quite sure how to use. This card uses one of the later. The busy floral print is pretty, but I wasn't sure how to use it until I pulled out my new Avery Elle Pinked Elements. The big rectangle seemed perfect, but I wasn't sure on the card stock. So I decided to go with vellum instead. I stamped the sentiment from stamp set in the kit then heat embossed it in Ranger Super Fine White embossing powder. Then started stamping the flowers in the corners then heat embossing them in colors to match the paper.

Sunday, July 13, 2014
Mixing Lawn Fawn with the Simon Says Stamp July 2014 Card Kit
I still have a few pieces of paper left from my Simon Says Stamp July 2014 Card Kit and I'm determined to use up the kit before the peek of the August kit tomorrow. So over the next few days you'll see the cards I've been working on to finish this kit. Those who follow my social media saw a tweet earlier today of this picture from my craft room desk as I was working on this card:

When I was young, Mom took a painting class everything Thursday night and Dad watched us kids. I have a lot of fun memories of those times with my sister staying up to watch shows past our bed time and such. Of course, Mom knows all about the mischief we got into under Dad's watch, but isn't that part of being a kid? When it was just me, sometimes Dad would go back to work and take me with him. I got to run around the office and do silly things like eat sugar cubes from the stash for coffee and ride on the big industrial vacuum cleaner with Woody, the custodian who was a heck of a nice guy. I loved those nights. I was thinking of those days when I colored the typewriter today because I remembered these tan typewriters with black keys. So after the photo, I colored in the keys and the roll bar with a dark grey because I thought black might be a bit too dark and I wanted the colors to go nicely with this piece of paper from the kit with the circles that remind me of keys on the old manual typewriters.

The card was pretty simple. I used the Neenah Desert Storm card stock from the kit to make my card base and cut the circle paper down to fit on the front with a bit of a frame of the card stock. After coloring and fussy cutting the cute typewriter from Lawn Fawn's Just My Type set, I used pop dot to adhere it to my card. I found this Studio Calico (I think) hearts in my embellishment egg carton on my desk (love that little porcelain egg carton that I picked up in the store of the Willamette Valley Fruit Company a couple of weeks ago). For one last touch, I used some Glossy Accents to highlight a couple of words in the pattern of the paper. Here's a close up of that last detail:

When I was young, Mom took a painting class everything Thursday night and Dad watched us kids. I have a lot of fun memories of those times with my sister staying up to watch shows past our bed time and such. Of course, Mom knows all about the mischief we got into under Dad's watch, but isn't that part of being a kid? When it was just me, sometimes Dad would go back to work and take me with him. I got to run around the office and do silly things like eat sugar cubes from the stash for coffee and ride on the big industrial vacuum cleaner with Woody, the custodian who was a heck of a nice guy. I loved those nights. I was thinking of those days when I colored the typewriter today because I remembered these tan typewriters with black keys. So after the photo, I colored in the keys and the roll bar with a dark grey because I thought black might be a bit too dark and I wanted the colors to go nicely with this piece of paper from the kit with the circles that remind me of keys on the old manual typewriters.
The card was pretty simple. I used the Neenah Desert Storm card stock from the kit to make my card base and cut the circle paper down to fit on the front with a bit of a frame of the card stock. After coloring and fussy cutting the cute typewriter from Lawn Fawn's Just My Type set, I used pop dot to adhere it to my card. I found this Studio Calico (I think) hearts in my embellishment egg carton on my desk (love that little porcelain egg carton that I picked up in the store of the Willamette Valley Fruit Company a couple of weeks ago). For one last touch, I used some Glossy Accents to highlight a couple of words in the pattern of the paper. Here's a close up of that last detail:
Wednesday, July 9, 2014
Thank You Inspired by Jennifer McGuire
I was completely enthralled watching Jennifer McGuire use Distress Inks with embossing folders. You can see her beautiful work and check out her video here. I immediately knew I had to give it a try.
For this background, I spread several colors of Distress Ink on the QuicKutz Zig Zag embossing folder, spritzed it with water and then ran it through my Big Kick. While it dried, I stamped the banner from Lawn Fawn's Bannerific with some Simon Says Stamp Soft Navy ink then cut it out with the matching die. I stamped the two cute little birdies from the set with some Grey Flannel Memento ink and colored them with my copic markers. I had to fussy cut those but they are so cute on the card as if they are holding the banner. I love how they look with some pop dots behind them. I added a little Wink of Stella to the banner and some simple coloring to shade the banner. I finished it off with some clear sequins because lately it seems like everything needs sequins.

For this background, I spread several colors of Distress Ink on the QuicKutz Zig Zag embossing folder, spritzed it with water and then ran it through my Big Kick. While it dried, I stamped the banner from Lawn Fawn's Bannerific with some Simon Says Stamp Soft Navy ink then cut it out with the matching die. I stamped the two cute little birdies from the set with some Grey Flannel Memento ink and colored them with my copic markers. I had to fussy cut those but they are so cute on the card as if they are holding the banner. I love how they look with some pop dots behind them. I added a little Wink of Stella to the banner and some simple coloring to shade the banner. I finished it off with some clear sequins because lately it seems like everything needs sequins.
Tuesday, July 8, 2014
Hello - Playing with Gelatos
I've been watching lots of videos of people having fun with gelatos from Faber Castell. While I bought some a bit ago, I hadn't played with them yet. So I pulled them down off the shelf and played for a little while. I didn't do anything fancy, just a few stripes of color, and then I used a little bit of water and a bit of another color of gelato to make a bit of mist. Once it was all dry, I topped it with a simple frame cut from the Hi Banner die by Technique Tuesday (with the banner cut off) and then a stacked together set of the scripty hello die from Lawn Fawn. I added a few sequins from Doodlebug Design for a bit of bling to finish it off.

Monday, July 7, 2014
I Thank My Lucky Stars for You
I started looking through the papers in the July 2014 Simon Says Stamp card kit when I got an idea to use the paper with my Simon Says Stamp Star Parade die and a background embossed with my Darice Stars embossing folder. It turns out, I didn't use a whole lot of paper from the kit other than card stock, but I like how it turned out. For the sentiment, I pulled out the Lawn Fawn Lucky Stars stamp and used some white embossing powder to really make it pop. I added some sequins (okay a lot of sequins) to finish it off.

Sunday, July 6, 2014
Happy Birthday Inspired by Lauren Bassen and Simon Says Stamp
Today I got to spend the whole day in my craft room (whoo hoo!) and, for once, I actually had some mojo. It all started with some big screen time watching videos. I loved one on the Simon Says Stamp blog with a card created by the talented Lauren Bassen that you can see here (really, go check it out. It's fabulous.).
I didn't have the stencil, but I was able to find an image on the Silhouette store (design ID 38579) that worked for my purposes. I then used a stack of Distress Inks and my mini round blender to ink up some balloons. Since I still have the fabulous stamp from the July 2014 Simon Says Stamp card kit, I decided to selectively ink the happy from the happy mail stamp then added the birthday from the it's your birthday stamp on the Fiskars All Year Greeting set. A few sequins finished the cards off. So much fun I had to make two.


I didn't have the stencil, but I was able to find an image on the Silhouette store (design ID 38579) that worked for my purposes. I then used a stack of Distress Inks and my mini round blender to ink up some balloons. Since I still have the fabulous stamp from the July 2014 Simon Says Stamp card kit, I decided to selectively ink the happy from the happy mail stamp then added the birthday from the it's your birthday stamp on the Fiskars All Year Greeting set. A few sequins finished the cards off. So much fun I had to make two.
Saturday, July 5, 2014
Happy Mail Using Simon Says Stamp's July 2014 Card Kit
I'm back... I had to take a bit of time to do my June Project Life, plus four bonus layouts from my two days in DC in June. Now that the first half of 2014 is in the book, I took five minutes tonight to clean up the Project Life goodness in my craft room. Five minutes later, it's, well, not so clean as I immediately drug back out the July 2014 card kit from Simon Says Stamp and started playing. While I watched the last episode of the first season of Fargo (not sure how I missed that one episode on the DVR until now), I put together a little card to get the juices flowing for a whole day in my craft room tomorrow (eek, so excited).
For this card, the only items not from the kit are a piece of red card stock from my stash, the white card base and some Wink of Stella. I used a banner die from the Hi Banner story card dies from Technique Tuesday to cut my smaller banners, but those totally could be cut by hand (although I liked that I could use the die to line up the hello paper. So here's my quick, simple and fun card for tonight:

For this card, the only items not from the kit are a piece of red card stock from my stash, the white card base and some Wink of Stella. I used a banner die from the Hi Banner story card dies from Technique Tuesday to cut my smaller banners, but those totally could be cut by hand (although I liked that I could use the die to line up the hello paper. So here's my quick, simple and fun card for tonight:
Thursday, July 3, 2014
Another Watercolor with Art Impressions
Here's the other card I put together using a watercolored panel made with Art Impressions stamps and Distress Ink. I used another sheet from the Maggie Holmes for Crate Paper 6x6 pad with the same design as yesterday's card, only this time in a monotone yellow color.


Here's a shot of yesterday and today's cards together:
Wednesday, July 2, 2014
More Watercoloring with Art Impressions
I have two panels of watercolors that I did a bit back that were sitting on my craft room desk for a long time. I wasn't sure what I wanted to do with them. Then I was putting away a few things in my craft room when I saw the Maggie Holmes for Crate Paper 6x6 pad with a snippet of this cute floral paper on the cover and decided it was the perfect paper for those watercolors. The watercolor panels were done with stamps from Art Impressions and Distress Ink Markers. It's a totally fun way to watercolor, even if, like me, you don't have any artistic talent.

Tuesday, July 1, 2014
XOXO with the Simon Says Stamp July 2014 Card Kit
Now that the card samples from the kit are done, I feel free to play around with the rest. I had this diamond panel sitting on my craft desk for a long, long time. I made it with some multi-medium and Rock Candy Glitter using a stencil from StencilGirl Products. I just selected a sheet from the paper left over in the kit as the background, added my panel, some baker's twine from Queen and Co., a couple of flowers punched from the kit paper with a Fiskars punch layered with a sticker from the kit to build my card. It still seemed to need something, so I punched a Martha Stewart heart punch through some red card stock sitting on my craft table. I added a few of the hearts, brushed them with some Wink of Stella and finished them off with some Glossy Accents. I swear those two products have been my go to finishing touches lately.

Subscribe to:
Posts (Atom)